Step 2
Slide soap dish onto the rail.
Slide hose retainer onto the rail (if supplied).
Step 3
Fit the internal mounting brackets by locating in slot
and rotating 90°.
Step 4
Tighten the tensioning screws lightly with the hex key provided.
Rail can be orientated so that handset sits on opposite side
of the rail.
Step 5
Match the mounting brackets to wall bosses and push
into place.
Slide the rail up or down to centralise the brackets.
Remove the rail and tighten the tensioning screws firmly.
Relocate the rail onto wall bosses and tighten grub
screws top and bottom.
•
•
•
•
•
•
•
•
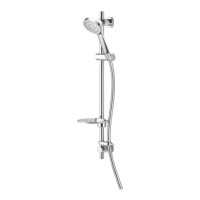
1850mm (Recommended)
1000mm Rail 810-945mm
700mm Rail 510-645mm
800mm Rail 570-745mm
Grub Screw
Underside
Grub Screw
Topside
Protection
Pad
FLOOR
Step 1
Mount the wall boss housings in
desired position with the screws. Check
the mounts are vertically aligned.
Ensure the grub screws are located on
the correct sides as shown.
Ensure protection pads are used
between wall bosses and tiles.
•
Tensioning Screw
Rail
Slider
Grub Screw
Internal
Mounting
Bracket
Elbow
(if supplied)
Soap Dish
Hose Retainer
(if supplied)
Self Tapping Screw
Wall Boss
Housing
Step 6
To adjust slider position, rotate the slider
handle to unlock and lock the slider as shown.
Insert the end of the shower hose through the
slot in the hose retainer and screw the handset
onto the hose.
•
•
Unlock
Lock
This product must be installed in
compliance with all relevant regional
regulations.
It is the responsibility of the installer to
ensure a waterproof seal is achieved
between the product and mounting
surface. If in doubt about the quality of
the seal, remove the product and
reinstall using silicone to ensure a seal is
achieved.
All pipe work must be thoroughly flushed
prior to the installation of the hose.
After installation all connections must be
checked for leaks.
All outlets used primarily for personal
hygiene shall deliver water at a safe
temperature as per regional regulations.
•
•
•
•
IMPORTANT: Please read all of the
instructions before installation.
General:
•