EasyManua.ls Logo

Metra Electronics 98-8999 User Manual

Metra Electronics 98-8999
4 pages
To Next Page IconTo Next Page
Page #1 background imageLoading...
Page #1 background image
INSTALLATION INSTRUCTIONS FOR PART 98-8999
Phillips Screwdriver
1-800-221-0932 www.metraonline.com
KIT FEATURES
© COPYRIGHT 2002-2008 METRA ELECTRONICS CORPORATION
Holds Three CD Jewel Cases
A) VW Pocket Trim Plate • B) Subaru Pocket Trim Plate • C) Mitsubishi Trim Plate • D) Pocket
E) (2) VW Brackets • F) (2) Left Brackets • G) (2) Right Brackets • H) (4) #8 x 1/4” Phillips Pan Head Screws
I) (6) #6 x 1/4” Phillips Flat Head Screws
KIT COMPONENTS
98-8999
A
B
MITSUBISHI
(page1)
3000 GT 1991-1999, Diamante 1997-2004, Eclipse 1995-2005,
Galant*1994-2009 (* With Manual Climate Control), Mirage 1997-2003,
Montero 1996-2005, Montero Sport 2000-2004
SUBURU
(page2)
Baja 2003-2005, Forester 1998-2008, Impreza 1993-2007,
Impreza WRX 2002-2005, Legacy 1995-2004, Outback 2000-2004
VOLKSWAGEN
(page3)
Golf 2001-2005, Jetta**2001-2005 (** No Including New A5)
Passat 2001-2005
F
G
H
I
E
C
D
TOOLS REQUIRED:
Applications
Question and Answer IconNeed help?

Do you have a question about the Metra Electronics 98-8999 and is the answer not in the manual?

Metra Electronics 98-8999 Specifications

General IconGeneral
ColorBlack
MaterialPlastic
BrandMetra Electronics
Part Number98-8999
Product TypeRadio Installation Kit
Compatible Car ModelsSaab 9-3 2007-2011
Installation TypeDash

Summary

Mitsubishi Pocket Installation

Step 1: Disconnect Battery

Disconnect the negative battery terminal to prevent an accidental short circuit.

Step 2: Attach Trimplate and Brackets

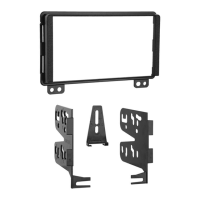
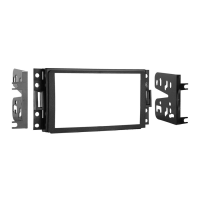
Snap Pocket Trimplate MIT onto the Pocket, attach Left and Right Brackets using screws.

Step 3: Mount Factory Brackets

Mount factory brackets to shaded bosses using Phillips Pan Head Screws and attach to sub-dash.

Subaru Pocket Installation

Step 1: Disconnect Battery

Disconnect the negative battery terminal to prevent an accidental short circuit.

Step 2: Attach Trimplate and Brackets

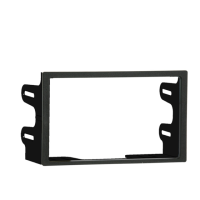
Snap Pocket Trimplate SUB onto Pocket, attach Left and Right Brackets using screws.

Step 3: Mount Factory Brackets

Mount factory brackets to shaded bosses using Phillips Pan Head Screws and attach to sub-dash.

Volkswagen Pocket Installation

Step 1: Disconnect Battery

Disconnect the negative battery terminal to prevent an accidental short circuit.

Step 2: Attach Trimplate and Brackets

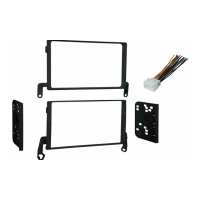
Snap Pocket Trimplate VW onto Pocket, attach X-5599L/R Brackets using screws.

Step 3: Mount Pocket Assembly

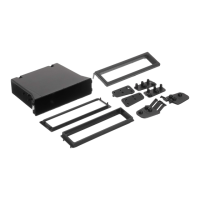
Remove dash tray, position Pocket, secure with screws, and slide into dash opening.

Related product manuals