Do you have a question about the Metra Electronics 99-7001 and is the answer not in the manual?
Disconnect the negative battery terminal, remove screws below a/c vents, pry out dash trim bezel, remove screws securing factory head unit, and disconnect wiring.
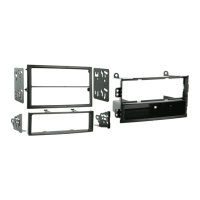
Cut and remove specific mounting tabs on the Radio Housing and Bracket Set #1 as indicated.
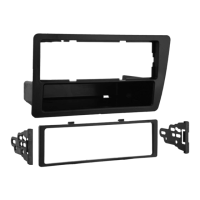
Instructions for modifying dash trim bezels with a divided radio opening.
Instructions for modifying dash trim bezels with an undivided radio opening.
Disconnect the negative battery terminal, pry out the radio trim bezel, remove screws securing the factory head unit, and disconnect wiring.
Cut and remove specific mounting tabs on the Radio Housing and Bracket Set #2.
Modify dash trim bezels for a divided radio opening.
Modify dash trim bezels for an undivided radio opening.
Disconnect battery, remove dash trim bezel screws, ashtray, and disconnect wiring.
Cut and remove specific mounting tabs on the Radio Housing and Bracket Set #2.
Modify dash trim bezels for a divided radio opening.
Modify dash trim bezels for an undivided radio opening.
Disconnect battery, unclip radio trim bezel, remove screws securing head unit, and disconnect wiring.
Cut and remove all mounting tabs on the Radio Housing EXCEPT tabs 'B'.
Modify dash trim bezels for a divided radio opening.
Modify dash trim bezels for an undivided radio opening.
Disconnect battery, remove center console components, trim bezel, and disconnect wiring.
Cut and remove mounting tabs on Radio Housing and Bracket Set #2.
Modify dash trim bezels for a divided radio opening.
Modify dash trim bezels for an undivided radio opening.
Disconnect battery, remove console, dash trim bezel, and disconnect wiring.
Cut and remove mounting tabs on Radio Housing EXCEPT tabs 'A'.
Cut and remove the lower rib from the radio opening and the lower portion of the Radio Housing.
Disconnect battery, remove dash trim bezel, and disconnect wiring.
Cut and remove mounting tabs on Radio Housing and Bracket Set #3.
Cut and remove the lower rib from the radio opening and the top portion of the Radio Housing.
Disconnect battery, remove shifter trim panel, dash trim bezel, and disconnect wiring.
Cut and remove mounting tabs on Radio Housing and Bracket Set #1.
Cut and remove the lower rib from the radio opening.
Disconnect battery, pry out dash trim bezel, remove screws securing head unit, and disconnect wiring.
Cut and remove mounting tabs on Radio Housing and Bracket Set #1.
Modify dash trim bezels for a divided radio opening.
Modify dash trim bezels for an undivided radio opening.
Disconnect battery, remove screws above climate controls, unclip dash trim bezel, and disconnect wiring.
Cut and remove mounting tabs on Radio Housing and Bracket Set #1.
Modify dash trim bezels for a divided radio opening.
Modify dash trim bezels for an undivided radio opening.
Disconnect battery, unclip radio/climate control trim bezel, and disconnect wiring.
Cut and remove mounting tabs on Radio Housing and Bracket Set #3.
Cut and remove the lower rib from the radio opening and the top portion of the Radio Housing.
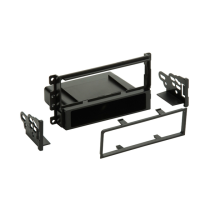
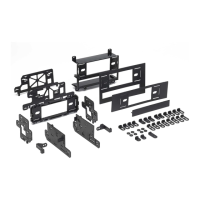
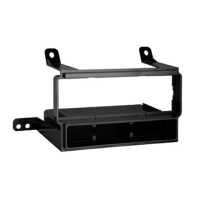
Mount brackets to the Radio Housing with clips and screws for pocket retention.
Mount brackets to the Radio Housing with clips and screws without pocket retention.
Mount brackets to the Radio Housing with clips and screws for Diamante.
Mount brackets to the Radio Housing and attach the factory cupholder.
Install aftermarket equalizer or equalizer dummy plate into the Radio Housing.
Install 2-shaft or DIN head units into the Radio Housing with faceplate.
Modify dash trim bezels for specific vehicle models regarding pockets or openings.
Locate factory wiring harness, use proper mating adaptor, and make connections.
Re-connect the battery terminal, test unit for proper operation, and mount the head unit/kit.
| Manufacturer | Metra Electronics |
|---|---|
| Part Number | 99-7001 |
| Product Type | Dash Kit |
| Color | Black |
| Material | Plastic |
| DIN Provision | Yes |
| Double DIN Provision | Yes |
| Application | Installation of aftermarket radio |