EasyManua.ls Logo

Metra Electronics 99-8245CHG User Manual

Default Icon
8 pages
To Next Page IconTo Next Page
Page #1 background imageLoading...
Page #1 background image
CAUTION!
All accessories, switches, climate
controls panels, and especially air bag indicator
lights must be connected before cycling the
ignition. Also, do not remove the factory radio
with the key in the on position, or while the
vehicle is running.
The World’s best kits.
®
MetraOnline.com © COPYRIGHT 2017 METRA ELECTRONICS CORPORATION REV. 11/13/17 INST99-8245CHG
INSTALLATION INSTRUCTIONS
99-8245CHG
U.S. Patent # D733,117
KIT FEATURES
• ISO DIN radio provision with pocket
• Painted charcoal high gloss
KIT COMPONENTS
• A) Radio housing • B) Radio brackets • C) Pocket • D) (2) Panel clip mounts • E) (4) #8 x 3/8” Truss head Phillips screws • F) (4) #4 x 3/8” Phillips screws
TOOLS REQUIRED
• Panel removal tool • Phillips screwdriver
• 10mm socket wrench
TABLE OF CONTENTS
Dash Disassembly ..................................................2
Kit Assembly
– ISO DIN radio provision with pocket .................3
WIRING & ANTENNA CONNECTIONS
(sold separately)
Wiring Harness: 70-1761
Antenna Adapter: 40-LX11
Steering Wheel Control Interface: ASWC-1
A B C
E
D
F
Toyota Corolla 2014-2016
Question and Answer IconNeed help?

Do you have a question about the Metra Electronics 99-8245CHG and is the answer not in the manual?

Metra Electronics 99-8245CHG Specifications

General IconGeneral
BrandMetra Electronics
Model99-8245CHG
CategoryAutomobile Accessories
LanguageEnglish

Summary

Dash Disassembly

Remove Dash Panel

Unclip and remove the entire panel around the radio, including clock and A/C vents.

Remove Factory Radio

Remove four 10mm bolts securing the factory radio.

Remove Panel Clips

Remove the four yellow panel clips from the factory radio.

Kit Assembly

Secure Pocket to Brackets

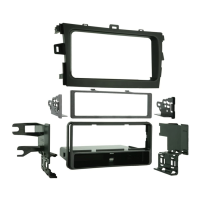
Attach pocket to radio brackets using #8 x 3/8” Phillips screws.

Prepare Aftermarket Radio

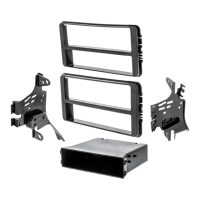
Remove metal DIN sleeve and trim ring from the aftermarket radio.

Install Radio in Brackets

Slide radio into radio brackets and secure with screws.

Connect Wiring and Antenna

Connect factory wiring harness and antenna, test radio.

Mount Radio Assembly

Secure radio/pocket/bracket assembly into dash using factory hardware.

Attach Panel Clip Mounts

Attach panel clip mounts to radio housing using #4 x 3/8” Phillips screws.

Attach Panel Clips

Attach previously removed panel clips to the clip mounts on the radio housing.

Install Trim Housing

Clip the trim radio housing over the radio/pocket/bracket assembly.

Reassemble Dash

Reassemble the dash in reverse order of disassembly.

Important Information

Tech Support and Troubleshooting

Contact Tech Support for installation difficulties and review instructions.

Professional Development

Enhance installation skills by enrolling in a recognized mobile electronics school.

Related product manuals