EasyManua.ls Logo

Metra Electronics 99-8201 User Manual

Metra Electronics 99-8201
4 pages
To Next Page IconTo Next Page
Page #1 background imageLoading...
Page #1 background image
KIT COMPONENTS
TOOLS REQUIRED
Cutting tool
Socket wrench
Phillips screwdriver
KIT FEATURES
ISO-DIN
head unit
provisions
Pocket
provisions
99-8201
INSTALLATION
INSTRUCTIONS
APPLICATIONS
CAR PAGE
TOYOTA
Celica 2000-05................................................1-3
Echo 2000-05..................................................1-3
Radio
Housing
"C"
Radio
Housing
"E"
Mounting
Brackets
Re-connect the battery terminal and test the unit
for proper operation.
Mount the head unit/kit
assembly
to the sub-dash with (4) screws
previously removed in step #1.
76
Locate the factory wiring harness in the
dash. Metra recommends using the
proper mating adaptor and making
connections as shown. (Isolate and
individually tape off the ends of any
unused wires to prevent electrical short
circuit).
A
B
C
D
A) Strip wire ends back ½"
B) Twist ends together
C) Solder
D) Tape
(6) #6 x ¼"
Phillips Flat-
5
Align the holes in the Mounting Brackets with the holes in the ISO-DIN head unit and mount
the Brackets to the head unit with the screws included with the unit.
3
Pocket
1-800-221-0932 www.metraonline.com
© COPYRIGHT 2001-07 METRA ELECTRONICS CORPORATION
rev. 06-15-07
Question and Answer IconNeed help?

Do you have a question about the Metra Electronics 99-8201 and is the answer not in the manual?

Metra Electronics 99-8201 Specifications

General IconGeneral
TypeDash Kit
ColorBlack
DIN ProvisionYes
Double DIN ProvisionYes
ISO ProvisionYes
PaintedNo
MaterialABS Plastic
ManufacturerMetra Electronics
Part Number99-8201
InstallationDash mount
Product TypeDash Kit

Summary

Kit Features Overview

ISO-DIN Head Unit Provisions

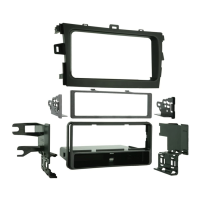
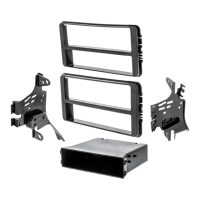
Details the provisions for installing an ISO-DIN head unit.

Pocket Provisions

Describes the availability and function of pocket provisions.

Vehicle Applications

Toyota Celica 2000-05

Specific installation instructions for Toyota Celica models from 2000 to 2005.

Toyota Echo 2000-05

Specific installation instructions for Toyota Echo models from 2000 to 2005.

Toyota Celica 2000-05 Installation Steps

Step 1: Disconnect Battery and Remove Trim

Procedure for disconnecting the battery and removing dash trim components.

Step 2: Locate Housing and Modify Brackets

Instructions for locating Radio Housing 'C' and modifying mounting brackets.

Toyota Echo 2000-05 Installation Steps

Step 1: Disconnect Battery and Remove Trim

Procedure for disconnecting the battery and removing dash trim components.

Step 2: Locate Housing and Modify Brackets

Instructions for locating Radio Housing 'E' and modifying mounting brackets.

General Vehicle Installation Steps

Step 3: Attach Pocket to Housing

Procedure for snapping the pocket onto the back of the radio housing.

Step 4: Attach Mounting Brackets

Instructions for attaching mounting brackets to the radio housing.

Step 5: Mount Head Unit to Brackets

Aligning and mounting the ISO-DIN head unit to the prepared brackets.

Step 6: Wiring Harness Connections

Guidance on locating the factory wiring harness and making necessary connections.

Step 7: Final Assembly and Testing

Reconnecting the battery, mounting the assembly, and testing operation.

Related product manuals