Do you have a question about the Metra Electronics 99-9305 and is the answer not in the manual?
Installation instructions for Metra Part 99-9305 for BMW X3 2004-2010 (Non-NAV Models).
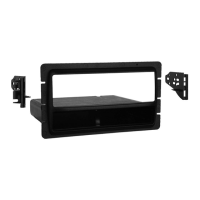
Highlights the ISO DIN Head Unit Provision capability of the kit.
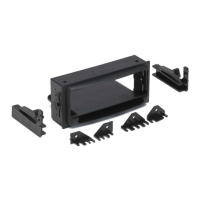
Lists the included parts: Radio Housing, ISO Brackets, Phillips Screws, and Phillips ISO Screws.
Specifies the necessary tools for installation: Flat Blade Screwdriver, Phillips Screwdriver, and Drill.
Disconnect the negative battery terminal to prevent accidental short circuits before starting disassembly.
Unclip and remove the hazard/door lock switch as the first dash component.
Unclip and remove the air conditioning vents located above the radio unit.
Remove two Phillips screws located on top of the radio/climate control panel facing downwards.
Unclip and remove the main radio/climate control panel from the dash assembly.
Remove the two Phillips screws that secure the original radio unit.
Secure the appropriate bracket to the aftermarket radio using the hardware supplied with the radio.
Mount the radio/bracket assembly into the dash using the provided four Phillips screws.
Position the radio housing over the radio face and secure it using the factory hardware.
Connect the factory wiring harness using the proper mating adapter and Metra recommendations.
Reconnect the negative battery terminal and test the unit for proper operation.
Reassemble the radio and dash components in the reverse order of disassembly.
Details wiring connections using EIA color codes: strip, splice, solder, tape for secure connections.
| Manufacturer | Metra Electronics |
|---|---|
| Part Number | 99-9305 |
| Product Type | Dash Kit |
| Color | Black |
| Material | Plastic |
| Size | Standard |
| Vehicle Compatibility | Select Toyota, Scion, and Lexus vehicles |
| Compatibility | Double DIN |
| Compatible Vehicles | Select Toyota, Scion, and Lexus vehicles |