2
Assembling your Metro wood re
This Metro wood re has been tested to and complies with
AS/NZS2918:2001 when installed in accordance with this
manual. Please ensure you are fully conversant with this relevant
standard and the contents of this manual. Correct installation is
critical to the safe operation and performance of this wood re.
Please take particular note of the following:
• It is recommended that Metro’s be installed with a Metro
ECO ue system which has been developed to enhance
the performance of Metro wood res. Any alternative ue
system must have a minimum ue pipe length of 4.2 metres
of 150mm diameter ue pipe & have been tested to
AS/NZS2918:2001.
• The 150mm active ue pipe must be fully encased from the
ceiling to the underside of the ashing cone at the top of
the ue system, (i.e. there must not be any 150mm ue pipe
exposed).
• All ue pipe joints must be sealed and riveted. The bottom of
the ue pipe in particular MUST be fully sealed into the ue
outlet of the Metro wood re.
• In New Zealand, the Metro must be bolted through the oor
protector into the oor to comply with the seismic restraint
provisions of AS/NZS2918:2001
• All Metro’s are extremely heavy, varying in weight from 85kgs
up to 150kgs. During the installation process do not lift the
appliance by yourself, and take care not to damage the
panel coating.
• Please take care when lifting the Metro into place onto the
hearth or oor protector as point loading may break tiles
and/or scratch surfaces.
All Metro wood res are packed in a single heavy-duty carton,
and tek screwed to a wooden pallet. Having removed the
packaging and located this manual, familiarise yourself with the
illustrations on pages 2 & 3, and proceed as detailed below.
Please note: you should only assemble this wood fire if you are suitably
experienced in wood fire assembly and installation.
Note: The Metro carton shows the model Metro you are about to install,
enabling you to select the appropriate model’s assembly instructions.
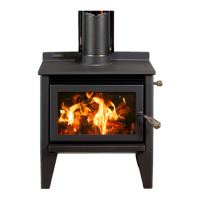
Metro Radiant Fires
These Metro’s are supplied virtually fully assembled. Packed inside
the rebox you will nd bricks in a cardboard wrapper, a wire door
handle and the air control wire handle.
• Remove the two tek screws located at the base of each rear
leg which secure the Metro to the wooden pallet, and carefully
“walk” the Metro off the pallet.
• Open the door fully and t the side bricks to each side of the
rebox. Location lugs are tted to the base and rear of the
rebox to retain the side bricks in position. Refer to Diagram 2.
• Attach the door handle to the door latch assembly by screwing
it on clockwise.
• Attach the air control wire handle by screwing it on clockwise.
Air control
wire handle
Door
handle
Radiant Fires
• WE HIGHLY RECOMMEND YOU READ THIS ENTIRE
MANUAL AS INCORRECT OPERATION, MISUSE AND/OR
LACK OF MAINTENANCE WILL VOID THE WARRANTY
• The appliance and ue-system shall be installed in
accordance with AS/NZS2918 and the appropriate
requirements of the relevant building code or codes
• Any modication of the appliance that has not
been approved in writing by the testing authority is
considered to be in breach of the approval granted for
compliance with AS/NZS4013 and will void the warranty
•
The appliance must be installed correctly. We recommend
a competent and suitably qualied NZHHA installer
WARNING! Important Information
• Mixing of appliance or ue-system components
from different sources or modifying the dimensional
specication or components may result in hazardous
conditions. Where such action is considered, the
manufacturer should be consulted in the rst instance
• Do not install a Metro re if there is any sign of visible
damage to the product
• This appliance must be regularly maintained.
• Use authorised Metro replacement parts only. The use of
unauthorised parts may void the warranty
• This manual must be left with the home owner
CAUTION! Important Information