34 35
EN
Allow the parts to dry completely before reassembling them.
After drying, lightly oil the grates (13, 14, 15), the roll blade (16), the cross blade (17) and the feeding
screw (9) with vegetable oil.
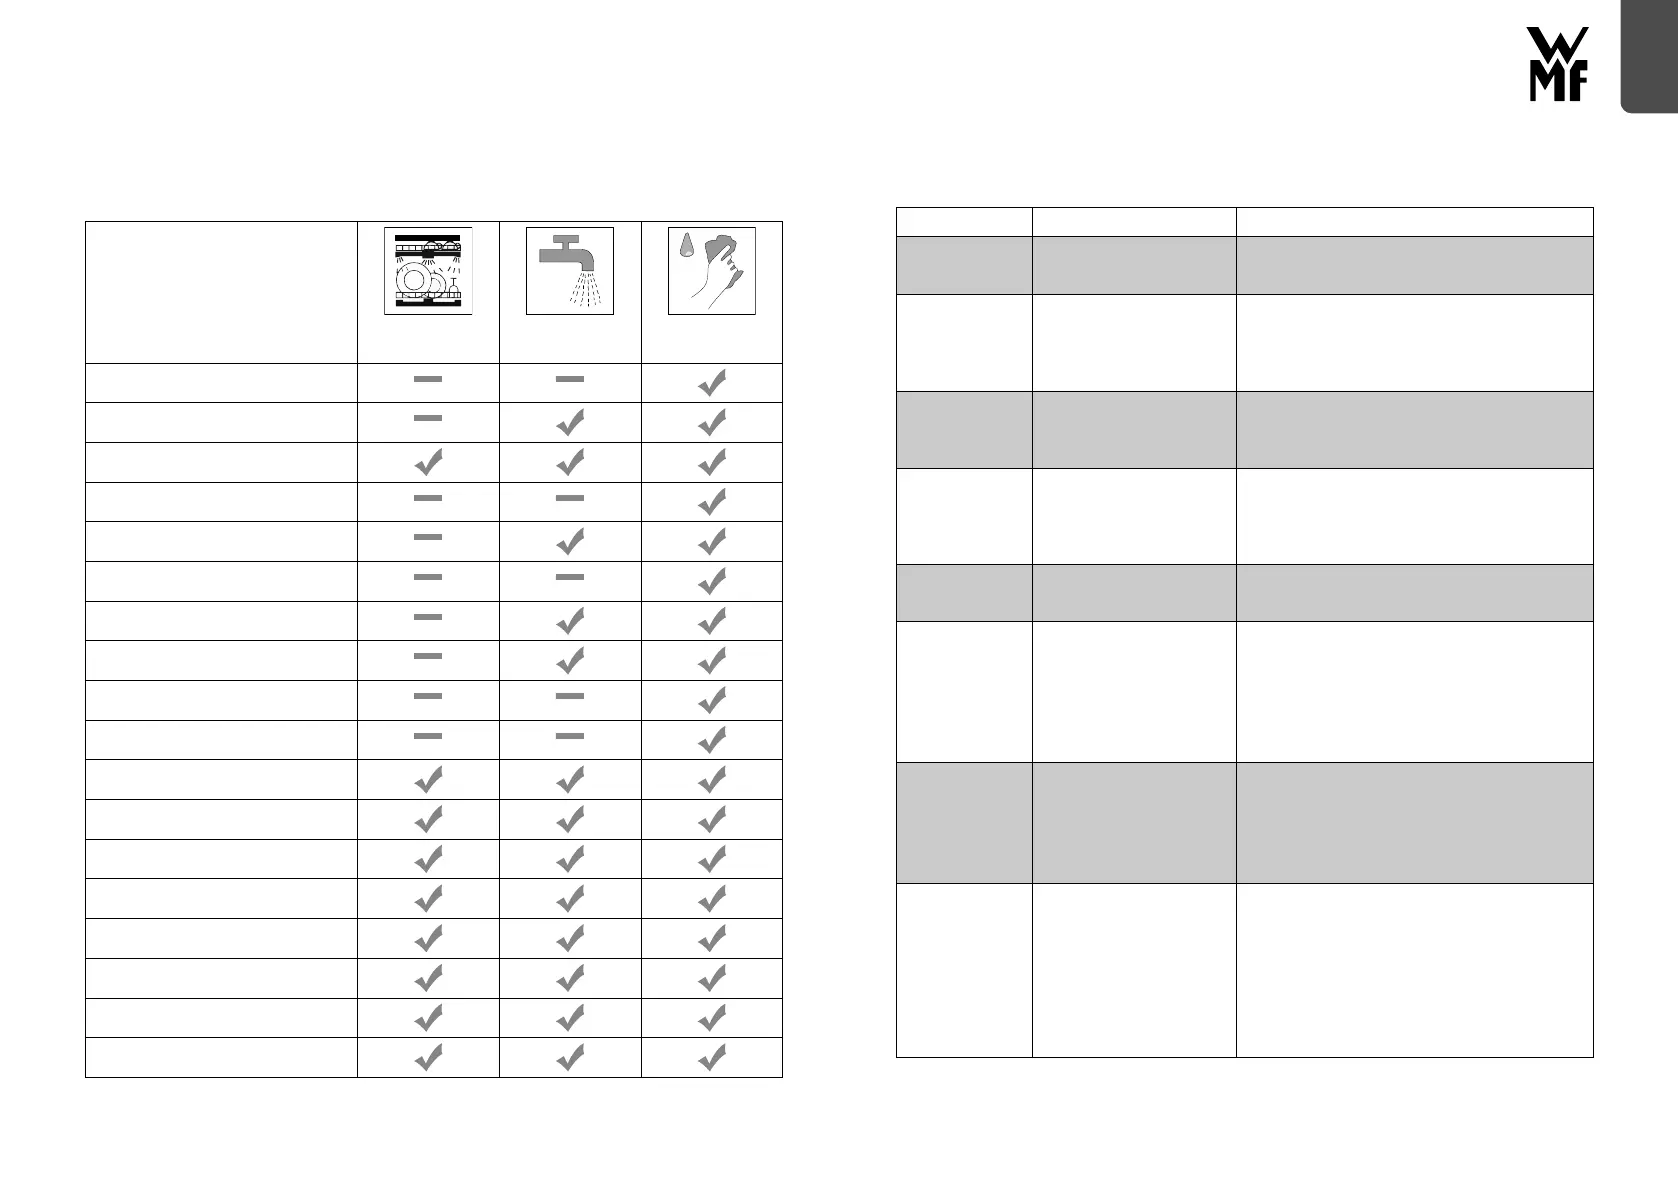
CLEANING THE PARTS
dishwasher safe rinse under
running water
wipe with a
damp cloth
Mincer casing (1)
Mincer attachment (2)
Filling bowl (4)
Display (5)
Threaded ring (6)
Control knob (7)
Stopper (8)
Feeding screw (9)
Grates storage (10)
Cover for grates storage (12)
Grates (13, 14, 15)
Roll blade (16)
Cross blade (17)
Cutting disc (18)
Sausage attachment (19, 20)
Kibbeh attachment (21)
Shortbread biscuit attachment (23,24)
Cleaning aid for grates (22)
9 | TROUBLESHOOTING
If any of the problems listed in the table persist, contact WMF Customer Service.
PROBLEM POSSIBLE CAUSE SOLUTION
Food gets stuck in
the feeding screw
Food was pushed into the
filler neck with too much
pressure
Briefly press the reverse button (a) to release the
blockage and then continue with the mincing
process
The feeding screw
is blocked repeat-
edly
Food was pushed into the
filler neck with too much
pressure
Switch off the appliance and pull the mains plug
out of the socket. Remove the mincer attachment
(2) and the feeding screw (9) and remove the
blockage. Then reassemble the appliance according
to the instructions and restart it.
The meat mass is
not fine enough
The grate is too big and/
or the ingredients have not
been minced a sufficient
number of times
Use a finer grate and/or mince the meat mass
several times in a row
The motor stops
during operation
The overload protection has
possibly switched off the
motor
Switch the appliance off by turning the control
knob (7) to “0”. Pull the mains plug out of the
socket, disassemble and clean the appliance accord-
ing to the “Cleaning and care” instructions. Let the
appliance cool down for approx. 30 minutes
The feeding screw
wobbles during
operation
The threaded ring (6) has
come loose
Switch off the appliance and then screw the
threaded ring (6) clockwise. Caution! Do not
overturn or overtighten the threaded ring (6)!
The motor auto-
matically switches
to the reverse
function for about
5 seconds
Possibly the motor is
overloaded
If this happens three times in a row, the motor
stops and the cleaning symbol lights up.
Disconnect the power plug from the socket. Disas-
semble and clean the appliance according to the
“Cleaning and care” instructions
The ingredients
are leaking out
on the side of the
threaded ring (6)
The threaded ring (6) is not
fitted correctly. It is sitting
too loosely on the mincer
attachment (2)
Switch off the appliance and then screw the
threaded ring (6) clockwise. Caution! Do not over-
turn or overtighten the threaded ring (6)! If this
does not solve the problem, disassemble and clean
the appliance according to the “Cleaning and care”
instructions
Rapid wear of the
cros blade and
the grates. Note:
Normal wear and
tear of the grates
(13, 14, 15) and
the cross blade
(17) may occur.
The threaded ring (6) has
been tightened too much
and / or the mincer has been
operated in empty mode.
The threaded ring (6) must never be tightened. And
the mincer must never be operated in empty mode,
i.e. without meat in the appliance! This leads to
overheating of the grate and the blade and thus
promotes wear of these parts!
Care instructions: After drying, lightly oil the grates
(13, 14, 15), the roll blade (16), the cross blade (17)
and the feeding screw (9) with vegetable oil for
care.