The Midea MY-GD20D2W Garment Steamer 5000 Series is designed for efficient and safe garment care, offering a range of features for easy and effective wrinkle removal.
Function Description
This appliance is a garment steamer intended for ironing clothes. It generates high-temperature steam to smooth out wrinkles from various fabrics. The design emphasizes user safety and convenience, with features that prevent common issues like hose kinking and dry boiling.
Important Technical Specifications
- Product Model: MY-GD20D2W
- Voltage: 220-240V~
- Frequency: 50/60Hz
- Power: 2000W
- Water Tank Capacity: 2.0L
- Weight: 7.0kg
- Dimensions: 358×293×1600mm
- Operating Environment: Temperature of 10-40°C and relative humidity of less than 90%.
The internal circuit diagram illustrates the components: an input power connection (220-240V~ 50/60Hz) leading to a thermal fuse, a power board, and a display panel. The power board connects to a heating body and a temperature controller, ensuring regulated operation.
Usage Features
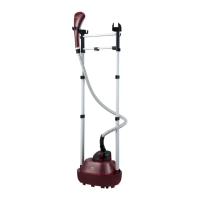
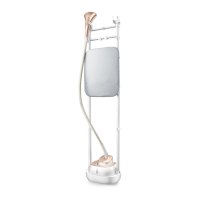
The garment steamer includes several parts for comprehensive garment care:
- Ironing Head: The primary tool for steam application.
- Shelf: Provides a surface for garment support.
- Clamping Piece: Helps secure garments during steaming.
- Windpipe: Delivers steam from the main unit to the ironing head.
- Clothes Hook and Clothes Rail Assembly: For hanging garments during steaming.
- Hanging Ironing Board: An auxiliary tool that can be used for ironing corners and lower hems, or as a flat surface for collars and cuffs.
- Locking Spanner and Support Rod: For adjusting the height of the clothes rail assembly.
- Control Panel: For operating the device, including power and function selection.
- Windpipe Fastener: Secures the windpipe to the main unit.
- Water Tank: Holds water for steam generation.
- Discharge Plug: For draining water.
Installation:
- Support Rod Installation: The support rod is installed by releasing the lock button, inserting the rod into the mainframe, and locking each spanner. The height is collapsible and adjustable.
- Windpipe Installation: Align the boss of the windpipe fastener with the "✔" mark and insert it to the end. Rotate the fastener clockwise to lock it, aligning the boss with the "Ω" mark.
- Hanging Ironing Board Installation: Align the fastener with the first and second support rods. Shorten the supporting rod to a suitable height, revolve the hook of the hanging ironing board to the side position, and place the board flat on top of the clothes rail assembly. Insert the fixed column into the right hole to secure it.
Operation:
- Preparation: Hang up the clothes on the clothes hook.
- Water Filling: Fill the 2.0L water tank. It is recommended to use purified or filtered water to prolong the steamer's durability and prevent clothing contamination from impurities.
- Start-up: Place the filled water tank back into the machine. Press the "Power" key to start the machine.
- Function Selection: Use the "Function" key to select the appropriate steam gear.
- Steaming: Wear gloves or use glove boards to prevent scalding. The hanging ironing board can be used for specific areas like corners and hems. A brush accessory can be used for removing fluff.
- Horizontal Ironing: Clothing can also be ironed horizontally.
- Ironing Trousers: For trousers, use the seam clamp to fix the trousers axis. Press the spanner and iron from the top downwards.
- Brush and Seam Clamp Installation: The brush snaps onto the upper edge of the iron head, aligning with the lower boss. The seam clamp also snaps onto the upper edge of the iron head, with its lower boss snapped below. Both are dismantled in reverse after use.
Safety Protection:
The device incorporates multiple safety features:
- Temperature Detection Protection: A built-in temperature sensing element controls the heating element, maintaining the product temperature within a suitable range.
- Thermal Fuse Protection: A thermal fuse switches off the device directly if the temperature is abnormal and the thermostat fails, preventing accidents.
- Dry Boil Protection: The device alerts for water insufficiency and automatically cuts power if it boils dry. An alarm buzzer sounds immediately, and power is cut off after the indicator blinks three times to protect the garment care.
Important Cautions:
- Always place the steamer on the floor to keep the hose straight and prevent U-shapes, which can cause irregular steam output or croaking sounds. Lift the steamer head occasionally to straighten the hose and allow condensation to flow back.
- Turn off the switch and unplug the device before pouring out water or cleaning. Allow it to cool for at least 10 minutes to avoid scalding.
- Hold the appliance body when moving it; never drag it by the power cord.
- Never immerse the appliance in water or other liquids, nor rinse it under the tap.
- Ensure the garment steamer has cooled down and water has been discharged before storage.
- Do not use the appliance for purposes other than ironing clothes.
- Avoid using other high-power electric appliances on the same socket to prevent circuit overload.
- Do not dismantle or repair the appliance yourself; only qualified personnel should perform repairs.
- Always check the plug and power cord for damage before use. If damaged, replacement must be done by the manufacturer or a qualified service agent.
- Switch off the appliance before inserting or pulling off the plug. Hold the plug, not the cord, and never operate with wet hands.
- Ensure the supporting surface is even and secure to prevent overturning or water overflow.
- Never heat the water tank if it's not properly placed or if the water level is insufficient.
- Switch off the device before adding water.
- Never put perfume, vinegar, detergents, or other chemicals into the water tank, as this can stain clothes and damage the steamer.
- Keep the appliance out of reach of children and disabled persons.
- Do not direct the spray nozzle towards people to avoid scalding.
- The spray nozzle, air duct, and air duct joint become very hot during operation; avoid touching them.
- Do not use on fabrics with poor heat resistance (e.g., fur clothing) that may deform or discolor from high-temperature steam.
- Keep the power cord away from hot surfaces of the appliance.
- Do not bend or wind the air duct.
- Avoid any actions that bring steam into contact with hands, such as installing a brush or inserting/pulling the air duct, to prevent scalding.
- This appliance is not intended for use by persons with reduced physical, sensory, or mental capabilities, or lack of experience and knowledge, unless supervised or instructed by a responsible person.
- Children should be supervised and not allowed to play with the appliance.
- Unplug the appliance during filling and cleaning.
- If the supply cord is damaged, it must be replaced by the manufacturer or a similarly qualified person.
- Children aged 8 years and above, and persons with reduced capabilities, can use the appliance if supervised and instructed on safe use, and if they understand the hazards. Cleaning and user maintenance should not be done by children without supervision.
- Do not dispose of the appliance with regular household waste; deliver it to a collection point for recycling electrical and electronic equipment.
- Do not iron one place for a long time to avoid damaging clothes.
- Ensure no overbending or U-shaped windpipe during ironing.
Maintenance Features
Cleaning and Maintenance:
- Press the "On/Off" button to turn off the garment steamer.
- Disconnect the power plug.
- After allowing the product to cool for 30 minutes, open the water tank cover, lift and tilt the product, and pour out the water from inside the water tank.
- Unscrew the drain plug counter-clockwise to allow water from the main machine to flow out. (Note: Remove accessories before unscrewing the drain plug to prevent them from getting wet.)
- For long-term use, regular cleaning of water scale is recommended to prevent impurities from staining clothing. Disassemble the airway tube from the main body, fill the water inlet with water, and shake the machine. Then pour out the dirty mixture along with water from the water outlet. Repeat these steps for better performance.
- After winding the power cord and air duct, store the product in a free place.
Troubleshooting:
- Product not working after power-on: Check if the power plug is inserted. If the domestic circuit fails or the fuse is burnt, or if the product circuit fails, contact professionals for inspection and repair.
- Product works but no steam: Fill the water tank if empty. If the internal steam channel is bent or disengaged, or the heating plate is damaged, contact professionals for inspection and repair. If the indicator light illuminates but no steam is produced, contact professionals.
- Ironing head drips water: This is normal condensation. Lift the hot head and vertically straighten the steam conduit, then shake the hot head. If the heating plate is damaged, contact professionals. If there is much water scale, shut down and clean the heating plate. If the product is placed on a high table, place it on the ground.
- Water leak: If water overflows from the connection between the water tank and the main machine, remove the steam return pipe and straighten the bent section. Remove water scale in the heating plate.
- Steam blocked: If the steam conduit is bent, after installing it, start the machine, wear gloves, and manually shape the bends to restore the conduit.