Page 17
A. Install the Main Support Bracket into
the window opening. Ensure that the
Horizontal Bracket and Extension Arms are
located on the indoor side of the window.
WARNING
Maintain control of the bracket until
installation is complete.
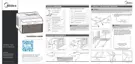
3. Install Support Bracket – Install Video Time 3:12
Fig. 4
B. Move the Angled Support Arms
toward the exterior wall until
the feet touch the wall. Place
the level on the bracket and
adjust the Support Arms so that
it is level or tilted 1/4 bubble
downward and towards the
outside. If exactly 1/4 bubble
cannot be achieved, set the
angled support arms to the
closest setting so that a slight
outward tilt exists.
Here is what
1/4 bubble on
the level
should look
like.
Depending on the
level used, place at
either location below
to check level.
Fig. 5
Fig. 6
C. Insert the Main Support Pin
through the holes in the Main
Support and Angled Support Arm.
Match the hole numbers on both
Main Supports for alignment.
If further adjustment is needed,
use alternate holes where the
Main Supports attach to the
Horizontal Bracket
Installation
Instructions
 Loading...