Figure 5.1
Slope of 1/100
or more
Figure 5.3
Before the test, make sure that the water discharge pipeline is smooth, and
check that each connection is sealed properly.
Conduct the water discharge test in the new room before the ceiling is paved.
1. Remove the test water cap to connect to the test water outlet, and use the
water injection pipe to inject 2000 ml of water into the drain pan.
5.2 Water Discharge Test
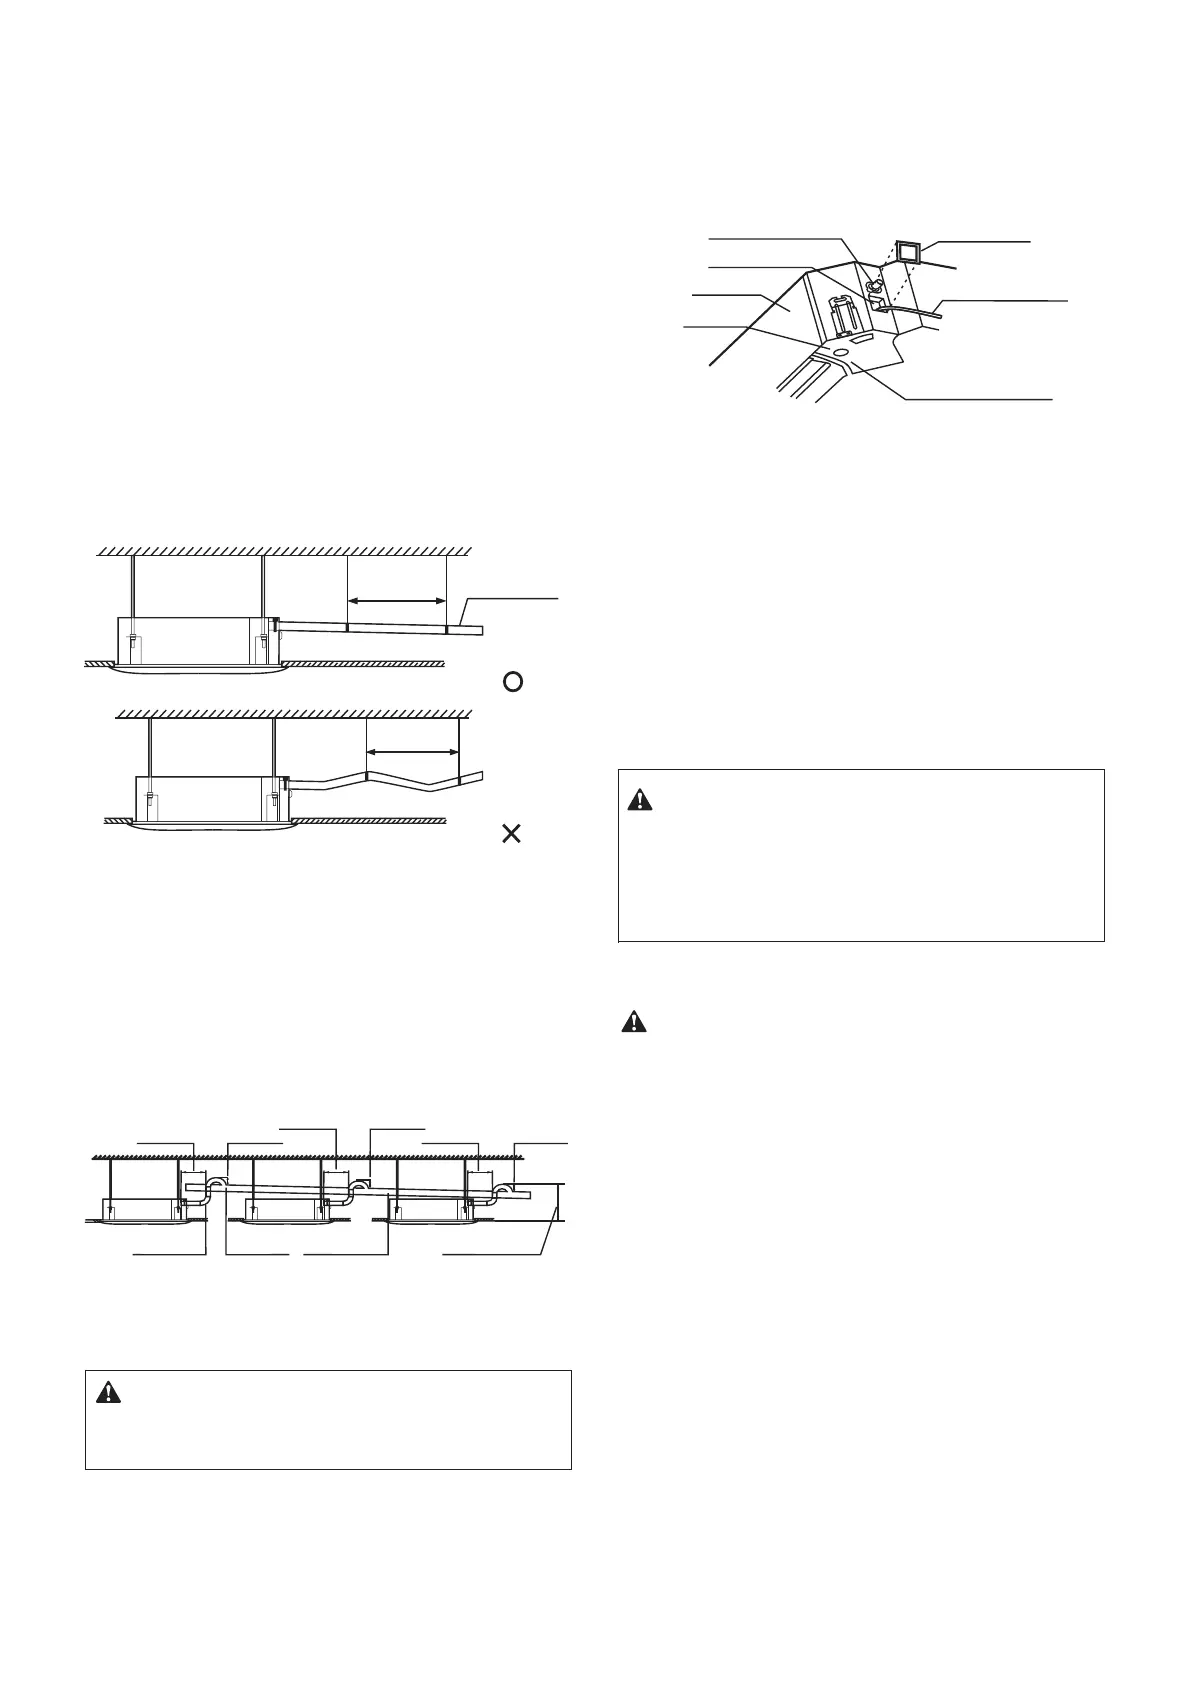
Water suction pipe
Test water outlet
Body
Drain pan
Test water cap
Water injection pipe
Water discharge trench
Figure 5.2
•
Make sure all the connections in the piping system are properly sealed
to prevent water leakages.
6. When connecting to a long water discharge pipe, the connections must be
covered with the insulation casing to prevent the long pipe from coming
loose.
7. When the outlet of the water discharge pipe is higher than the pipe connec-
tion for water suction, try to keep the water discharge pipe as vertical as
possible, and the water outlet connecting fittings will bend so that the height
of the water discharge pipe should be within 1000 mm away from the base
of the drain pan. Otherwise, there will be excessive water flow when the
operation stops. See Figure 5.2.
Water discharge pipes from multiple units are connected to the main
water discharge pipe to be discharged through the sewage pipe.
Water outlet
pipe fittings
Main water
outlet pipe
Slope of
1/100 or more
Below 200 mm
All are below 1000 mm
Below 200 mm
Below 200 mm
8. If the end of the water discharge pipe is more than 50mm above the ground
or from the base of the water discharge slot, do not put it in the water.
2. Connect the power supply, and set the air conditioner to operate in the cool
mode. Check the running sound of the drainage pump, as well as whether
water is properly drained from the water discharge outlet.
3. Stop the air conditioner. Wait for three minutes, and then check if there is
anything unusual. If the water discharge piping layout is not correct, the
excessive water flow will cause the water level error and “EE” error code will
be displayed on the display panel. There may even be water overflowing
from the drain pan.There may even be water overflowing from the drain pan.
4. Continue to add water until the alarm for excessive water levels is triggered.
Check if the drainage pump drains water immediately. After three minutes,
if the water level does not fall below the warning level, the unit will shut
down. At this time, you need to turn off the power supply, and drain away the
accumulated water before you can turn on the unit normally.
5. Turn off the power supply, remove the water manually using the drainage
plug, and put the test cap back to the original place.
• The drainage plug at the bottom of the unit body is used to discharge
accumulated water from the drain pan when the air conditioner
malfunctions. When the air conditioner is operating normally, make
sure the drainage plug is properly plugged to prevent water from
leaking.
5. Water Discharge Piping Installation
5.1. Water Discharge Piping Installation for Indoor Unit
1. Use PVC pipes for the water discharge pipes (outer diameter: 37~39 mm,
inner diameter: 32 mm). Based on the actual installation circumstance,
users can purchase the appropriate piping length from sales agent or local
after-sales service centre, or purchase directly from the local market.
2. Insert the water discharge pipe into the end of the water suction connecting
pipe of the unit body, and use the ring clamp (accessory 10) to clamp the water
discharge pipes with the insulation casing for the water outlet piping securely.
3. Use the insulation casing for water discharge piping (accessory 9) to
bundle the water suction and discharge pipes of the indoor unit (especially
the indoor portion), and use the tie for the water discharge piping (accesso-
ry 12) to bind them firmly to make sure air does not enter and condense.
4. In order to prevent the back-flow of water into the interior of the air
conditioner when the operation stops, the water discharge pipe should
slope downwards towards the outside (drainage side) at a slope of more
than 1/100. Make sure that the water discharge pipe does not swell or store
water; otherwise, it will cause strange noises. See Figure 5.1.
5. When connecting the water discharge piping, do not use
force to pull the
pipes to prevent the water suction pipe connections from coming loose. At
the same time, set a supporting point at every 0.8~1 m to prevent the water
discharge pipes from bending. See Figure 5.1.
Caution
50~100mm
50~100mm
50~100mm
Caution
>1.0m
0.8~1.0m
Warning
6. Electrical Wiring
• All the supplied parts, materials and electrical works must comply with local
regulations.
• Use only copper wires.
• Use a dedicated power supply for the air-conditioners. The power voltage
must be in line with the rated voltage.
• The electrical wiring works must be carried out by a professional technician,
and must comply with the labels stated in the circuit diagram.
• Before the electrical connection works are carried out, turn off the power
supply to prevent injuries caused by electric shock.
• The external power supply circuit of the air conditioner must include an
earth line, and the earth line of the power cord connecting to the indoor unit
must be securely connected to the earth line of the external power supply.
• Leakage protective devices must be configured according to the local
technical standards and requirements for electrical and electronic devices.
• The fixed wiring connected must be equipped with an all-pole disconnection
device with a minimum 3 mm contact separation.
• The distance between the power cord and signalling line must be at least
300 mm to prevent the occurrences of electrical interference, malfunction or
damage to electrical components. At the same time, these line must not
come in contact with the piping and valves.
• Choose electrical wiring that conforms to the corresponding electrical
requirements.
• Connect to the power supply only after all the wiring and connection works
have been completed, and carefully checked to be correct.
10
 Loading...