1
2
3
Installing the AudioLinkPlus4x4 Software
Now that you have logged in as an administrator you are ready to install
yourAudioLinkPlus4x4 product in your computer.
1. Install the drivers.
You should do this before connecting the AudioLinkPlus4x4
Interface to the USB port on your computer.
Insert the AudioLinkPlus4x4 To install the
downloaded driver, double-click “Setup.exe”
on the icon and follow the instructions.If you
found newer driver on our website, then you
will want to install that instead of the older
Please plug your AudioLinkPlus4x4 to the
USB port in the following windows, and then
continue with the Installation.
Installation completed successfully:
2. Once you have installed the Windowsdriver
locate the audio interface box, the power
cableor power adapter, and the USB cable.
3. Plug one end of the USB cable into the
USB connector on the rear of the
AudioLinkPlus4x4 interface. Attach the
other end of the USB cable to an open USB port on your computer.
(If the connector does not match the port on your computer then you
will need to get an adapter)
4
Connecting to the Audio Interface
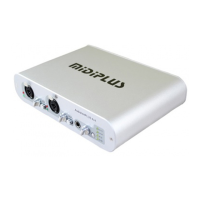
The AudioLinkPlus4x4 audio interfaces contain a wide variety of
connections that allow great flexibility in operation. For optimal
performance, it is criticalto use the appropriate cabling and connectors.
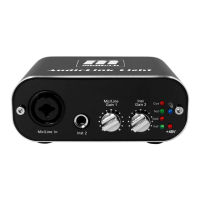
Analog Inputs and Outputs – AudioLinkPlus4x4
AudioLinkPlus4x4’s front panel has:
1. Two universal inputs (1 – 2) with meters and trim knobs.
The universal input connections
can accept balanced or unbalanced
signals via ¼”or XLR connectors.
Since your Audio Fire has built-in
preamps, you can just plug your
microphone or guitar cable right into
the universal input. No external preamp
direct box, or mixer is needed!
2. Two signal indicated LEDs: The Red one shows the input signal too high
and it will be cut the peak, while the Green one shows the input signal is
available.For optimal audio quality, you should adjust the input trim knob
so that yourloudest recorded signal lights up the yellow light, but not the
red. When the red meter light shines extra bright – you’ve clipped! If the
signal level ever exceeds 0dBFS the signal will be “clipped” and you
will hear a “pop” or “tick” in the recording. This is a very bad thing, and
clipping should be avoided at all costs! There is enough headroom so
that you can be conservative in this area, and there is no need to push
the input levels right up to the edge of clipping.
3. Gain selector switch: if the switch is down, the voltage of signal will be
enlarged 10 times. It always used in the mic in situation.
4. There is also an 1/4” stereo monitor headphone output jack, with a
corresponding volume knob, and you also can select “analog output
1/2” , “analog output 3/4”, “analog input 1/2”, and “analog input 3/4” with
the button by side, the LEDs will show which it is monitoring.
2
1
1
2
3
3
4
Important Safety Instructions
1. Read Instructions – Be sure to read all of the safety and operating
instructions before operating this product.
2. Retain Instructions – The safety instructions and owner's manual
should be retained for future reference.
3. Heed Warnings – All warnings on your Midiplus product and in the
Owner'sManual should be followed.
4. Follow Instructions – All operating and use instructions should be
followed.
5. Moisture – Water and moisture are detrimental to the continued
good health of your Midiplus product. Do not install or operate your
Midiplus product near sources of water or moisture such as sinks,
damp basements, leaky roofs, etc.
6. Heat – Your Midiplus product should be situated away from sources
of heat such as heaters or radiators.
7. Grounding –Precautions should be taken so that the grounding
capabilities of the unit are not undermined. The AduioLinkPlus4x4
provided with a cord with an equipment grounding conductor and
grounding plug. This plug must be plugged into an outlet that is
properly installed and grounded in accordance with all local rules and
ordinances. Do not modify the plug provided with the equipment. If the
plug will not fit into your outlet, have a proper outlet installed by a
qualified electrician.
8. Power Cord Protection – Power supply cords should be routed so
that theyare unlikely to be walked on or pinched by items placed upon
or against them. Pay particular attention to protecting the plugs, outlets
and the point at which the cord exits your Midiplus product.
9. Servicing–Do not attempt to service this unit yourself, as opening
the case will expose you to hazardous voltage or other dangers. All
servicing should be referred to qualified service personnel.
Thank you for choosing Midiplus Digital Audio. We think you’ll find your
Midiplus product to be an extremely flexible, high-performance tool for your
computer-based hard disk recording system.
What You Should Have Received in the Box
When you opened the box, you should have found the following:
• An audio interface box
• A USB cable
•
An Owner’s Manual
System Requirements
In order to use AudioLinkPlus4x4, you’ll need the following:
• A desktop or laptop computer with:
• Windows XP Service Pack 2 or newer operating system
• An unused USB 2.0 port
• A minimum 256Mb of RAM (512Mb highly recommended)
• A fast, high-capacity IDE, SATA
• Peripheral audio equipment, such as a mixer, microphones, studio
monitors, musical instruments, etc.
Installation
Complete
installation
consists
of
logging
in
as
an
administrator,
installing the
Windows
drivers
into
your
system,
connecting
the
audio
interface
to
a
USB
port
and
then
connecting
your
AudioLinkPlus4x4 to
any
other
peripheral
audio
equipment.You need to download the driver from:
Log
In
as
Administrator
http://www.midiplus.com.tw
/
MIDIPLUS-Download.htm
To
install
your
Midiplus product
you
must
be
logged
into
your
computer
as
anAdministrator.
You
can
either
log
in
with
the
account
called
“Administrator”
orwith
any
other
account
that
has
administrative
privileges.
Otherwise,
you
will
notbe
able
to
install
the
hardware
and
drivers.
Important —Check the Midiplus Website for Software Updates
You
should
always
check
our
website
www.midiplus.com.tw
MIDIPLUS-Download.htm
for
the
latest
driver updates
before
installing
your
AudioLinkPlus4x4
product.
Just
go
to
the
driver
downloads area
and
find
the
AudioLinkPlus4x4
section.
You should
check
the
website
periodically
in
the
future
in
case
new
drivers
are released
at
a
later
date.
Installation