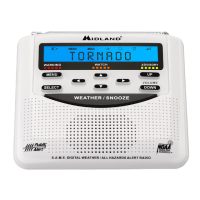
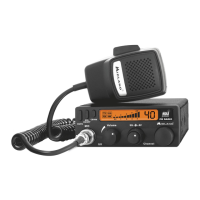
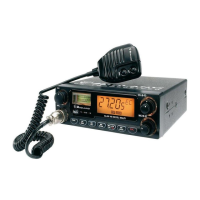
The Midland Weather Alert Radio is a crucial device designed for early warning and protection against various weather emergencies and hazards. This S.A.M.E. (Specific Area Message Encoding) digital weather/all hazards alert radio provides timely notifications to keep you informed and safe.
Function Description:
The primary function of the Midland Weather Alert Radio is to receive and broadcast weather alerts and other hazard warnings from the NOAA (National Oceanic and Atmospheric Administration) weather radio network. It acts as a vigilant sentinel, constantly monitoring for potential threats such as tornadoes, severe thunderstorms, and other advisories. The device is equipped with a sophisticated alert system that can be customized to your preferences, allowing you to choose between voice, tone, or display alerts. This ensures that you are notified in a manner that best suits your needs, whether it's an audible siren, a spoken broadcast, or a scrolling text message on the display.
Beyond just receiving alerts, the radio also features a "Weather/Snooze" button, which allows you to listen to local weather reports on demand. This provides a proactive way to stay updated on current conditions and forecasts, even when no immediate alerts are active. The device is designed for ease of use, with a clear display and intuitive controls that make navigation and setup straightforward.
Usage Features:
Setup:
- Unpacking: Upon receiving the device, carefully remove all items from the package and discard any plastic wrapping. The package should contain three main items: the Weather Unit, an AC Power Adapter, and a User's Guide.
- Powering On: Locate the On/Off switch on the back of the Weather Unit and slide it to the "ON" position. An important reminder is often printed near the switch to "Ensure the switch is in the ON position."
- Antenna Extension: For optimal reception, pull the antenna out from the unit and fully extend it.
- Battery Installation: Insert three AA batteries into the battery compartment located on the back of the unit. These batteries serve as a backup power source, ensuring the radio continues to function during power outages.
- AC Power Connection: Plug the AC Power Adapter into the "POWER" jack on the back of the unit, and then plug the other end of the adapter into a wall outlet. This provides continuous power to the radio.
- Initial Display: Once powered on, the radio's display will first show "Welcome," followed by "Set Language."
Initial Configuration:
- Setting Language:
- Press the "MENU" button.
- Use the "UP" button to scroll to "Set Language."
- Press "SELECT."
- Use the "UP" arrow to choose your preferred language.
- Press "SELECT" to confirm.
- Setting Location:
- Press the "MENU" button.
- Use the "UP" arrow to scroll to "Set Location."
- Press "SELECT."
- Use the "UP" arrow to select "Single."
- Press "SELECT."
- The display will show "01 EMPTY." Press "SELECT."
- Use the "UP" and "DOWN" arrows to select your country, state/province, and county/area. Press "SELECT" after each selection.
- Press "MENU" to exit.
- Setting Time:
- Press the "MENU" button.
- Use the "UP" arrow to scroll through the menu options until you find the time setting.
- Press the "SELECT" button.
- Use the "UP" arrow to change the hour.
- Press the "RIGHT" arrow to save the hour and move on to setting the minutes.
- Use the "UP" arrow to set the minutes.
- Use the "RIGHT" arrow to save the minutes.
- Press "SELECT" to save the current time.
- Press "MENU" to exit the menu mode.
- Setting an Alarm:
- Press the "MENU" button.
- Use the "UP" button to scroll to "Set Alarm."
- Press "SELECT."
- Use the "UP" arrow to display "ON."
- Press "SELECT."
- Use the "UP" arrow to choose the hour.
- Press the "RIGHT" arrow to save the hour.
- Use the "UP" arrow again to program the minutes.
- Press the "SELECT" button to save the time.
- Press "MENU" to exit.
- Setting Alert Type:
- Press the "MENU" button.
- Use the "UP" arrow to scroll to "Alert Type."
- Press "SELECT."
- Use the "UP" arrow to choose between "Voice," "Tone," or "Display."
- Voice: An alert tone will sound for 8 seconds, followed by a voice announcing the weather broadcast for 3 minutes.
- Tone: An alert tone will sound for 3 minutes.
- Display: Only a text alert will scroll on the display.
- Press "SELECT" to confirm.
- Press "MENU" to exit.
Daily Operation:
- Directional Pad: Use the arrow buttons (UP, DOWN, LEFT, RIGHT) to navigate through various menu options and settings.
- Menu Button: Press this button to access the main menu and configure the radio's settings.
- Select Button: Use this button to confirm choices or select options within the menu.
- Volume Control: The "UP" and "DOWN" buttons adjust the listening volume of the radio.
- Weather/Snooze Button: This multi-function button allows you to listen to local weather reports or to snooze active alerts and sirens.
- Indicator Lights:
- Warning Light: This light illuminates to indicate a weather emergency, signifying the highest level of alert.
- Watch Light: This light indicates a watch for potential weather emergencies, signaling that conditions are favorable for a hazard to develop.
- Advisory Light: This light indicates a weather advisory, representing the lowest warning level for less severe but still important weather events.
Testing Alerts:
- Press the "MENU" button.
- Use the "UP" arrow to scroll to "Alert Test."
- Press "SELECT," and a siren will sound.
- Press "MENU" to turn off the siren, or press "WEATHER/SNOOZE" to snooze it.
- Press "MENU" to exit.
Setting Channel and Volume:
- Press the "MENU" button.
- Use the "UP" arrow to scroll to "Set Channel."
- Press "SELECT."
- Use the "UP" and "DOWN" arrows to find your desired radio station.
- Use the "VOLUME UP" and "VOLUME DOWN" buttons to adjust the volume.
- Press "MENU" to exit.
Adjusting Backlight:
- Press the "MENU" button.
- Use the "UP" arrow to scroll to "Backlight."
- Press "SELECT."
- Use the "UP" arrow to select "BLT NORM," "BLT ON," or "BLT OFF."
- BLT NORM: The backlight turns on when a button is pressed.
- BLT ON: The backlight is always on.
- BLT OFF: The backlight is always off.
- Press "SELECT."
- Press "MENU" to exit.
- Press the "MENU" button.
- Use the "UP" arrow to scroll to "Button Beeps."
- Press "SELECT."
- Use the "UP" arrow to choose "ON" or "OFF."
- Press "SELECT."
- Press "MENU" to exit.
Setting Events:
- Press the "MENU" button.
- Use the "UP" arrow to scroll to "Set Events."
- Press "SELECT."
- Use the "UP" arrow to choose "ALL ON," "ALL OFF," "ALL DEFAULT," or "EDIT EVENTS."
- ALL ON: Turns on tones for all applicable alerts.
- ALL OFF: Turns off tones for all alerts.
- ALL DEFAULT: Returns all alert settings to default.
- EDIT EVENTS: Allows individual alert sirens to be enabled or disabled.
- Press "SELECT."
- Press "MENU" to exit.
Editing Events (Individual Alert Customization):
- Press the "MENU" button.
- Use the "UP" arrow to scroll to "Set Events."
- Press "SELECT."
- Use the "UP" arrow to scroll to "Edit Events."
- Press "SELECT."
- Use the "UP" arrow to select your desired alert.
- Press "SELECT."
- Use the "UP" arrow to choose "ON" or "OFF" for that specific alert.
- Press "SELECT."
- Press the "MENU" button to exit.
Maintenance Features:
The Midland Weather Alert Radio is designed for minimal maintenance, focusing on reliability and long-term performance.
- Power Management: The ability to operate on both AC power and AA batteries ensures continuous operation, even during power outages. Regularly checking and replacing batteries when they are low is the primary maintenance task to ensure backup power is always available.
- Antenna Care: While the antenna is robust, ensuring it is fully extended for optimal reception and not bent or damaged will contribute to the device's effectiveness.
- Cleaning: Periodically, the exterior of the unit can be wiped with a soft, dry cloth to remove dust and grime, keeping the display and buttons clear and functional. Avoid using harsh chemicals or abrasive cleaners, as these can damage the plastic and electronic components.
- Firmware Updates (Not explicitly mentioned but common for such devices): While the manual does not detail firmware updates, some advanced weather radios may offer this feature to improve performance or add new functionalities. If available, these updates would typically be performed via a computer connection or through over-the-air broadcasts.
- User's Guide: The comprehensive User's Guide provided with the device is a valuable resource for troubleshooting and understanding all features. Referring to it for any operational questions or minor issues is a key aspect of device maintenance.
By following these setup and usage instructions, and performing basic care, the Midland Weather Alert Radio will serve as a dependable tool for staying informed and prepared for weather and other hazards.