Do you have a question about the Milwaukee MX FUEL MXF512 and is the answer not in the manual?
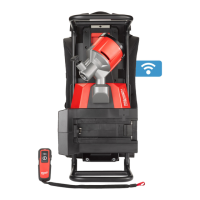
The Milwaukee MX FUEL™ Pipe Threading Machine (Cat. No. MXF512) is a robust and versatile tool designed for threading pipes. It comes with a cart for portability and features a range of components to facilitate efficient and safe operation.
The machine is equipped with hammer chucks (1) for securing pipes, an oil reservoir (6) for lubrication during threading, and a die head (28) that houses the dies for cutting threads. A cutting wheel (21) and reamer (26) are also integrated for pipe preparation and finishing. The machine's operation is controlled via a foot switch (14), and it includes speed (16) and direction (17) controls. The accessory carriage handles (3) and carriage assembly adjuster (4) allow for precise positioning of the die head, cutter, and reamer. The cart (11) with handles (10) and cross bars (9) provides mobility and stability, with a cart latch (8) for securing it in place. A debris tray (5) collects chips and oil during operation. The machine is powered by an MX FUEL™ battery pack, which is inserted into the battery bay (7). It also features ONE-KEY™ connectivity (18) for advanced control and tracking, and indicators for overtemperature (19) and fuel gauge (20).
The machine requires proper setup, including ensuring the area is dry, stable, and level. The cart can be set up by opening the latch and pulling up the accessory carriage handles until the locking pin is in place. Before collapsing, the debris tray and battery pack should be removed, and the cutting wheel, die head, and reamer should be in place on the assembly carriage. The foot switch cord should be wrapped around the cord holders.
Battery Management: To remove the battery, push the latch lock to the side and squeeze the lever. To insert, slide the pack into the machine until it latches. The fuel gauge (20) displays the battery pack's remaining run time, mirroring the battery pack's own gauge. A flashing light indicates less than 10% charge, and 8 flashes indicate 0% charge.
Die Head and Dies: The die head can be removed by pushing the reamer and cutting wheel to the open position and lifting the die release lever. To remove dies, the die head is placed with numbers facing up, the die release lever is opened, and the clamp lever is loosened. Dies are then pulled out. For installation, dies are inserted with numbers facing upward, ensuring they go into the correct slots as a set. The die head is adjusted using the micro adjustment knob (23) to achieve the desired thread diameter. The auto-opening adjustment feature allows for specific pipe sizes (1/2" - 2") to hit the adjustment mechanism for automatic opening.
Operation: The machine must be armed by inserting the battery pack and pressing the Arm button (15). The MX FUEL™ icon will light up, and the trigger will arm in 2 seconds. After 15 minutes of inactivity, the machine enters sleep mode. Speed (16) and direction (17) can be selected (Low/High speed, Reverse/Forward). To thread a pipe, ensure oil is in the reservoir and correct dies are installed. Select the desired threading size on the pipe scale (23) and set auto-opening if needed. Lift the cutter, die head, and reamer to the open position, turn the hammer chucks counter-clockwise, and insert the pipe from the rear. Secure the pipe by turning the hammer chucks clockwise. Position the cutting wheel on the pipe, ensuring it doesn't contact the hammer chucks. Press the arming button, select direction and speed, and push the foot switch to rotate the pipe. To stop, release the foot switch. The reamer is used by lowering it and sliding it closer to the pipe with the carriage assembly adjuster. The cutting wheel is used by turning its handle counter-clockwise until it engages the pipe, then clockwise to cut, and finally counter-clockwise to loosen and lift.
Overtemperature Indicator: If overtemperature occurs, the indicator light (19) will flash, and the machine will not operate until it cools down.
Inspecting Threads: After threading, clean the pipe and inspect the threads for smoothness and completeness. A ring gauge can be used to check the thread size; the pipe end should be flush with the gauge side (plus or minus one turn).
Regular maintenance is crucial for optimal performance and safety.
The manual emphasizes reading and understanding all safety warnings and instructions to reduce the risk of injury, electric shock, or fire. Key warnings include:
| Brand | Milwaukee |
|---|---|
| Model | MX FUEL MXF512 |
| Category | Power Tool |
| Language | English |