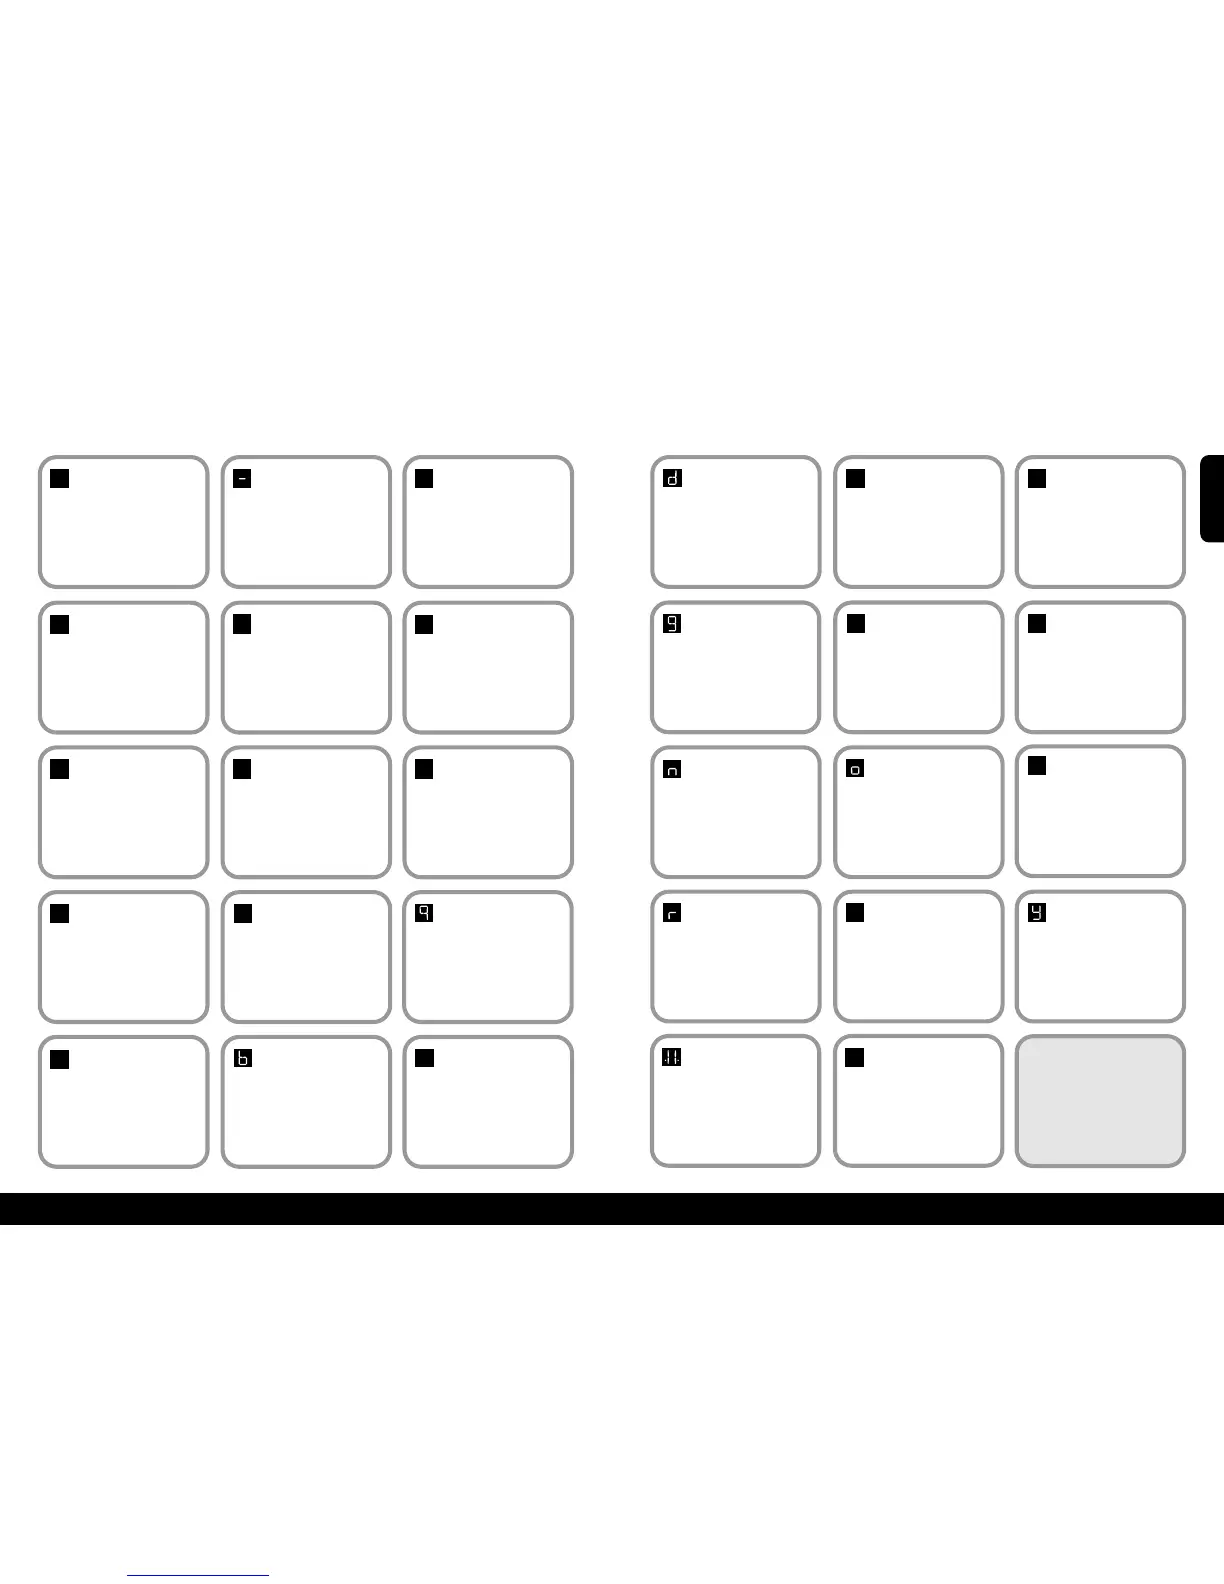
15
Appendix 2 – Diagnostic display
Code:
None
Meaning:
No display.
Self help action:
Press the toggle switch and see if display
comes on. Check that the main power
switch on the lift is turned on. If this
does not clear the fault, contact your
dealer or Minivator.
Code:
1
Meaning:
Requires charge.
Self help action:
The stairlift batteries require charging.
Drive the lift to the charge contacts – if
the 'Okay’ code does not show contact
your dealer or Minivator.
Code:
Okay
Meaning:
O
kay.
Self help action:
Contact your dealer or Minivator.
Code:
0
Meaning:
Final limit activated
or cable short circuit.
Self help action:
Check that the keyswitch is on and seat
is fully swivelled to the drive position. If
this does not clear the fault, contact your
dealer or Minivator.
0
1
Code:
4
Meaning:
Safety edge (up/down
direction) activated –
footplate.
Self help action:
Contact your dealer or Minivator.
4
Code:
5
Meaning:
Ends limit activated.
Self help action:
Contact your dealer or Minivator.
5
Code:
7
Meaning:
Batteries approaching
critical level.
Self help action:
The stairlift batteries r
equir
e char
ging.
Drive the lift to the charge contacts - if
the 'Okay’ code does not show contact
your dealer or Minivator.
7
Code:
9
Meaning:
Shows when toggle
switch is activated in
down/up direction.
Self help action:
N/A.
Code:
6
Meaning:
A switch is active at
power on i.e. Toggle
Up, Toggle Down, IR
Up, IR Down or Learn.
Self help action:
Contact your dealer or Minivator.
6
Code:
2
Meaning:
Off charge.
Self help action:
The stairlift is not parked on a charging
position or is not charging. Drive the lift to
the char
ge contacts – if the 'Okay’ code does
not show or the lift is already on the charge
contacts check the power supply is on.
Failing this contact your dealer or Minivator.
Code:
3
Meaning:
Ends limit activated.
Self help action:
Contact your dealer or Minivator.
2
3
Code:
A
Meaning:
Hinge open.
Self help action:
Contact your dealer or Minivator
.
Code:
8
Meaning:
Shows when toggle
switch is activated in
up/down direction.
Self help action:
N/A.
8
A
Code:
b
Meaning:
A switch is active at
power on i.e. T
oggle
Up, T
oggle Down, IR
Up, IR Down or Learn.
Self help action:
Contact your dealer or Minivator.
Code:
C
Meaning:
The IR address
(dip switch) does not
match
.
Self help action:
Contact your dealer or Minivator
.
C
16
C
ode:
d
M
eaning:
The main power relay
is welded closed.
Self help action:
Contact your dealer or Minivator.
Code:
E
Meaning:
The main power
relay did not close.
Self help action:
Contact your dealer or Minivator.
E
C
ode:
F
M
eaning:
Brake semi-conductor
failed.
Self help action:
Contact your dealer or Minivator.
f
Code:
g
Meaning:
Brake not connected.
Self help action:
Contact your dealer or Minivator.
Code:
H
Meaning:
The main power relay
has closed early.
Self help action:
Contact your dealer or Minivator.
H
Code:
L
Meaning:
Current limit
exceeded.
Self help action:
Contact your dealer or Minivator.
l
Code:
n
Meaning:
Half speed.
Self help action:
If permanently showing contact your
dealer or Minivator.
Code:
o
Meaning:
The main control
board has a memory
problem.
Self help action:
Contact your dealer or Minivator.
Code:
P
Meaning:
Powered swivel did
not respond.
Self help action:
Contact your dealer or Minivator.
P
Code:
r
Meaning:
No charge current.
Self help action:
Make sur
e that power supply is switched
on from mains. If it is contact your
dealer or Minivator
.
Code:
N/A
Meaning:
Over curr
ent.
Self help action:
Contact your dealer or Minivator
.
Code:
N/A
Meaning:
Lift is in "sleep
mode" to conserve
battery power.
Self help action:
Pr
ess toggle or handset button to wake
lift.
Code:
U
Meaning:
Faulty power supply.
Self help action:
Contact your dealer or Minivator
.
u
Code:
Y
Meaning:
The main control
board has a software
fault.
Self help action:
Contact your dealer or Minivator
.
NOTE: If the display is
showing anything but the
diagnostic codes listed it
r
equir
es r
esetting.
Drive the lift off the charge
contacts. Turn the main switch on
the unit off for 10 seconds and
then back on.
.8.
ENGLISH
 Loading...