PREPARATION
" Build solid framing to the dimensions in Figure 1.
" Ensure that the floor is level, correct if necessary.
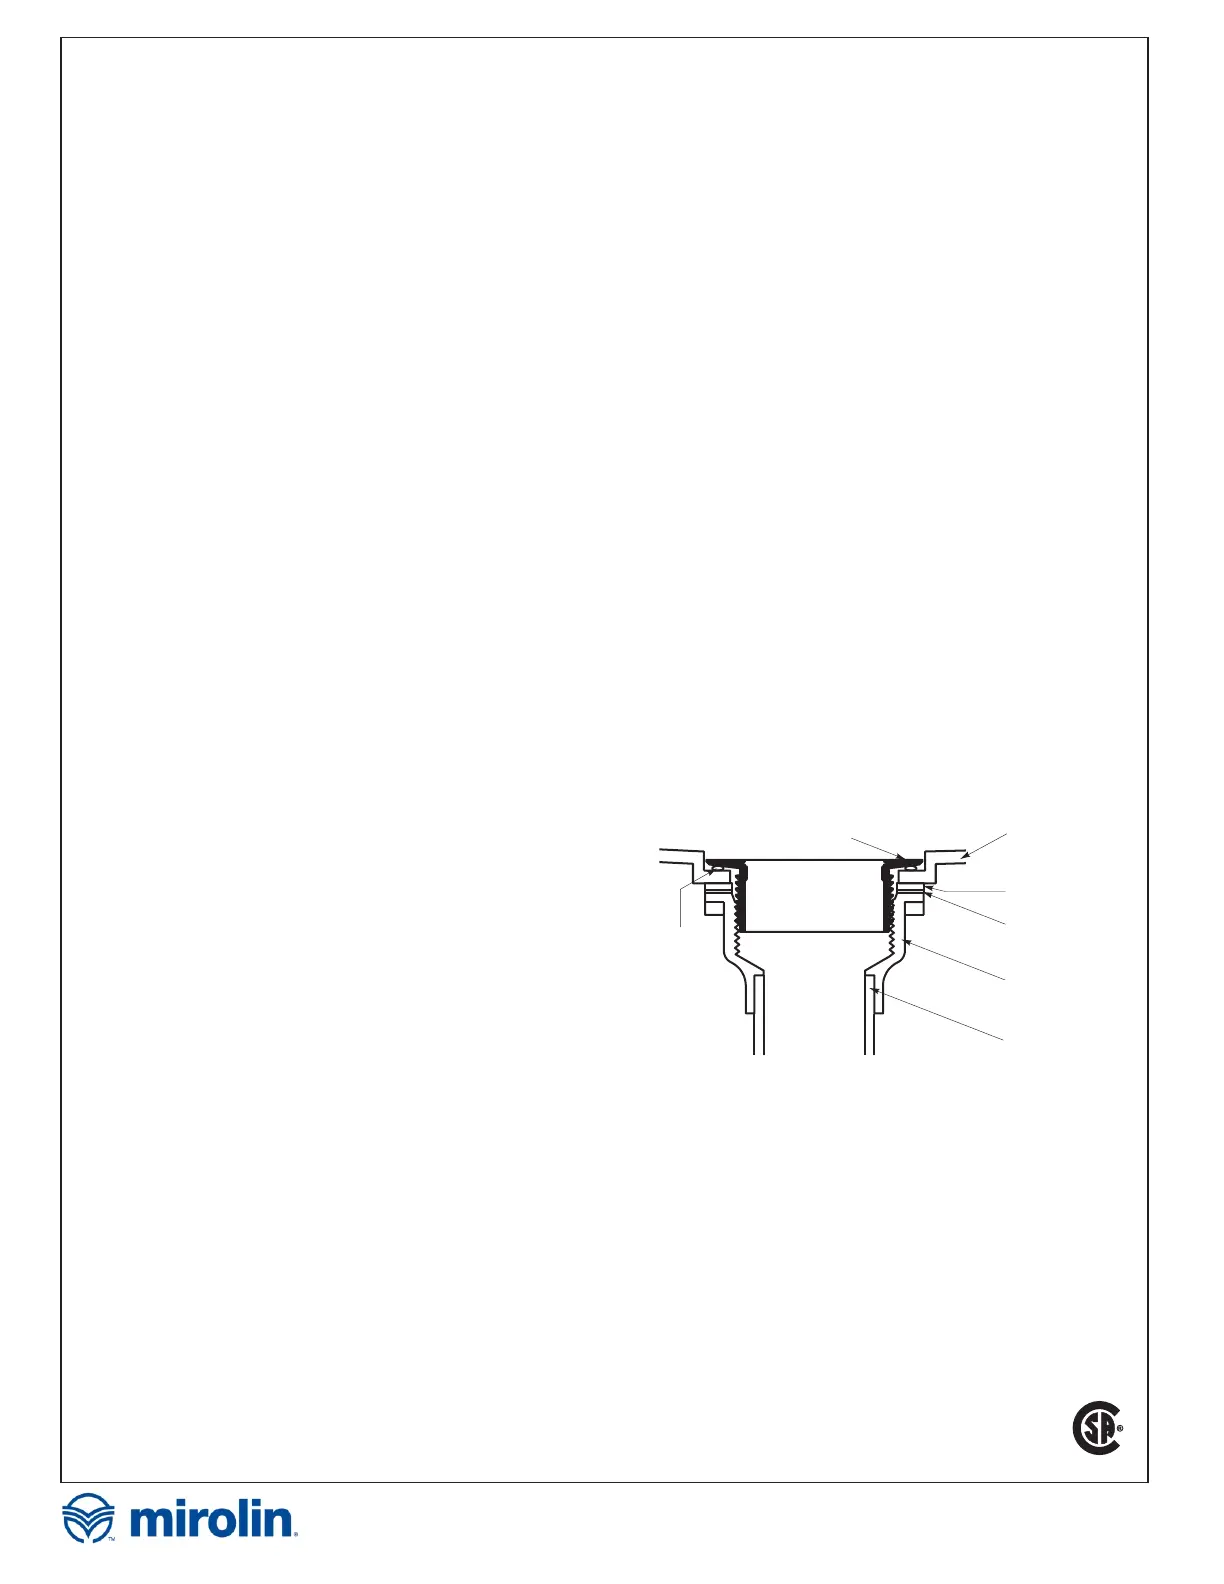
" Location of Mirolin supplied drain for shower stalls is
shown in Figure 1 & 2, to be assembled as in Figure 14.
" Drain pipe must be vertical.
" Trim drain pipe as required to meet drain assembly
" Place the unit into position and plumb vertical, shim if
necessary.
" Dry fit drain to check position.
" Mark and drill 1/4” pilot holes for plumbing fixtures.
" Verify that the holes are in the right location.
" From the finished side of the unit use the correct size
hole saw to cut the openings, using the pilot holes as
guides.
" Remove the unit and cement the drain body into place.
INSTALLATION
" Carefully position the shower into the framing and push
flush against the framework walls.
" Install the drain according to the manufacturer’s
instructions. Use a mildew resistant silicone bathroom
caulking to seal the drain to the top surface of the
shower.
" Fasten the acrylic unit to the framing using drywall
screws. Note that over tightening or burying the head of
the screw will cause the acrylic to crack.
" Apply silicone caulking over the head of the screws and
around the openings for the fittings when they are
installed.
" Finish with drywall as shown in Figure 4.
" After installation is complete, remove the protective film
from the front of the acrylic shower unit.
TESTING
Test the installation after completing the plumbing, but
before enclosing the bath and finishing the surroundings.
Run water for 15 minutes to ensure that there are no leaks
at the drain.
Mirolin Industries Corp. will not be liable for any kind of
damages as a result of not water testing the unit prior to use
by end user.
INSTALLATION CLEAN-UP
Remove construction dirt and residue with a mild liquid
detergent. DO NOT USE abrasive cleaners, scouring
compounds and pads, metal scrapers, steel wool, or other
materials that could damage or dull the surface of the bath.
Remove plaster carefully with a blunt wooden block
having rounded edges.
Remove paint and other stubborn stains with isopropyl
(rubbing) alcohol.
DO NOT USE products such as acetone (nail polish
remover), dry cleaning solution, lacquer thinners,
gasoline, pine oil, etc.
MAINTENANCE
The acrylic sheet, which forms the surface of your bathtub,
provides one of the most durable surfaces found in
modern bathrooms. Keep it bright and smooth with mild
liquid household detergent, soap and water, or foaming
cleansers. NEVER USE aromatic solvents, abrasive
cleaners, scouring compounds or pads, strong liquid
cleansers, or other material that could damage or dull the
surface of the shower.
Restoring Surface Gloss.- Restore surface gloss by
applying a very fine rubbing compound and polishing the
surface by hand or with a power buffer. Finish with an
application of a good quality automotive wax.
Minor Repairs to Surface.- Remove minor scratches and
scuffs as follows. First, wet sand the area with 600 grit wet
sandpaper until the surface is smooth. Then, restore the
gloss as described under RESTORING SURFACE
GLOSS.
Mirolin Industries Corp. is not responsible for any
damages incurred as a result of poor installation of the
product.
DRAIN NUT
SHOWER BASE
RUBBER
GASKET
CARDBOARD
GASKET
DRAIN
BODY
SILICONE
2” ABS
PIPE
FIGURE 14 - SHOWER DRAIN ASSEMBLY
3
R0084272
27 Feb.19
C
US
60 Shorncliffe Rd., Toronto, Ontario M8Z 5K1
Telephone: 416.231.9030 Fax: 416.231.0929
www.mirolin.com
Customer Service: 416.231.5790
Canada, U.S.A.: 800.MIROLIN(647-6546)
Fax, Canada: 800.463.2236
We want you to be completely satisfied with our products and service. If you have any comments or suggestions, please call
800.MIROLIN(647-6546) toll free.
The company reserves the right to change models and specifications without notice.


 To Next Page
 Loading...