MELSEC System Q
Programmable Controllers
Installation Manual for MES Interface
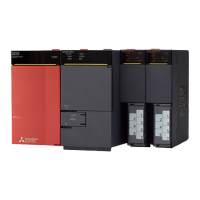
Module QJ71MES96
Art-no.: UK, Version A, 19032010
Safety Information
For qualified staff only
This manual is only intended forusebyproperly trained and qualifiedelectrical
technicians who are fully acquainted with automation technology safety stan
-
dards. All work with the hardware described, including system design, installa
-
tion, setup, maintenance, service and testing, may only be performed by
trained electrical technicians with approved qualifications who are fully
acquainted with the applicable automation technology safety standards and
regulations.
Proper use of equipment
The programmable controllers (PLC) of the MELSEC System Q are only
intended for the specific applications explicitly described in this manual or the
manuals listed below. Please take care to observe all the installation and oper
-
ating parameters specified in the manual. All products are designed, manufac
-
tured, tested and documented in agreement with the safety regulations. Any
modification of the hardware or software or disregarding of the safety warn-
ings givenin this manual or printed on the product can cause injury to persons
or damage to equipment or other property. Only accessories and peripherals
specifically approved by MITSUBISHI ELECTRIC may be used. Any other use or
application of the products is deemed to be improper.
Relevant safety regulations
All safety andaccidentprevention regulations relevant toyour specific applica-
tion must be observed in the system design, installation, setup, maintenance,
servicing and testing of these products.
In this manual special warnings that are important for the proper and safe use
of the products are clearly identified as follows:
Further Information
The following manuals contain further information about the module:
쎲
QJ71MES96 MES Interface Module User´s Manual
쎲
MELSEC System Q User´s Manual (Hardware)
쎲
MELSEC System Q Programming Manual, art. no 87431
These manuals are available free of charge through the internet
(www.mitsubishi-automation.com).
If you have any questions concerning the installation, configuration or opera
-
tion of the equipment described in this manual, please contact your relevant
sales office or department.
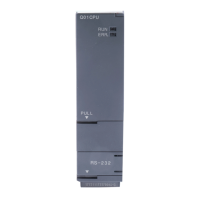
Names and Functions of Parts
쎲: LED ON, 쏆: LED flashing, 쑗: LED OFF
Installation and Wiring
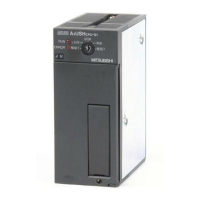
Connecting the backup battery
The QJ71MES96 is shipped with the battery connector disconnected. Before
using the module, connect the battery connector.
Mounting a module to a base unit
햴
Secure the module with an additional screw (M3 x 12) to the base unit if
large vibration is expected. This screw is not supplied with the module.
Installation of the CompactFlash쏐 card
The CompactFlash쏐 card can be installed with the power of the PLC switched
on.
햲
Open the LED cover on the front of the MES interface module.
햳
Remove the CompactFlash쏐 card slot cover.
햴
Install the CompactFlash쏐 card. Pay attention to the orientation of the
card. Push the CompactFlash쏐 card securely into the slot until it is flush
with the EJECT button.
햵 Close the LED cover.
When a CompactFlash쏐 card is installed, thecard slot covercannot be attached
to the MES interface module.Save the removedCompactFlash쏐 card slot cover
carefully.
Formatting the CompactFlash쏐 card
For the CompactFlash쏐 card format, use the formattingfunction of theconfigu-
ration tool MX MESInterface.
Do not format the CompactFlash쏐 card with Windows XP/2000.
E
CAUTION
쎲
Use the product in the environment within the general specifications
described in the Hardware Manual for the MELSEC System Q. Never
use the product in areas with dust,oily smoke, conductive dusts, cor
-
rosive or flammable gas, vibrationsorimpacts,orexposeittohigh
temperature, condensation, or wind and rain.
쎲
Whendrillingscrew holes or wiring, cutting chips orwirechipsshould
not enter ventilation slits. Suchan accident may cause ashort circuit.
Use the provided dust proof sheet to cover the ventilation port. Be
sure to remove this sheet from the PLC's ventilation port when the
installation work is completed to prevent overheating.
쎲
Fix the cable connected to the module so that the connector is not
directly stressed
.
P
E
P
DANGER
쎲
Turn off all phases of the powersupply for thePLC and other external
sources before starting the installation or wiring work.
MITSUBISHI
ELECTRIC
FACTORY AUTOMATION
Mitsubishi Electric Europe B.V. /// FA - European Business Group ///
Germany /// Tel.: +49(0)2102-4860 /// Fax: +49(0)2102-4861120 ///
www.mitsubishi-automation.com
With the LED cover open
Opened battery compartment
No.
Description
Status
LED
RUN
쎲
Normal operation
쑗
Watch dog timer error (Hardware error)
ERR.
쎲
Error (Operation of the module is
continued)
쏆
Error (Operation of the module is stopped)
쑗
No error
100M
쎲
Transmission speed 100 Mbps
쑗
Transmission speed 10 Mbps
SD/RD
쎲
Data being send or received
쑗
Data not being send or received
쐇 10BASE-T/100BASE-TX connector (RJ45 type modular jack)
쐋 CompactFlash쏐 memory card eject button
쐏 CompactFlash쏐 memory card slot
쐄 Memory card slot cover
쐂 Battery
쐆 Battery connector
E
CAUTION
쎲
Do not open or modify a module. Doing so can cause a failure, mal
-
function, injury or fire.
쎲
Always insert the module fixing latch of the module into the module
fixing hole of the base unit. Forcing the hook into the hole will dam
-
age the module connector and module.
쎲
Do not touch the conductive or electronic parts of a module directly.
Doing so can cause a unit malfunction or failure.
햲
After switching off the power supply,
insert the module fixing latch into the
module fixing hole of the base unit.
햳
Push the module in the direction of arrow
to load it into the base unit.
햲
Open the cover on the bottom of the MES
interface module.
햳
Make sure that the battery is installed cor
-
rectly.
햴
Connect the battery connector ("A" in the
left figure) to the matching connector in
the battery compartment. Make sure that
the connector is inserted in the retaining
clip in the battery compartment (left fig.
"B").
A
B
QJ71MES96
Battery
햲
햳
Pawl
CompactFlash쏐 card
Orientation of
memory card
Notch
Notch
햴