Before Use Operation Cleaning TroubleshootingCleaning
28
Water supply pipe
Tank holder
Water supply pipe
Tank holder
Packing
Aluminum
Pipe
Water supply
pipe
Tank
packing
Horizontally
Not to let
foreign
objects in
Clean the ice maker periodically to ensure that the ice is
pure and delicious.
Do not pour water into the tank
holder. Doing so may cause a
malfunction.
Rotate and remove the
aluminum pipe.
* White minerals or chlorine
accumulation may be adhered to
the parts, this is not abnormal.
Wash off such substances and
reuse the parts.
Push in the water supply
pipe fi rmly so that there is no
unevenness. Using the water
supply pipe while it is unevenly
set may cause a malfunction.
If the water supply pipe is not
installed, the food inside the
refrigerator compartment may freeze.
If the parts are not inserted
fi rmly or there are gaps due to
foreign objects, it may cause
abnormal noise or prevent
ice from forming. It may also
cause the water in the water
tank or food in the refrigerator
compartment to freeze.
* If mold forms easily in the certain types of water,
clean about 2 or 3 times a week.
When using bleach to clean the water tank and
lid, follow the product instructions.
* Do not use a dishwashing machine, because it may deform the parts.
Prevents formation of water scale and mold.
Align the mark on
the water tank cap
with the mark on the
lid, and remove it.
Mark
2
Open the door of the ice
making compartment and
unlock the ice tray lock lever.
When the ice tray lock lever is unlocked the display turns on.
If the buzzer sounds continuously after removing the ice
tray lock lever, close the door.
When
is blinking, perform the operation 2 after waiting
for the blinking to be fi nished.
Page 18
1
Set the ice making setting of the ice
making compartment to
.
6
Set the ice making setting of the ice making
compartment to
or .
Page 18
After washing the tray, dry off any moisture.
4
Empty the ice tray and wash it.
There is a risk of the water spilling.
Pull out the tray slowly.
3
Pull the ice tray
towards the front and
then remove it.
Lift slowly to
remove it
Easier to disassemble/
assemble when wetted
5
Push in the ice tray until it makes a clicking
sound, and then lock the ice tray lock lever.
Check that
is off.
If the lamp is on, check the setting status such as the position of the
ice tray lock lever and the up and down orientation of the ice try.
Ice tray lock lever is locked
Ice tray lock lever is released
Ice tray
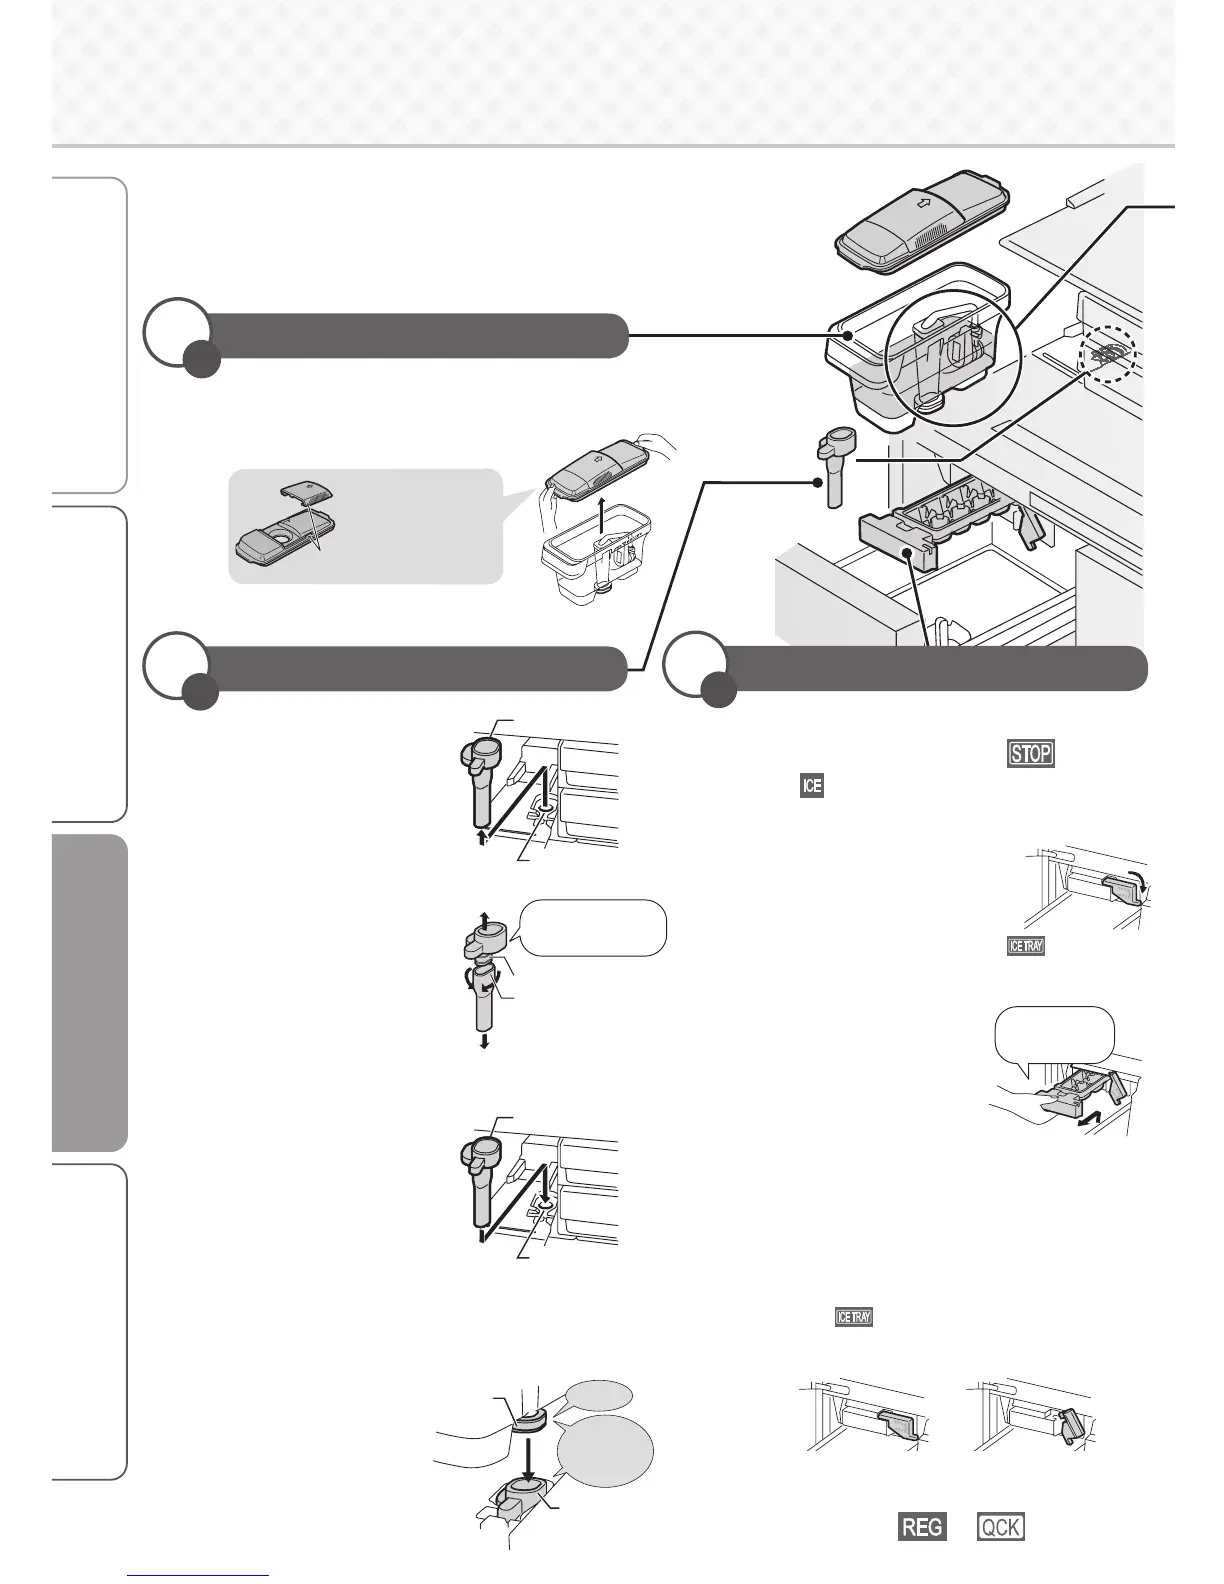
Water tank
Water supply pipe and tank holder
1
Remove the lid and wash it.
(Upper temperature limit about 60°C)
1
Pull out the water supply
pipe and wipe the tank
holder with a clean cloth.
2
Disassemble and
wash the parts.
3
Follow the procedure in reverse to
return the parts to their
original positions.
4
Check that there are no foreign objects
between the water supply pipe and the tank
packing or tank holder.
month
once a
year
1~2 times
a
week
once a
Cleaning the Automatic Ice
Maker
 Loading...