Eng-5
English
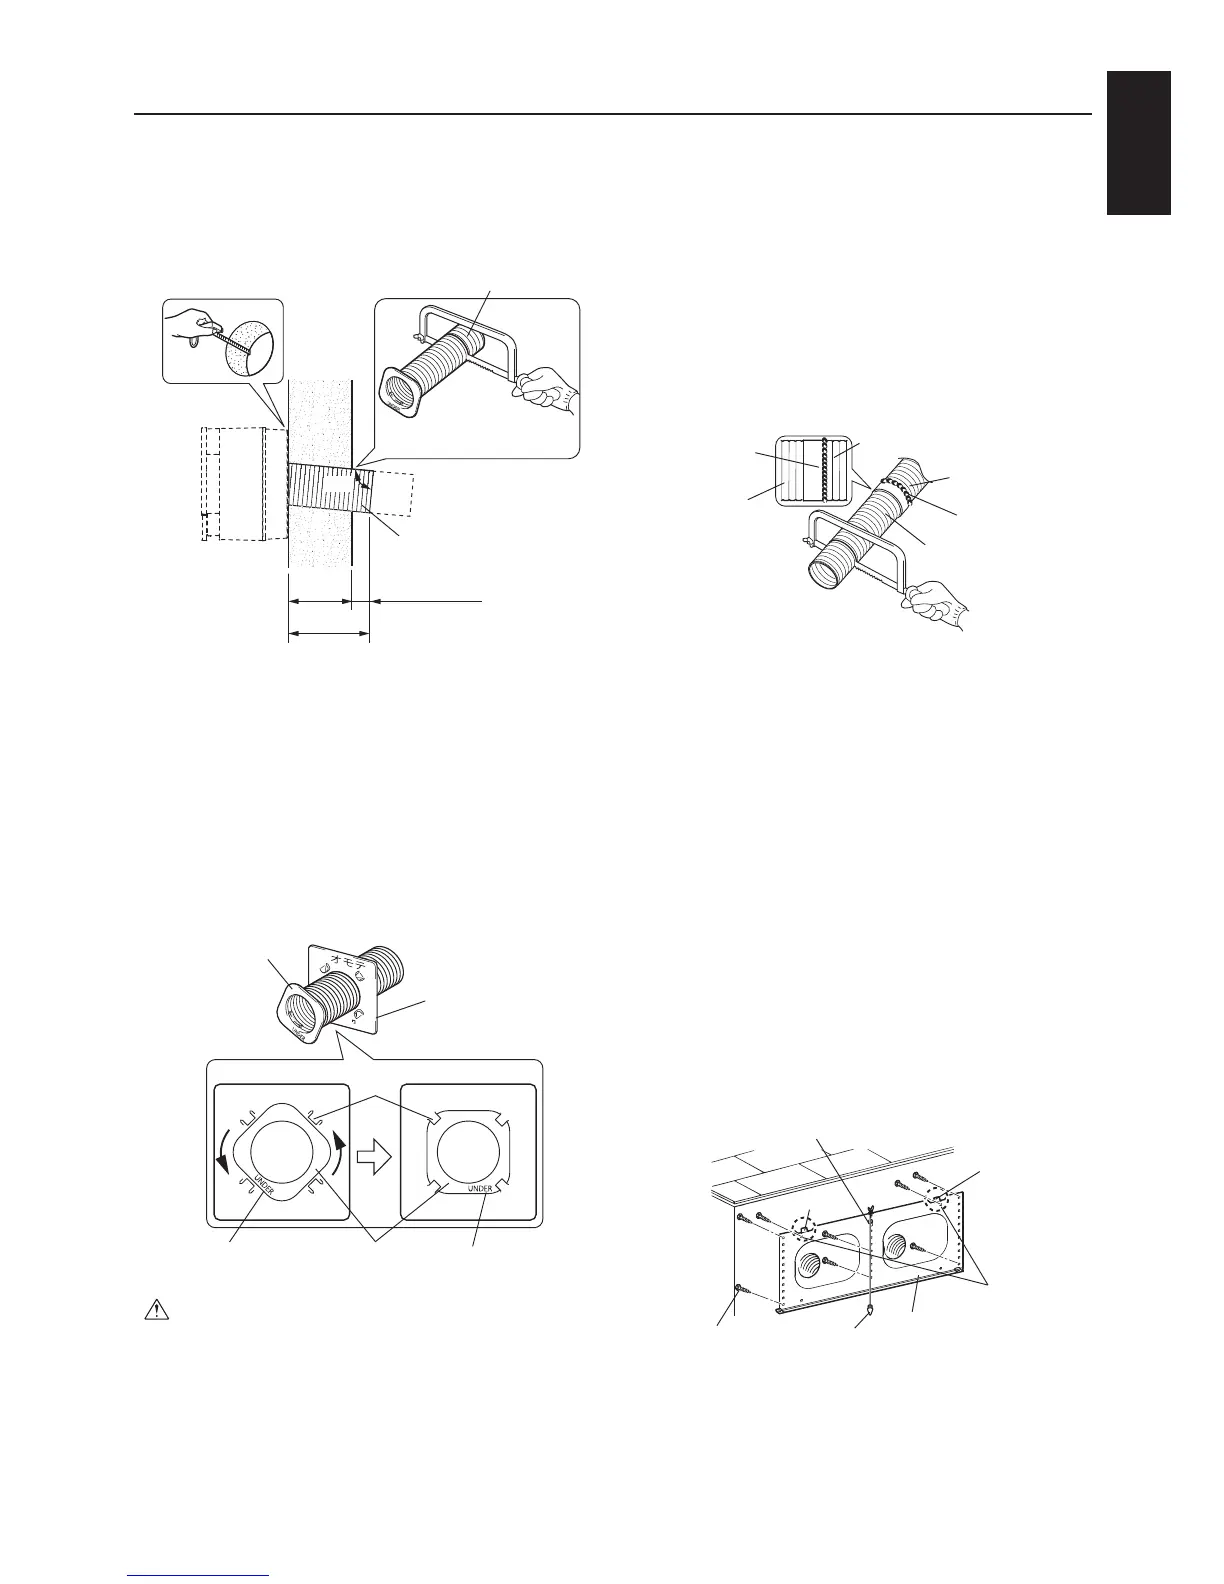
Note
Check that each air supply/exhaust pipe
A catches on all four prongs of its pipe
mounting plate. (If a prong has not caught,
the pipe will press against the back of
the Lossnay unit and the shutter may not
operate properly.)
,IWKHZDOOLVPRUHWKDQPPWKLFN
&XWDLUVXSSO\H[KDXVWSLSHV%LQNHHSLQJZLWK
WKHFXWWLQJGLPHQVLRQVRIVWHSZDOOWKLFNQHVV
WRPP
Note
Securely screw air supply/exhaust pipes A
and B together all the way.(If they are not
VFUHZHGWRJHWKHUWLJKWO\ZDWHULQ¿OWUDWLRQ
may occur.)
Caulk the connections between air supply/
exhaust pipes A and B as shown above.
Attaching the mounting plate
$WWDFKWKHPRXQWLQJSODWHWRWKHZDOO
provisionally using a single loosely attached
screw.
2) Hang a plumb bob to make sure that the
ORRVHO\DWWDFKHGPRXQWLQJSODWHLVKRUL]RQWDO
WRZLWKLQ
3) Attach eight wood screws at locations where
WKHZDOOFRQWDLQVUHLQIRUFLQJPDWHULDO
Note
Attach the two locations near the catches
underneath the catches.(See diagram above.)
To attach the plate to a concrete wall, use off-
the-shelf concrete screws.
Air supply/
H[KDXVWSLSH%
Air supply/exhaust
SLSH%
Air supply/
exhaust pipe A
Air supply/exhaust pipe A
Caulking
Caulking
Catch
Attach under
the catches
Mounting plate
Plumb bobWood screw
Wood screw (loosely attached screw)
Catch
Cutting air supply/exhaust pipes
0HDVXUHWKHZDOOWKLFNQHVV
,IWKHZDOOLVPRUHWKDQPPWKLFNXVH
WKHSURYLGHGDLUVXSSO\H[KDXVWSLSH%6HH
SDJHVHFWLRQIRUPRXQWLQJLQVWUXFWLRQV
2) Cut air supply/exhaust pipes A perpendicular
to the pipe axis at the length shown in the
¿JXUHDERYH
,IWKHSLSHLVORQJHUWKDQLWLVVKRZQWKH
ZHDWKHUFRYHUZLOOQRW¿W
3) Prepare the air supply/exhaust pipes.
Insert each air supply/exhaust pipe A
into a pipe mounting plate and rotate it
FRXQWHUFORFNZLVHXQWLOWKHIRXUSURQJVFDWFK
Caution
Mount air supply/exhaust pipes A so that
the UNDER mark is at the bottom. After
mounting the pipes, check that they slope
downward as they go outside. (If they do
QRWUDLQZDWHUPD\LQ¿OWUDWHWKHZDOODQGWKH
shutter may not operate properly.)
Cut perpendicular to the
pipe
Wall
thickness
OutsideInside
'LPHQVLRQDWWRSRISLSH
Cut length
Air supply/
exhaust pipe A
Cut on this side
WRPP
Air supply/exhaust
pipe A
Pipe mounting
plate
%HIRUHVHWWLQJLQSODFH
81'(5PDUN 81'(5PDUN
$IWHUVHWWLQJLQSODFH
Prong
Air supply/exhaust
pipe A
 Loading...