1
Date of publication: May 1, 2023
Printed in Japan
Mitutoyo Corporation 20-1, Sakado 1-Chome, Takatsu-ku, Kawasaki-shi, Kanagawa
213-8533, Japan
■
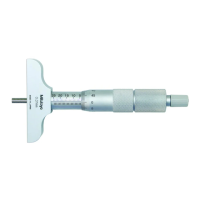
129Series
DMC
⑩
⑥
⑦
⑪
①
Spindle
②
Base
③
Sleeve
④
Thimble
⑤
Ratchet stop
⑥
Spindle clamp
⑦
Key wrench
⑧
Rod
⑨
Thimble cap
⑩
Hex wrench
⑪
Wrench
2. PrecautionsforUse
■
Parallax
• Because of the structure of the product, the reference line surface on
the sleeve and the graduation line surface on the thimble are not on
the same plane, so the point where the two lines meet will deviate
depending on the position of your eyes. When reading measured
values, do so with reference to the gure at right, perpendicular from
the point where the reference line on the sleeve is aligned with the
graduation line on the thimble.
• If looking from a different direction (as in the gure at right), there will
be a parallax of approximately 2 μm.
■
MeasuringForce
• Use the ratchet stop to ensure consistent measuring force.
• The appropriate measuring force is about three to ve turns of the ratchet
stop with ngers after the measuring surface lightly contacts the
workpiece. Note that excessive measuring force may cause measurement
error.
■
PrecautionsandCleaningafterUse
• After use, check each part for damage and clean the entire spindle, rod, and base with a soft lint-free cloth.
• When oil, cutting uid, or liquid itself is adhered, or when very dirty, clean with a soft lint-free cloth impregnated with a
volatile solvent (cleaning alcohol, etc.).
• After use, apply anti-rust treatment to the spindle, rod, and base using Micrometer Oil (Part No. 207000).
• If using in places exposed to water-based cutting uid, always apply anti-rust treatment after cleaning.
• If Micrometer Oil is unavailable and the only option is a commercial product, we recommend low-viscosity anti-rust oil
of ISO VG10 or so.
3. ReferencePointSetting
Important
• Be sure to follow the procedure below to conrm and adjust the reference point prior to measuring.
• Reference point setting for this product should be performed on a at surface such as a precision surface plate.
• When setting the reference point for this product, make sure to use a calibrated gage (gauge block, etc.).
• Remove any dirt or oil from the measuring surfaces of the gages and product prior to setting the reference point.
• Use the same orientation and conditions when measuring and setting the reference point.
• When setting the reference point, press the base rmly against the reference surface as shown in the gure below.
■
ReferencePointConrmation
1
Remove any dirt or dust from the measuring surfaces of the gages and the product.
2
Rotate the thimble and bring the measuring surface gently into contact with the precision surface plate.
3
Apply the prescribed measuring force by turning the ratchet stop three to ve times.
4
Read the scale, and if the reading does not match the zero point or the gage dimensions, adjust the reference point
in accordance with the following procedure.
■
ReferencePointAdjustment
●
128Series
• If the reference point difference is ±0.01 mm or less
1
With the reference point conrmed, x the spindle with the spindle clamp.
2
Insert the supplied key wrench into the hole on the rear of the reference line on the sleeve, and then rotate the
sleeve until the reference line is aligned with the zero graduation line on the thimble.
• If the reference point difference is approximately ±0.01 mm or more
1
With the reference point conrmed, x the spindle with the spindle
clamp.
2
While holding the thimble in place with your ngers to prevent it
from turning, insert the supplied key wrench into the hole on the
side of the ratchet stop and loosen the ratchet stop.
3
Rotate the thimble while pushing it toward the ratchet stop and
align the thimble's gradations with the sleeve's reference line.
4
Tighten the ratchet stop with the key wrench while gently pushing
the thimble in the direction of the sleeve, being careful not to allow
the thimble to rotate.
5
Loosen the spindle clamp.
SafetyPrecautions
To ensure operator safety, use this product according to the directions, functions and specications given in this
User's Manual. Use under other conditions may compromise safety.
Always handle the sharp parts of this product such as measuring faces with care to avoid injury.
• Do not use this product for purposes other than measurement.
• Do not disassemble or modify. Doing so will void the warranty.
• Do not use or store the product in a place with sudden temperature changes. Adapt the product to
ambient temperature before use.
• Do not store the product in a place with high humidity or a lot of dust.
• Do not use the product in a place where it may contact water, etc.
• Apply anti-rust treatment after use if the product is used in a place where it is directly exposed to
splashes of coolant, etc. Rust may cause malfunction.
• Do not apply excessive force or subject to sudden impacts such as dropping.
• Remove dust, cutting chips, etc. and apply anti-rust oil after use.
• Remove any dirt on the product by wiping gently with a soft non-linty cloth. Do not use organic solvents
such as cleaning agents or thinner.
• Do not write numbers, etc. with an electric pen.
DepthMicrometer
User's Manual
No.99MAA024A
Contents
1. Names of Components ........................................................................................... Page 1
2. Precautions for Use................................................................................................. Page 1
3. Reference Point Setting .......................................................................................... Page 1
4. Changing the Measurement Range ........................................................................ Page 2
5. How to Read Graduations ....................................................................................... Page 2
6. Specications .......................................................................................................... Page 2
7. Paid Maintenance ................................................................................................... Page 2
1. NamesofComponents
■
128Series
DMS
⑦
NG
OK
NG
Reference line
Sleeve
Thimble
For 0 to 25 mm measurement range
For measurement range greater than 25 mm
2
Thimble
Ratchet stop
Key wrench
Rotate about three to ve times
Base
Reference surface
Precision surface plate
en