Do you have a question about the MJX Bugs 16 pro and is the answer not in the manual?
Steps to prepare the aircraft, including gimbal lock removal, arm unfolding, and battery installation.
Instructions for installing batteries in the transmitter and important battery warnings.
Steps for initiating one-key takeoff and landing, and exiting the mode.
Procedure for activating the one-key return home function and how to exit it.
Information on one-key return, low power return, and out-of-control return home functions.
Specifications for Bugs 16 and Bugs 16 pro batteries, including charging methods.
Important safety guidelines for charging, handling, and storing the aircraft battery.
Instructions for downloading, installing, and connecting the M RC PRO app to the aircraft.
Essential pre-flight checks for the transmitter, aircraft, battery, propellers, and accessories.
Procedure for matching signals and performing gyro/geomagnetic calibration for stable flight.
Steps to unlock/lock aircraft, emergency stop, operate controls, and basic flight maneuvers.
Guidance on maintaining safe distances from obstacles, people, and protecting from humidity.
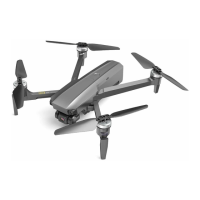
The Bugs 16/Bugs 16 pro is a sophisticated drone equipped with an optical flow system and GPS, enabling stable indoor and outdoor flight. It offers automatic return home functionality and intelligent flight modes such as Orbit Flight, Follow-Me, and Waypoint Flight. The drone is capable of shooting 4K HD video with a highly precise 3-axis anti-shake gimbal. Its transmitter features functional buttons for various operations and camera settings. Through the accompanying M RC PRO APP, users can access real-time HD images and flight parameters. The folding design of the transmitter enhances user experience, and its pull-out phone holder is designed for easy portability and storage. The gimbal allows for adjustment of the camera shooting angle during flight. The maximum flying speed of the Bugs 16/Bugs 16 pro is 40km/h.
To prepare the aircraft, first disassemble the gimbal protection lock by pulling out the protective cover of the gimbal camera. Next, unfold the aircraft arms, which are in a folded state during shipping. Finally, insert a fully charged battery into the battery holder, ensuring it is installed correctly to prevent power failure. For the transmitter, open the battery box and insert two AA batteries according to the polarity, then close the box. Non-chargeable AA batteries or AA chargeable batteries can be used (purchased separately). Always observe polarity during installation. Non-chargeable batteries cannot be charged; only use recommended battery types. Remove chargeable batteries before charging. Do not mix old and new batteries or different types. Remove exhausted batteries promptly and dispose of them properly. If the transmitter will not be used for a long time, remove the batteries to prevent leakage.
The Bugs 16 and Bugs 16 pro use different battery types, so ensure you use the corresponding adapter for charging. For Bugs 16 (USB to Type C charging cable): Charge the battery fully using the officially supplied USB charging cable. Charging time is approximately 5.5 hours with a 5V 2A adapter. During charging, the battery indicator light will flash in turns; once fully charged, it will stay on. For Bugs 16 pro (PD Fast charging cable): This applies only to Bugs 16 pro batteries. Charge the battery fully using the officially supplied USB charging cable. Charging time is approximately 70 minutes with a 45W Up PD charger. During charging, the battery indicator light will flash in turns; once fully charged, it will stay on. Always charge the battery under adult supervision, away from flammable materials. Do not short-circuit or squeeze the battery, and avoid high temperatures. Regularly check the charger for damage.
To assemble propellers, select the corresponding A and B propellers and use a screwdriver to fix them with two screws clockwise. Ensure the holes align. To disassemble, turn the screwdriver anti-clockwise, remove the two screws, and pull out the propellers. Ensure clockwise and anti-clockwise propellers are installed correctly. Be careful during installation to avoid scratches. Use only official propellers, which are consumable and can be purchased separately if needed.
The drone supports GPS mode for precise hovering, requiring a GPS signal strength of at least 7 satellites. If the GPS signal is weak, the aircraft will enter Fix-Altitude Mode or Optical Flow Position mode. In such cases, land immediately in a safe area. The Optical Flow Position mode is activated automatically if GPS is unavailable or turned off, providing stable hovering up to 3 meters in height. The drone features an automatic return home function, which includes one-key return, low power return, and out-of-control return. The aircraft records its home point when the GPS signal first reaches 7 satellites.
The 3-axis gimbal provides a stable platform for the camera, allowing for stable images even during high-speed flight. The camera angle can be adjusted from -90° to 0° using the transmitter handwheel or through the M RC PRO APP camera interface. Always place the aircraft on a flat, open ground before takeoff and avoid touching the gimbal after power-on. The gimbal contains precision parts; avoid physical damage, keep it clean, and prevent contact with objects like sand or rocks. Do not add any objects to the gimbal camera, as this may affect performance or cause motor damage. Remove the gimbal protection lock before use and re-assemble it for storage or transportation. If flying in heavy fog or clouds, condensation may affect the gimbal; dry it thoroughly if this occurs.
Long-press the power button for 3 seconds to turn on the aircraft, accompanied by a power-on sound and steady indicator light. Long-press again for 3 seconds to turn off the aircraft and lights.
The transmitter includes a flight mode switch (GPS mode, Fix altitude mode), a status display screen showing headless mode, aircraft battery, flying distance, transmitter signal, transmitter battery, photo/video status, fast/slow speed, satellites number, flight height, GPS mode, and joystick mode. The gimbal control handwheel allows adjustment of the camera shooting angle.
The transmitter supports different joystick modes (Mode 1 and Mode 2, with Mode 2 as default). To switch modes, press the unlock button while turning on the transmitter to enter signal matching status, then long press the designated button for 3 seconds. The current mode will display on the LCD screen.
Pull up the phone holder completely, rotate it up 30°, rotate and fix the support board, then adjust the phone fixing components to fit your phone size.
Download the M RC PRO APP from the App Store (iOS) or Google Play (Android) by searching or scanning the QR code. To connect, enable Wi-Fi on your mobile phone, find "Drone4G_*******" in the Wi-Fi list, and connect. Once "Connected" appears, open the APP.
Perform a pre-flight inspection, select the appropriate gimbal camera angle, fly in good weather without wind, conduct a test flight to plan routes and views, and push joysticks slowly for smooth flight.
The drone is a precision device, not a toy. Proper installation and operation are crucial to avoid accidents. It is suitable for users aged 14+ with model aircraft experience. Contact support for issues. Keep small parts away from children.
| Model | MJX Bugs 16 Pro |
|---|---|
| Max Speed | 40 km/h |
| Max Flight Time | 28 minutes |
| Camera Resolution | 4K |
| GPS | Yes |
| Gimbal | 3-Axis Mechanical Gimbal |
| Follow Me Mode | Yes |
| Return to Home | Yes |
| Headless Mode | Yes |
| One Key Takeoff/Landing | Yes |
| Altitude Hold | Yes |
| Folding Design | Yes |
| Category | Drone |
| Image Sensor | 1/3" CMOS |
| Video Resolution | 4K@30fps, 1080P@60fps |
| Battery Capacity | 3400 mAh |