EasyManua.ls Logo

MJX Bugs 3 Pro - User Manual

MJX Bugs 3 Pro
21 pages
Print Icon
To Next Page IconTo Next Page
Loading...
—11r
Wiar
(Camera not included)
MP'
A
V
I
7C-1
•••
One-key return
Brushless motor
Independent ESC
2. 4 G Hz
y
CETI4151:HILY1
'
CO
Ca:h...1
(./95 LE
Pro
l!g
Bugs Series Brushless Drone with GPS
User Manual
GPS
GPS Positioning
—11r
Wiar
(Camera not included)
MP'
A
V
I
7C-1
•••
One-key return
Brushless motor
Independent ESC
2. 4 G Hz
y
CETI4151:HILY1
'
CO
Ca:h...1
(./95 LE
Pro
l!g
Bugs Series Brushless Drone with GPS
User Manual
GPS
GPS Positioning
Question and Answer IconNeed help?

Do you have a question about the MJX Bugs 3 Pro and is the answer not in the manual?

Summary

Safety and Initial Statements

Important Statement

Key statements and disclaimers regarding the aircraft's nature and user responsibility.

Flight Safety Guidelines

Essential rules for safe operation, emphasizing hazards and environmental conditions.

Product Profile and Specifications

Product Configuration

Lists all items included in the aircraft package and their quantities.

Aircraft Technical Parameters

Details specifications like dimensions, weight, battery, motor, and flying time.

Product Assembly Guide

Propeller Installation and Removal

Step-by-step instructions for propeller installation and removal, including safety tips.

High Landing Gear Installation

Guide for attaching the high landing gear to the aircraft body securely.

Battery Handling

Battery Removal Procedure

Procedure for safely detaching the aircraft's battery using the designated release mechanism.

Battery Charging Instructions

Detailed steps for connecting the charger and battery, including charging time and indicators.

Camera and Mount Installation

Camera Mounting Procedure

Steps to install a camera onto the mount and attach it to the aircraft, using EVA pads.

Aircraft Component Identification

Major Aircraft Parts Diagram

Diagram labeling key components of the aircraft for user reference.

Remote Controller Overview

Remote Controller Parts

Identification of buttons, sticks, and indicators on the remote controller.

LCD Screen Information

Explanation of various icons and data displayed on the remote controller's LCD screen.

Remote Controller Setup

Remote Controller Battery Installation

Instructions for inserting AA batteries into the remote controller correctly.

Aircraft-Controller Signal Connection

Steps for pairing the aircraft with the remote controller for flight.

Throttle Mode Switching

How to Change Throttle Mode

Guide on switching between different control stick modes (Mode 1 and Mode 2).

Controller Status and Calibration

Control Stick Calibration Procedure

Procedure to recalibrate the control sticks if they are not functioning correctly.

Controller Status Indicators

Table explaining meanings of different remote controller indicator lights and sounds.

Aircraft Status and Initialization

Aircraft Status Indicators

Meanings of various front and rear light patterns for aircraft status.

Aircraft Initialization Detection

Process the aircraft undergoes after signal connection to prepare for flight.

Aircraft Compass Calibration

Horizontal Calibration Steps

Steps for performing horizontal compass calibration after initialization.

Vertical Calibration Steps

Steps for performing vertical compass calibration after horizontal calibration.

Aircraft Calibration and Control

Gyroscope Calibration

Procedure for calibrating the aircraft's gyroscope for stable flight.

Locking and Unlocking the Aircraft

Methods for securing and releasing the aircraft's motors before and after flight.

Aircraft Operation Modes

One-Key Takeoff and Landing

Automated takeoff and landing function initiated by a single button press.

Gesture Mode Flight

Flight mode using hand gestures for control, relying on barometer for altitude.

GPS Mode Flight

Flight mode utilizing GPS for precise positioning and stable hovering.

Headless Mode Flight

Flight mode where the aircraft's direction is relative to the controller, simplifying orientation.

Return-To-Home (RTH) Function

Automated flight back to the recorded Home Point under various conditions.

Failsafe Return-to-Home

Automatic return triggered by loss of remote controller signal.

Low Voltage Return-to-Home

Automatic return or landing due to critically low battery levels.

Photo and Video Capture

Instructions for taking photos and recording videos using the aircraft's camera.

Flight Preparation and Steps

Pre-Flight Checklist

Pre-flight checklist ensuring aircraft and controller are ready for operation.

Basic Flight Operation Steps

Sequential guide for connecting, calibrating, unlocking, flying, and landing the aircraft.

Product Components and Troubleshooting

Basic Product Components

Illustrated list of fundamental aircraft components and their part numbers.

Optional Accessories

List of additional accessories available for purchase to enhance aircraft functionality.

Troubleshooting Common Issues

Common flight issues, their phenomena, and recommended solutions.

Overview

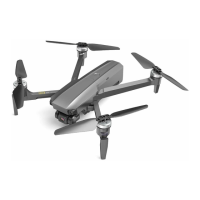
The MJX Bugs 3 Pro is a hobby-grade brushless drone designed for pilots aged 14 and above with skilled flying experience. It is part of the Bugs Series and features GPS capabilities, enabling intelligent flight modes and precise positioning. The drone is not a toy and requires proper assembly and operation to ensure safe flight and prevent injury or property damage. Users are responsible for operating the aircraft correctly, and the manufacturer and dealers disclaim responsibility for damages caused by misuse. Small accessories should be kept away from children to avoid accidents.

Function Description

The Bugs 3 Pro is equipped with a brushless motor (2204 1500KV) and an independent ESC (Electronic Speed Controller) with stuck and high-temperature protection, ensuring stable and powerful flight performance. It utilizes a 2.4GHz two-way communication system, which includes weak signal and low voltage alarms to enhance flight safety. The drone's GPS module allows for accurate positioning and hovering, making it suitable for various intelligent flight modes.

Key functions include:

  • GPS Positioning: The drone can precisely position itself and hover with the assistance of the GPS module. This is crucial for intelligent flight modes and stable flight.
  • One-key Return (RTH): This feature allows the aircraft to automatically fly back to its last recorded Home Point. There are three types of RTH procedures: Smart RTH, Failsafe RTH, and Low Battery RTH.
    • Smart RTH: If GPS signal is available (more than 7 satellites) and the Home Point is recorded, pressing the RTH button will make the aircraft fly back. During Smart RTH, pilots can still guide the aircraft around obstacles and can exit RTH to regain control.
    • Failsafe RTH: Triggered if the remote controller signal is lost for more than 6 seconds, provided GPS signal is available and a Home Point is recorded. The aircraft will automatically return to the Home Point. Obstacle avoidance is not active during Failsafe RTH. If there's no GPS signal and the remote controller signal is lost, the aircraft will descend slowly and land.
    • Low Voltage RTH: Activated when the aircraft's battery reaches a low voltage level. If the flying altitude is over 100 meters or the flying distance is over 300 meters, the aircraft will automatically return to the Home Point. If the altitude or distance is less than 15 meters, it will land on the spot. During Low Voltage RTH, pilots cannot regain control by pressing the RTH button.
  • One-key Takeoff/Landing: After unlocking the aircraft, a short press of the designated button will make the drone automatically take off and hover at 1.5m altitude. When flying, another short press will initiate an automatic landing.
  • Headless Mode: In this mode, the aircraft's orientation is relative to the pilot's position at takeoff, eliminating the need to worry about the drone's front direction during flight.
  • Gesture Mode: This mode does not use GPS for positioning and relies solely on the barometer for altitude maintenance. It requires good piloting skills as it does not offer precise positioning and hovering.
  • Photo/Video Functionality: When equipped with an optional camera and TF card, the drone can capture photos and videos using a dedicated button on the remote controller. A short press takes a photo, while a long press starts video recording.

Usage Features

The Bugs 3 Pro is designed with user convenience and safety in mind, offering several features that enhance the flying experience:

  • Propeller Installation: Propellers A and B must be installed on their corresponding motor shafts and tightened according to the "lock" direction. A propeller changing tool is provided for easy attachment and detachment. Incorrect propeller installation will prevent normal flight.
  • High Landing Gear Installation: The high landing gear plugs into sockets at the bottom of the aircraft and is secured with screws, providing stable support for takeoff and landing.
  • Battery Installation and Removal: The battery slides into a compartment at the rear of the aircraft. It should be installed firmly to prevent power-cut related crashes. Removal involves pressing an elastic buckle and pulling backward.
  • Battery Charging: The drone's battery is charged using a power adapter, balance charger, and charging converter. The charging process is indicated by LED lights: flashing green and solid red during charging, and solid green and red when fully charged.
  • Remote Controller Battery Installation: The remote controller requires 4*AA batteries, installed according to polarity.
  • Signal Connection: The aircraft and remote controller connect automatically after powering on. A long beep sound and a solid indicator light on the remote controller confirm a successful connection.
  • Throttle Mode Switch: The remote controller supports left-hand and right-hand throttle modes, allowing users to choose based on their preference. The default mode is mode 2. The throttle mode can be changed while the remote controller is in signal connection status.
  • Remote Controller Control Stick Calibration: This procedure ensures the control sticks function normally. It involves a sequence of button presses and stick rotations to calibrate the gyroscope. This is typically done at the factory but can be repeated if control sticks are not working correctly. It's important not to power on the aircraft during this calibration.
  • Aircraft Initialization Detection: After signal connection, the aircraft performs an initialization detection, indicated by flashing red, green, and yellow lights. The aircraft must be on a flat surface during this 8-second process.
  • Compass Calibration: This is a two-step process (horizontal and vertical calibration) that must be performed before every flight, especially if the battery is changed or reinstalled. It involves rotating the aircraft 360 degrees horizontally and then vertically until the lights indicate successful calibration. It's crucial to perform this in an open area with good GPS signal (over 7 satellites) and away from strong magnetic fields or metal objects.
  • Gyroscope Calibration: This calibration is usually done at the factory. It's only necessary if the aircraft cannot exit the initialization detection procedure. The aircraft must be on a horizontal surface for accurate calibration.
  • Lock and Unlock Aircraft: The aircraft can be unlocked by a short press of the red button or by pushing both sticks to specific corners. It can be locked by a long press of the red button or by pulling the throttle stick down for 3 seconds after landing. Locking the aircraft during flight will cause it to crash.
  • Optional Camera and Mount: The drone supports MJX original 5G WIFI cameras, which, when paired with the "Bugs Go" APP on a mobile device, enable intelligent flight modes like Follow Me, Point of Interest, and Waypoint flight. The camera mount includes EVA pads to secure the camera.

Maintenance Features

Proper maintenance ensures the longevity and safe operation of the Bugs 3 Pro:

  • Dry Environment: The aircraft contains sophisticated electronic and mechanical components, so it should be kept in a dry environment to prevent damage. A clean cloth should be used to wipe its surface.
  • Heat Source Avoidance: The drone is made of various materials that can deform or be damaged by sun exposure and high temperatures, so it should be kept away from heat sources.
  • Regular Examination of Charging Line: The charging line should be regularly checked for potential hazards such as damage to the cable, cord, plug, enclosure, or other parts. If damage is found, the product should not be used until the damage is properly repaired.
  • Propeller Replacement: If the rotor propellers are out of shape, they should be replaced to ensure stable flight.
  • Battery Management:
    • Only batteries of the same or equivalent type as recommended should be used.
    • Batteries should be inserted with correct polarity.
    • Non-rechargeable batteries should not be charged.
    • Old and new batteries should not be mixed, nor should alkaline, standard (carbon-zinc), or rechargeable (nickel-cadmium) batteries.
    • Rechargeable batteries must be removed from the aircraft before charging and should only be charged under adult supervision.
    • Exhausted batteries should be removed from the aircraft.
    • Supply terminals should not be short-circuited.
  • Environmental Protection: To protect the environment, the aircraft should be recycled according to local laws and regulations.

MJX Bugs 3 Pro Specifications

General IconGeneral
BrandMJX
ModelBugs 3 Pro
TypeQuadcopter
GPSYes
Max. Ascent Speed5 m/s
Max. Descent Speed3 m/s
Max Speed40 km/h
Operating Frequency2.4 GHz
GimbalNo
Control Range500 meters
Battery2800mAh LiPo
MotorBrushless
Charging Time120 minutes
Transmitter Battery4 x AA (not included)
FPV Distance500 meters
CameraHD 1080P

Related product manuals