EasyManua.ls Logo

Moen T2741 User Manual

Moen T2741
6 pages
To Next Page IconTo Next Page
Page #1 background imageLoading...
Page #1 background image
Please Contact Moen First
For Installation Help, Missing or
Replacement Parts
(USA)
1-800-BUY-MOEN (1-800-289-6636)
Mon - Fri 8:00 AM to 7:00 PM, Eastern
Sat. 9:00 AM to 3:00 PM Eastern
WWW.MOEN.COM
(Canada)
1-800-465-6130
Mon - Fri 7:30 AM to 7:00 PM, Eastern
WWW.MOEN.CA
Shower heads:
Standard 9.5 L/min (2.5 gpm) max. and High Eciency 7.6 L/min (2.0
gpm) max. or less
For use with automatic compensating valves rated at 4.2 L/min (1.1
gpm) or less
Por favor, contáctese primero con Moen
Para obtener ayuda de instalación, piezas
faltantes o de recambio
01-800-718-4345
Lunes a viernes de 8:00 a 20:00 hs.
(Costa Este)
Sáb. 8:00 a 18:30 hs. (Costa Este)
WWW.MOEN.COM.MX
Roseta:
Estándar 9.5 L/min (2.5 gpm) máx. y alta eciencia 7.6 L/min (2.0 gpm)
máx. o menos
Para usarse con válvulas de compensación automática de 4.2 L/min
(1.1 gpm) o menos
Veuillez d’abord contacter Moen
En cas de problèmes avec l’installation, ou pour obtenir toute pièce
manquante ou de rechange
1-800-465-6130
Du lundi au vendredi :
de 7 h 30 à 19 h, HE
WWW.MOEN.CA
Pommes de douche :
Débit standard de 9,5 L/min (2,5 gpm) max. ou à haute ecacité
7,6 L/min (2,0 gpm) max. ou moins
À utiliser avec des soupapes de compensation automatiques dont le
débit nominal est de 4,2 L/min (1,1 gpm) ou moins
Installation Guide
Guía de Instalación
Guide d’installation
HELPFUL TOOLS
For safety and ease of faucet replacement, Moen
recommends the use of these helpful tools.
HERRAMIENTAS ÚTILES
Para que el cambio de la llave sea fácil y seguro,
Moen le recomienda usar estas útiles herramientas.
OUTILS UTILES
Par mesure de sécurité et pour faciliter l’installation,
Moen suggère l’utilisation des outils suivants.
INS1186F - 7/15
ONE-HANDLE TUB/SHOWER TRIM
MONOMANDO TERMINACIÓN
PARATINA/REGADERA
GARNITURE DE DOUCHE/
BAIGNOIREÀUNE POIGNÉE
Style varies by model
El estilo varía por el modelo
Le modèle varie par le modèle
Thread seal tape
Cinta para sellar roscas
Ruban pour joints letés
5/32 Hex
Llave Hexagonal
Clé Hexagonale
7/64 Hex
Llave Hexagonal
Clé Hexagonale
T2801
T2802
T2803
T2131
T2132
T2133
T2811
T2812
T2813
T2741
T2742
T2743
Question and Answer IconNeed help?

Do you have a question about the Moen T2741 and is the answer not in the manual?

Moen T2741 Specifications

General IconGeneral
BrandMoen
ModelT2741
CategoryPlumbing Product
LanguageEnglish

Summary

Moen Contact and Support Information

USA Customer Support Details

Contact Moen USA for installation help, missing, or replacement parts.

Canada Customer Support Details

Contact Moen Canada for installation help, missing, or replacement parts.

Mexico Customer Support Details

Contact Moen Mexico for installation help, missing, or replacement parts.

Shower Head Flow Rate Specifications

Standard and High Efficiency Flow Rates

Details standard and high efficiency shower head flow rates and compatibility.

Helpful Tools for Faucet Installation

Recommended Installation Tools

Moen recommends specific tools for safe and easy faucet replacement.

Old Faucet Removal Safety Precautions

Removal Safety Tips

Important safety tips and cautions for removing the old faucet before installation.

Faucet Component Identification

Faucet Parts Diagram

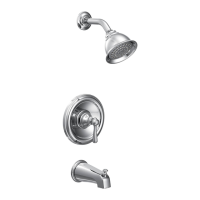
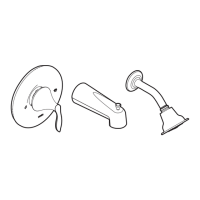
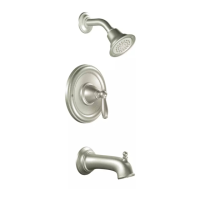
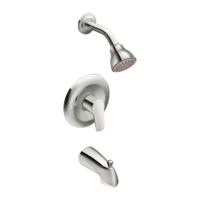
Visual guide identifying all faucet components with labels A through P.

Detailed Parts List

List of all faucet parts with corresponding labels and names.

Shower Arm and Head Assembly Installation

Install Shower Arm and Flange

Steps for wrapping threads and connecting the shower arm and flange.

Attach Shower Head

Instructions for screwing the shower head onto the shower arm.

Tub Spout and Stop Tube Installation

Install Tub Spout

Steps for installing the tub spout, including orientation and securing the set screw.

Install Stop Tube

Guidance on sliding the stop tube onto the valve.

Escutcheon Mounting Procedure

Secure Escutcheon to Wall

How to secure the escutcheon against the wall using screws.

Cartridge and Handle Installation Steps

Prepare Cartridge and Stop Tube

Positioning the cartridge stem and inserting the key stop and limit stop.

Install Handle Adapter and Screw

Attaching the handle adapter to the cartridge stem and securing it with a screw.

Place Handle onto Adapter

Positioning the main handle onto the installed handle adapter.

Hot Water Temperature Testing

Test Water Temperature

Testing hot water flow and ensuring it does not exceed 120°F.

Adjusting the Maximum Temperature Limit

Remove and Rotate Limit Stop

Steps to remove and rotate the limit stop to reduce maximum water temperature.

Reassemble Handle Components

Reattaching the handle adapter and lever after adjusting the limit stop.

Final Installation and Securing

Secure Handle Assembly

Securing the handle with the set screw using the hex wrench.

Confirm Installation Completion

Confirmation that the installation process is complete.

Moen Limited Lifetime Warranty Details

Warranty Coverage Terms

Details on Moen's limited lifetime warranty for original consumer purchasers.

Warranty Exclusions and Limitations

Information on what is not covered by the warranty and legal limitations.

Procedure for Warranty Claims

Procedure for obtaining warranty service, including required documentation.

Related product manuals