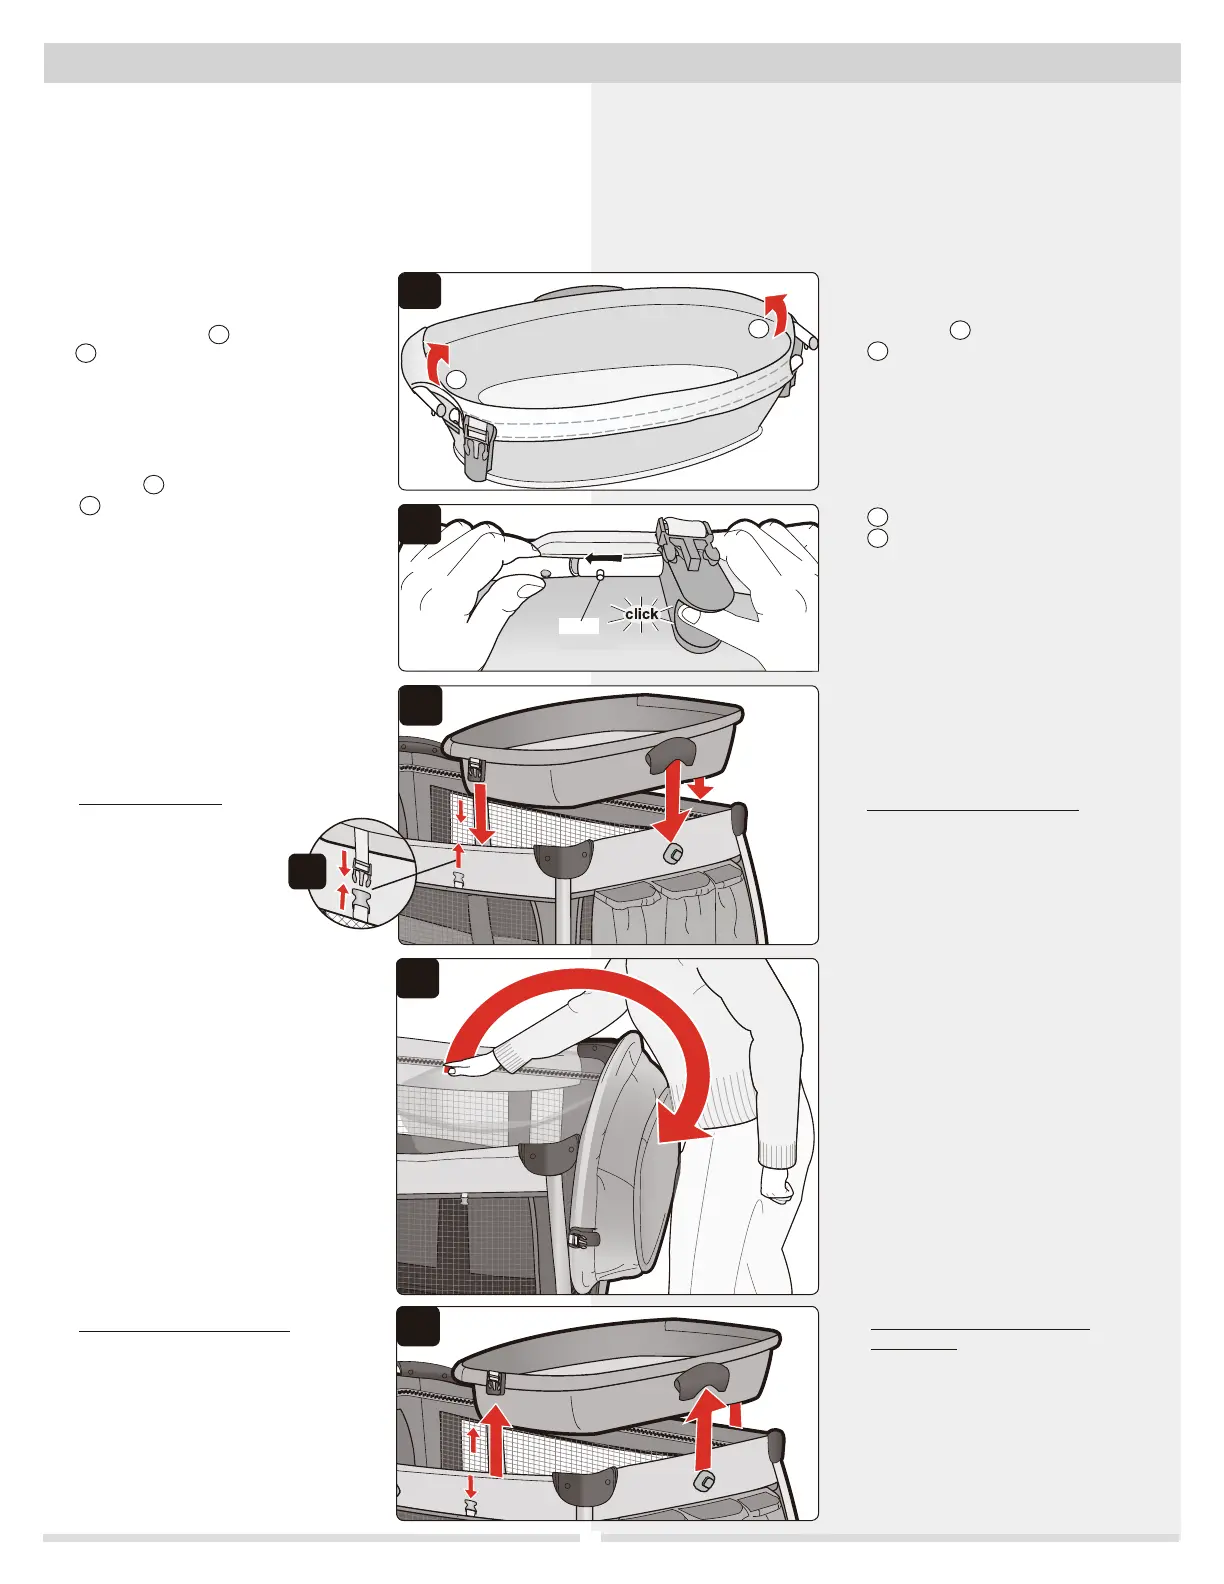
1 Locate the two hidden seams on
changer located RIGHT side and
LEFT side (Figure 1).
2 Create changer rim by connecting
bars on
1
RIGHT side and
2
LEFT side (Figure 2). Ensure ALL
bars are connected by pulling on each
connection.
3 Attach changer to storage pocket
side of playard by connecting
mounting bracket to short side of
playard (Figure 3).
Fastening buckles:
Secure changer by fastening
buckles on BOTH SIDES
of changer to playard
(Figure 3a).
Pull up on changer to
ensure it is secure.
7
Changing Station Assembly Armado del cambiador
1 Abra las dos costuras ocultas del
cambiador
1
en el lado DERECHO y
2
en el lado IZQUIERDO (Figura 1).
2 Arme el borde del cambiador
conectando las barras
1
en el lado DERECHO y
2
en el lado IZQUIERDO (Figura 2).
Asegúrese de que TODAS las barras
estén conectadas tirando de cada
unión.
3 Ajuste el cambiador al bolsillo
lateral de almacenamiento del corral
conectando el soporte de montaje al
extremo corto del corral (Figura 3).
Cómo abrochar las hebillas:
Asegure el cambiador abrochando las
hebillas situadas a AMBOS LADOS de
este del cambiador (Figura 3a).
Tire del cambiador para asegurarse de
que haya quedado bien encajado.
NOTA: No coloque al niño en el cambiador hasta no finalizar
completamente el armado.
NOTA IMPORTANTE: Lea las advertencias sobre el uso del
cambiador y la bolsa de almacenamiento en las páginas 1
y 3.
NOTE: Do not place child in changing station until
assembly is complete.
IMPORTANT NOTE: Review the Changing Station
and Storage Pouch Warnings on pages 1 and 3.
3
5
4
1
2
1
4 During non-use of changer:
Unfasten buckles. Disengage the
two side supports. Lift changer and
SLOWLY rotate to non-use position
(Figure 4).
Please note: Never leave changing
station in place when child is in
playard.
4 Cuando no use el cambiador:
Desabroche las hebillas. Destrabe los
dos soportes laterales. Levante el
cambiadory LENTAMENTE hágalo
girar hasta la posición fuera de uso
(Figura 4).
Por favor tenga en cuenta: Nunca
deje el cambiador colocado en
posición cuando el niño se encuentre
en el corral.
5 Remove changer assembly:
Unfasten buckles. Disengage mounting
bracket from playard and lift
assembly off playard (Figure 5).
5 Cómo retirar el conjunto del
cambiador:
Desabroche las hebillas. Destrabe el
soporte de montaje del corral y separe
el conjunto del corral (Figura 5).
3a
2
Pins
Clavijas
1
2
 Loading...