11
© Monitor Audio 2005 RS W12 Rev 1
Positioning/Initial Set Up
The RS W12 should now be sited in the most suitable position, preferably not
directly in the corner of a room as this may cause excessive bass boom. Once a
desirable position is achieved it is important to check if the cables are long
enough to reach comfortably without being under tension. Leave the RS W12
unplugged until the installation procedure is completed. The optimal control
settings willdepend entirely on your systemconfiguration. For initial trials set the
controls as follows:
Volumecontrol Should be settominimum
Frequency control Should be settotheminimum position (40Hz)
Phase control Should be settozero degrees
Powerswitch Should be set to‘Auto’
EQ 1setting Should be selected
Lowpass filterswitch Should be settothe‘Out’ position
Inputconnections can bemadeat this stage before the poweris connected to the
RSW12. Please refer to page 7forset up and fine-tuning.
Neverconnector disconnect theRCA input leadconnection withthe RS W12
switchedon.
Set Up
Once the input cables are connected and the controls are set in accordance with
the initial set-up procedure above, the RS W12 can be connected to the mains
power supply and switched on. Do not play any music at this stage. With the
Power Mode Switch in the ‘Auto’ position, the unit should remain in standby until
a signal is received.
Play a variety of music/ film excerpts starting at a very low volume level,
increasing to an average listening level once you are sure everything is working
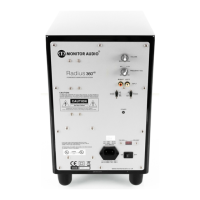
correctly. Check the back of the RS W12, the LED indicator should now indicate it
is ‘ON’. Please nowfollowthebulleted instructions below: -
For use with an AV amp/receiver (product with Subwoofer output) please
select the low pass filter switch to the ‘Out’ position. Otherwise select
low pass filter switch to the ‘On’ position, to engage the crossover
frequency control, ref. Page8.
If using the crossover frequency control please adjust in accordance with
the table on page9 further fine-tuning may be required.
Adjust theVolumeControl to desired level for initial trials, ref. page10
The PhaseControl can nowbe setref. Page 8
The volume control can now be set to finish the set-up procedure. It is important
to try a variety of music and film excerpts with which you are familiar in order to
obtain the optimum overall settings.
 Loading...