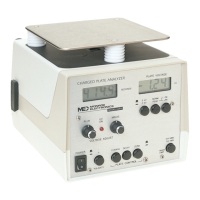
OPERATION
BASIC OPERATION - DISCHARGE MODE:
1. Separate sections and position as necessary. Connect to the proper power source and
press "|" on the power switch to apply instrument power. The displays will indicate that
power is on.
2. Select a polarity. For discussion purposes, we will select positive. Press the POLARITY
pushbutton in to lock.
3. Select a range. We will use 5kV as an example. Release the 5kV/2kV pushbutton under
the PLATE VOLTAGE meter.
4. Select NORMAL mode by releasing the NORM/PK pushbutton (under the meter).
5. Select TIMER LIMIT. Release the TIMER LIMIT pushbutton to set limits to 5kV and 500
volts. In general, the setting of this function should concur with the meter range selected.
6. Zero the plate by pressing the ZERO button. This removes all voltage from the plate. (It
connects the plate to ground through a 10k-ohm resistor.)
7. Charge the plate. Press the CHARGE button. The HV light indicates that the high voltage
is on. The PLATE VOLTAGE meter will indicate some voltage. Adjust the voltage to a
minimum of approximately 5kV +3% (5150 volts).
8. Allow the plate to decay. Press the DECAY pushbutton. In the absence of ions, the plate
will decay very, very slowly. In a balanced ion field, the plate will decay at a more rapid
rate.
9. As the plate voltage crosses the +5000 volt level, the timer will start. As the plate crosses
the +500 volt level, the timer will stop and indicate the elapsed time interval between
these two levels. Whenever the plate is recharged, the timer will be reset for the next
test.