Tri Auto ZX2 Quick Guide
Maintenance
see back page
Treatment
Preparation
see back page
2. Canal
Measurement
3. Glide Path 4. Canal Shaping
1. Shape Upper Part
of Canal
⹅
Default Settings
Almost all canals can be treated with the memories from m1 to m4.
●
Default Memory Settings and Main Uses
Memory Mode Main Uses
m1 EMR
Canal measurement
m2 CW
Shape the upper part of canal.
m3 OGP
Negotiation and making a glide path for a normal canal.
m4 OTR
Canal shaping for a normal canal.
m5 OGP
Negotiation and making a glide path for a complex canal
m6 OGP
Making a glide path for a complex canal
m7 OTR
Canal shaping for a complex canal.
m8 CCW
Injection solutions such as calcium hydroxide, etc.
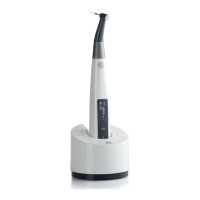
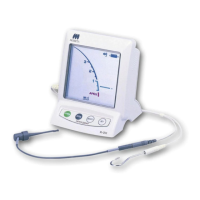
Main Switch
Set Switches ( )
Select Switch
File Holder
Contrary Electrode
Hint
Hint
Do not fail to read the Operation Instructions before using this instrument.
1. Select memory “m1”.
2. Hook the contrary electrode in
the corner of the patient’s mouth.
3. Clip the file in the file
holder.
4. Advance the file to 0.5
meter bar, and then po-
sition a rubber stopper.
For canals that are hard to measure, refer to “Canal Shaping (for
complex
canals)” in the Operation
Instructions.
Use only files that are designed for clockwise filing. Use files very carefully and follow all the recom-
mendations of the manufacturer.
These instructions are for the default settings. If you change the settings, use the instrument accord-
ing to your own treatment procedures.
●
Turn Power On
Memory
m2
Mode
CW
1. Turn power on.
2. Select memory “m2”.
3. Install a file.
4. Shape upper part of the canal.
The Main switch is used to start and stop
the motor.
●
Memory Selection
Memory
m1
Mode
EMR
To create a smooth path
for canal shaping.
1. Select memory “m3”.
2. Install a file.
3. Hook the contrary electrode in
the corner of the patient’s mouth.
4. Make the glide path.
1. Select memory “m4”.
2. Install a file.
3. Hook the contrary electrode in
the corner of the patient’s mouth.
4. Perform canal shaping.
⹅
Basic Operations
●
Turn Power Off
Hold down
⹅
Parts Identification
●
Pecking Motion (for OGP)
Repeat pressing lightly for 1 sec-
ond and then pulling back.
●
Pecking Motion (for OTR)
Pull back when OTR action is trig-
gered and then repeat.
Inserted in canal
With light load
(normal CW rotations)
With heavy
load, OTR action
is triggered.
Pull back quickly
Press lightly Pull back
Thoroughly wipe off all debris
stuck to the file.
Memory
m3
Mode
OGP
Files
• Nickel-Titanium: #10 – 20(t02)
• Stainless Steel:
#10 – 15(t02)
• Glide path files
Memory
m4
Mode
OTR
Files
• Nickel-Titanium:
#20 and larger shaping files