b
Home button (Long
Press)
6
P1 to P6 Programmable but-
tons
7
Battery Latch
8
2-Dot (Side Bottom) Feature
button
9
1-Dot (Side Middle) Feature
button
10
Push-to-Talk (PTT) button
11
Purple (Side Top) Button
12
High Dynamic Range (HDR)
Mic 1
17. High Dynamic Range
(HDR) Mic 2
18. 3-Dot (Speaker Grill) Fea-
ture button
19. Speaker
20. Near Field Communication
(NFC) Antenna
21. Battery
22. Charging Contacts
23. Accessory Connector
24. Emergency button
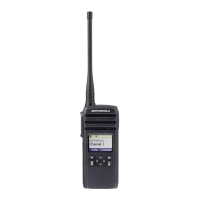
Attaching the Battery
Slide the battery into the radio frame until the side latches click into
place.
Attaching the Antenna
Rotate the antenna clockwise.
Turning the Radio On or Off
Ensure that the battery is fully charged before the first use.
Turning the Radio On
Turn the On/Off/Volume Control knob clockwise until it clicks.
Turning the Radio Off
Turn the On/Off/Volume Control knob counterclockwise until it
clicks.
Adjusting the Volume
•
To increase the volume, rotate the On/Off/Volume Control knob
clockwise.
•
To decrease the volume, rotate the On/Off/Volume Control knob
counterclockwise.
Selecting Zones and Channels
1 Tap Zone/Channel in the Radio Control Widget.
2 Tap Current Zone.
3
Tap the desired zone.
4
Tap the desired channel.
Radio Control Widget shows the selected zone and channel.
LED Indications
Mode Indication Status
Operation Mode Solid Green Powering Up
Blinking Green Receiving a Call
Solid Red Transmitting
Blinking Red Transmitting at low
battery condition or
detects an incom-
patible battery
Rapidly Blinking
Red
Self-test failure
upon powering up
or fatal error
Double Blinking
Red
Transmitting Emer-
gency
Solid Yellow Channel Busy
(Conventional
Mode)
Blinking Yellow Receiving a Se-
cured Transmis-
sion
English
2

 Loading...