W
arning: The Emergency Alert feature should only be used in
t
he event of an actual emergency. Motorola is not responsible if
there is no response to the emergency alert from the receiving
g
roup.
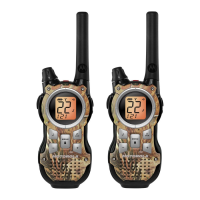
B
uilt-in Flashlight
P
ress and hold the flashlight button to turn and keep the light on.
T
he switch functions as a momentary control for the light.
N
ote: Turn off the flashlight when not in use to conserve battery
p
ower.
K
eypad Lock
T
o avoid accidentally changing your radio settings:
1
. Press and hold until displays.
2
. When in lock mode, you can turn the radio on and off, adjust
t
he volume, receive, transmit, send a call tone, and monitor
channels. All other functions are locked.
T
o unlock the radio, press and hold until is no longer
d
isplayed.
S
canning Channels
Use scan to search the 22 channels for transmissions from
u
nknown parties, to find someone in your group who has
accidentally changed channels, or to quickly find unused
c
hannels for your own use.
There is a priority feature and 2 modes of scanning ( basic and
a
dvanced ) to make your search more effective. The basic scan
mode uses the channel and code combinations for each of the
22 channels as you have set them ( or with the default code
v
alue of 1). The “Advanced Scan” mode will scan all channels
for any and all codes, detect any code in use, and use that code
v
alue temporarily for that channel.
Priority is given to the “home channel,” that is, the channel (and
I
nterference Eliminator Code) your radio is set to when you start
the scan. This means the initial channel (and code setting) is
s
canned more often than the other 21 channels, and your radio will
respond quickly to any activity occurring on the home channel as
a
priority.
T
o start Scanning:
1. Briefly press the key. The scan will appear in the
display, and the radio will begin to scroll through the channel
and code combinations.
2. When the radio detects channel activity matching the
channel and code combination, it stops scrolling and you
can hear the transmission.
3. To respond and talk to the person transmitting, press
within five seconds after the end of the transmission.
4. The radio will resume scrolling through the channels five
seconds after the end of any received activity.
5. To stop scanning, briefly press the key.
To start Advanced Scanning:
1. Set the Interference Eliminator Code to “zero” or OFF.
2. Briefly press the key. The scan will appear in the
display, and the radio will begin to scroll through the
channels. No Interference Eliminator Codes will filter what
is heard.
3. When the radio detects channel activity with ANY code (or
NO code), it stops scrolling and you can hear the
transmission. Any Interference Eliminator Code that may be
in use by that party will be detected and displayed.
4. To respond and talk to the person transmitting, press
within five seconds of the end of the transmission. The radio
will transmit using the newly detected Interference
Eliminator Code.
5. The radio will resume scrolling through the channels five
seconds after the end of any received activity.
6. To stop scanning, briefly press the key.
Scanning Notes:
1. If you press while the radio is scrolling through inactive
channels, the transmission will be on the “home channel”.
Scanning will resume five seconds after the end of your
transmission. You may press the key to stop scanning at
any time.
2. If the radio stops on an undesired transmission, you may
immediately resume the scan by briefly pressing or .
3. If the radio repeatedly stops on an undesired transmission,
you may temporarily remove that channel from the scan list
by pressing and holding or for three seconds. You
may remove more than one channel in this way.
4
. To restore the removed channel(s) to the scan list, turn the
radio off and then back on, or exit and re-enter the scanning
mode by pressing .
5. You cannot remove the home channel from the scan list.
6
. In Advanced Scan, the detected code will only be used for
one transmission. You must note the code, exit scan, and set
that detected code on that channel to permanently use the
detected code.
Weather Receiver
Y
our radio can tune in to broadcasts by the United States National
Oceanic and Atmospheric Administration (NOAA) Weather Radio
a
nd Environment Canada Weatheradio.
Y
ou can listen to a weather channel (see “Weather Channels and
F
requencies” table below) or set your radio to alert you to
emergency weather broadcasts that interrupt routine broadcasts.
W
hen you listen to a weather channel, you cannot use your radio in
scan mode or for two-way communications.
B
oth NOAA and Environment Canada have transmitters located
throughout the United States and Canada, respectively. These
t
ransmitters broadcast watches, forecasts, and other information 24
hours a day.
N
ote: NOAA weather radio stations are assigned to cover specific
areas and service may be limited. Please check with your local
weather office for frequency and details, or visit
w
ww.weather.gov/nwr in the US or
www.msc.ec.gc.ca/msb/weatheradio in Canada to view the
a
ppropriate transmitter for your area.
The use of the NOAA logo does not provide an endorsement or
i
mplied endorsement by NOAA’s National Weather Service, nor
does the use of the Weatheradio logo provide an endorsement or
implied endorsement by Environment Canada.
Turning Weather Channel Reception On and Off
1. To turn weather reception on, press and hold for 3 seconds.
2. To turn off, press or turn the radio off and then back on.
S
etting the Weather Channel
Your radio receives weather frequencies:
1. After turning weather reception on, press . The current
channel flashes.
2. Press or to select the appropriate channel with good
reception in your area.
3. Press to save the weather channel setting.
Setting the Weather Alert
Your radio can be set to respond to NOAA Weather Radio
emergency messages. A special alarm tone sounds an alert and
turns on the weather receiver to give you immediate weather
and emergency information.
1. After turning weather reception on, press twice. On/Off
displays.
2. Press or to select On/Off. If you activate Weather
Alert and return to two-way mode, will display.
3. Press to save the Weather Alert setting.
4. Press to return to two-way mode.
As with two-way radio reception, weather channel reception
depends on how close you are to a transmitter and whether you
are indoors or outdoors. Because weather channels are
transmitted without codes, they may contain static or noise.
Weather Alert will not function while actively transmitting or
receiving in two-way mode.
4
MR350/351
Channel Frequency Description Channel Frequency Description
1
462.5625
MHz
G
MRS/FRS
1
2
467.6625
MHz
F
RS
2
462.5875
MHz
G
MRS/FRS
1
3
467.6875
MHz
F
RS
3
462.6125
M
Hz
GMRS/FRS 14
467.7125
M
Hz
FRS
4
4
62.6375
M
Hz
GMRS/FRS 15
4
62.5500
M
Hz
GMRS
5
4
62.6625
M
Hz
GMRS/FRS 16
4
62.5750
M
Hz
GMRS
6
462.6875
MHz
G
MRS/FRS
1
7
462.6000
MHz
G
MRS
7
462.7125
MHz
GMRS/FRS 18
462.6250
MHz
GMRS
8
4
67.5625
MHz
FRS 19
4
62.6500
MHz
GMRS
9
4
67.5875
MHz
FRS 20
4
62.6750
MHz
GMRS
10
467.6125
MHz
FRS 21
462.7000
MHz
GMRS
11
467.6375
MHz
FRS 22
462.7250
MHz
GMRS
W
eather Channels and Frequencies
W
eather
C
hannel
F
requency
W
eather
C
hannel
F
requency
W
X1
1
62.550 MHz
W
X7
1
62.525 MHz
W
X2
1
62.400 MHz
W
X8
1
61.650 MHz
W
X3
1
62.475 MHz
W
X9
1
61.775 MHz
W
X4
1
62.425 MHz
W
X10
1
61.750 MHz
W
X5
1
62.450 MHz
W
X11
1
62.000 MHz
W
X6
1
62.500 MHz
C
hannels and Frequencies
 Loading...