Do you have a question about the Motorola RADIUS GM300 and is the answer not in the manual?
How to power on the Motorola GM300 radio and what to expect.
Steps for receiving, monitoring, and transmitting calls using the radio.
Explanation of the TOT feature that limits transmission duration.
How to activate, deactivate, and cycle through scan types.
Creating, modifying scan lists, and setting priority channels.
Temporarily removing unwanted channels from the scan list.
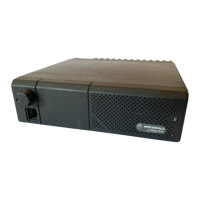
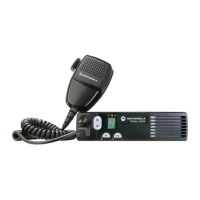
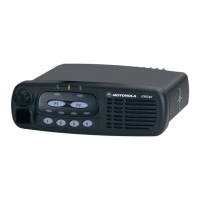
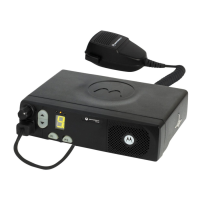
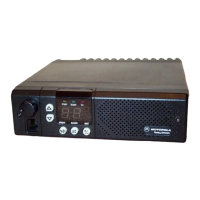
The Motorola Radius® GM300 is a 16-channel, conventional FM radio designed for mobile communication. This device offers a range of features for efficient two-way radio operation, including channel selection, monitoring, scanning, and transmission capabilities. Its user-friendly interface is designed for straightforward operation, making it suitable for various professional environments where reliable communication is essential.
The primary function of the Motorola Radius® GM300 is to facilitate two-way radio communication across 16 distinct channels. Users can select channels, monitor ongoing transmissions, and transmit their own messages. The radio is equipped with an ON/OFF VOLUME knob that also controls the power, and UP/DOWN buttons for channel selection. A dedicated MONITOR button allows users to listen to a channel, while a SCAN button enables the radio to cycle through preprogrammed or user-defined scan lists. The device also features a SELECT SCAN button for managing scan types and lists. Visual indicators, such as LEDs for ON/OFF, CHANNEL UP, MONITOR, SCAN, and TRANSMIT/BUSY, provide immediate feedback on the radio's status. The microphone connector allows for the attachment of a microphone, which is crucial for transmitting messages. The integrated speaker ensures clear reception of audio.
Turning the Radio On and Off: To power on the radio, simply turn the ON/OFF VOLUME knob clockwise until it clicks. The LEDs will illuminate, indicating the radio's last status, and a start-up tone will sound. To turn it off, rotate the knob counter-clockwise until it clicks.
Receiving Transmissions: After turning on the radio, adjust the volume by rotating the ON/OFF VOLUME knob clockwise to a comfortable listening level. Channels can be selected by pressing the UP/DOWN buttons. An extended press of these buttons will quickly scroll through the available channels.
Monitoring Channels: To monitor a specific channel, press the MONITOR button or simply lift the microphone off-hook. When in monitor mode, the amber MONITOR LED will light steadily, indicating that the radio is actively listening to the selected channel. For unsquelched listening, press and hold the MONITOR button for two seconds. This allows the user to hear all activity on the channel, regardless of squelch codes. To return to the coded squelch (PL/DPL) mode, press the MONITOR button again. A short beep tone will confirm each keypress.
Transmitting Messages: Before transmitting, ensure the channel is clear to avoid interrupting ongoing conversations. To transmit, press and hold the Push-to-Talk (PTT) button located on the side of the microphone. While holding the PTT button, speak slowly and clearly into the microphone. The red TRANSMIT/BUSY LED will remain illuminated, indicating that the radio is actively transmitting. This LED will turn off once the PTT button is released. If another carrier is present on the selected channel, the red TRANSMIT/BUSY LED will flash, signaling that the channel is busy.
Time-Out Timer (TOT): The radio may be equipped with a Time-out-timer (TOT) function. If activated, transmissions will automatically terminate if the PTT button is held down for more than 60 seconds, or for a pre-programmed duration. An alert tone will sound four seconds before the transmission is cut off. To resume transmitting after a TOT activation, release the PTT button and then press it again.
Channel Scan Functionality: The GM300 supports channel scanning, allowing the radio to automatically cycle through a list of channels to detect activity. The radio can store a preprogrammed scan list for each active channel and a single user-defined scan list.
Activating and Deactivating Scan: To turn the scan function on or off, press the SCAN button. The radio will only scan when the microphone is on-hook. Green display segments will light up to indicate that scanning is active. The SELECT button is used to cycle through different scan types, including "Scan," "User Scan," "Priority User Scan," and "Priority Scan." The "Scan" and "Priority Scan" displays apply to preprogrammed scan lists, while "User Scan" and "Priority User Scan" become available once a user list is programmed.
Responding to Scanned Activity: When the radio detects activity on a channel during scanning, the channel number will be displayed, and the user will hear the call. To exit the scan mode, press the SCAN button again. If the microphone is lifted off-hook while scanning, the radio will temporarily suspend scanning and revert to the channel that was displayed before scanning began. To transmit on a different channel, use the UP/DOWN buttons to select the desired channel. Scanning will resume once the microphone is placed back on-hook. When scanning with priority, the green scan LED will flash for activity on Priority One channels and light steadily for Priority Two channels.
Deleting Nuisance Channels: If an undesired transmission is being received during scanning, the user can temporarily delete that channel from the scan list. To do this, press and hold the SELECT button for two seconds. The nuisance channel will be removed until the scan is exited or the radio is turned off. Note that priority channels and the home channel cannot be deleted.
Creating and Modifying User Scan Lists: To create or modify a user scan list, press and hold the SCAN button for two seconds until a second chirp tone is heard and the channel number flashes. The currently displayed channel can be added to or deleted from the user list by pressing the SELECT button. When a channel is added, a vertical segment in the upper left corner of the display will light and flash, alternating with the channel number. This segment will disappear when the channel is deleted. The UP/DOWN and SELECT buttons can be used to add or delete other desired channels from the user list.
Setting Priorities for the User List: To designate a channel as a priority channel, navigate to the desired channel and hold the SELECT button down for two seconds. The scan LED will flash to indicate that it has been set as the first priority channel (Priority One). To set a second priority channel (Priority Two), repeat the process; the scan LED will light steadily. It is important to program Priority One first, followed by Priority Two. Deleting either priority channel will simultaneously delete both.
While the manual primarily focuses on operational procedures, it implicitly suggests certain maintenance practices through its usage instructions. Keeping the microphone on-hook when not in use, for instance, helps maintain the radio's scanning functionality and prevents accidental transmissions. Proper handling of the ON/OFF VOLUME knob and channel selection buttons ensures their longevity. The radio's robust design is intended for mobile environments, implying a degree of durability against typical wear and tear. Regular cleaning of the exterior, particularly around the buttons and display, would help maintain visibility and functionality. The manual does not detail internal maintenance or repair procedures, suggesting that such tasks should be performed by qualified service personnel. The Time-out-timer function, while a usage feature, also serves as a protective measure, preventing excessive transmission times that could potentially strain the radio's components or interfere with other users. The clear visual and auditory feedback provided by the LEDs and tones aids in troubleshooting basic operational issues, allowing users to quickly identify the radio's status and any potential problems.
| Frequency Range | VHF: 136-174 MHz, UHF: 403-470 MHz |
|---|---|
| Voltage | 13.8 VDC |
| Modulation | FM |
| Channel Spacing | 12.5 kHz, 20 kHz, 25 kHz |
| Operating Temperature | -30°C to +60°C |
| Channel Capacity | 16 channels |