3. Gently
renove each battery
by
easing
each battery
out individuallv-
4. Reposition the
baftery cover
and
press
down to secure.
Notes
.
Exercise care
when removing
NiMH
or M batteries. Do
not use
sharp or conductive
tools
to remove either ol
these batteries.
.
Remove
the batteries before
storjng
your
radio for extended
peaiods
0f
time.
Batteries
corrode
over time and
maV
cause
permanent
damage
to
your
radio.
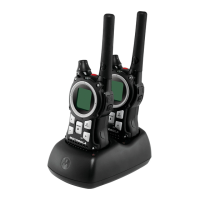
Using the Battery
Charger
{optional
Accossory}
The
battery
charger
provjdes
drop,in
charging convenience
for
NiMH
batteries and
can be
placed
on
any flat surface, such
as a
desk or
workbench.
Charge the
NiMH battery overnight
{at
least 16
hours) beiore
using it
f0r
the
first
time. After the initial charge,
an
empty battery is fully
charqed
within 14 hours.
l. Follow
the steps above to
install a
NiMH Batrery
Pack.
2. Plug
the AC
power
supply cord
into the
jack
on
the
desk
stand.
3. Pluq the
AC
power
supply into a standard
wall outlet.
4.
With
a radio
facin! lorward,
slide it into
one
of
the charging
Dockets.
5. When charging in
the battery
charger, the red light on rhe
charger
base will
glow
conttnu0usly.
Using the mini-tlSB
Charging
Connector
The miniUSB chargiug
connector
is a handy
port
lhat
allows
you
to
conveniently charge
your
NiMH battery
pack.
This is an alternative
t0 charging
your
Nil\4H
batterV
pack
in the Batrery
Charqer
desk
stand using the AC wall adaptor
and especjally
uselul
when used
while
traveling.
A,vailable
nini-U SB c
ha rging optiotis:
(optional
accessories)
L Wall travel charqer
2.
Vehicle
charqer
3 l\,4ini-USB computer cable
lf usinq a computet the
computer
must be turned on.
This
and other accessories
{sold
separatelyl are available for
your
radio. For more inlormation, visit
our
Web site at
ww.m0lor0la.com 0r sh0p.qiantintl.com,
'L
Plug
your
mini-USB
cable 0r charqer into a
power
source as is
appropflare ror
your
accessory,
2,
Pluq the
cable into the nini-USB
pon
on the bottom of
your
radio.
3.
An empty baftery
will
be
tully charged in 14 hours.
4. The LED indicator lightonthe
radiowill
glowto
indicate thatthe
battery is charging.
l{otes
.
The light will remain red after
the
Nil\4H
battery
pack
is fully
cnarge0.
.
When
movinq
belween
hot and cold temperatures, do not
charge
the
NiMH
battery
pack
until rhe
battery temperature
acclimates
{usually
about 20 minutes).
.
For oplimal
battery lite, remove
the radio from the charger within
l6 hours.
Do not store the radio while
connected t0
the
charoer
.
Turn
radio
otf while
charging.
Anachitrg
and
Semoring rhe
Eelt
Clip
l. Aftach belt clip
to
pocket
or belt strap.
2, Align the belt clip
post
with the hole
in
the back
of the radio.
3.
Gently
push
until
the
clip
clicks
in
place.
To Renove
1. Push down onthe
releaselab atthetoD of
rhe
beltclioto
release the
catch.
2. Pull the belt cliD
awav
from
the back 0f the radio.
Turoing
Your
Badio 0n and Ofl
Turn
A
clockwise to turo
the
radio on and counterclockwise to
turn the
radio
off.
l. In the
0N
position,
the radio
chirps and briefly shows all feature
icons
avsilable
on the ,adio.
2. The displsy screen
then shows the current channsl,
code and
all features that are
enabled.
Ssltitrg the Volsme
Press and
hold
@
for three seconds
while rotating
A
until
you
reach a comfonable listening level.
l.
Botate
[I
clockwise to
increase the volume.
2. Rotate
Ll
counterclockwise
to decrease
the
volume.
Do not hold the radio
close
to
vour
ear lI the volume is set to an
uncomfortable
level,
it could hurt
Vour
ear
To communicate,
all
radios
in
your
group
must be set to
the same
channel and lnterferencs Eliminator Cods.
L Totalk,
press
and
hold
@.
2. When
you
are tinished talking, release
O.
For
maximum clarity, hold
the
radio tuvo to three
inches away from
your
mouth
and
speak
directly into the microphone.
D0 n0t cover
the microphone
while talking.
Talk Raogs
Your radio is designed
to maximize
performance
and improve
transmission
range. 0o not use ths
radios closer than
five
feet
€part.
Motritor Button
Pressing and holding
@
for three seconds
allows
you
to listen to
the
volume
level ol the
radio when
you
are
not
receiving.
This allows
you
to
adiust the volume, if
necessary.
you
can also
press (Q
to
check Ior activity on the
current channel
belore
you
talk.
Push to Talk
@
Timeout Imer
To
prevent
accidental transmissions
and save batterv
lile, the radio
emits a continuous
warning tone
aod stops transmitting if you
pr€ss
e)
for
60 continuous
seconds.
Selecting
ths
Chann€l
Your
radio
has 22 channels.
Channels
8-14 are FRS 0.5 wan
only and
all
other
channels are
GMRS
(See
the'Channels
and Frequencies"
table on
overleaf for details).
1. With the
radio
on,
press
O.
When
the radio is on a 0.5
watt
channel,
d'
displays.
When the radio is on
a
1.5
watts
channel,
'1"' displavs. The
currenl channel flashes.
2. Press
@
or
O
and select
an unused or
quiet
channel.
3. Press
@
to sav€ the channel
settjno or
@
to continue
sst up.
Solecting The
Interference
Eliminato.
Code
Interference
Eliminator Codes help minimize interference by
blocking
transmissions
from unknown
sourcas.
your
radio has l2l
lnterference
Eliminator
Codes. C0des
'l
-
38 are the standard aralog
c0des that
appear
on
other FRS/GMRS radios. Codes 39
-
121 are
additional
digital
codes
added for superior interference
protection.
0
is
the off
position,
no
analog
or digital
codes are
onabled.
To setthe code
for a channel:
l. Press
O
untilthe code
startstoflash.
2.
Press
Q
or
O
to selectrhe code.
3. Press
@
t0 save the c0de setting or
O
to continue set up.
You
can set a difterent code for each
channel using this
procedure.
An
extended
press
of
Q
or
Q
allows
you
to
scroll through the
Interference Code
rapidly so
you
can
quickly
reach lhe code
y0u
want.
Note: Vou must
set
the lnterference
Eliminator Cods
to 0
on a radio
that
uses
lnterfe.ence
Eliminator Codes to communicate
with
radios
that do not have Interference Eliminator CodBs. Select 0 for
"no
tone,
no code" and oFF
will
flash
0n
your
radio's display.
Sotting
atrd Tran$mitting Call Tones
Your
radio
can
transmit
ditferent call tones to other radios in
your
group
so
you
can alert them that
you
want to talk. You have 10 call
tones from which
to choose.
To set a call tone:
L With the radio on,
press
@
three
times
until
the
cutrent
eall tone sening
(0
-
l0l
llashes and
@
appears.
2. Press
@
or
Q
to change and hear the call ton€.
3. Press
@
to set the new
call tone or
@
to continue set up,
To transmit
your
call
tone
to
other radios sst to the same channel
and Intederence Eliminator Code as
your
radio,
press
{r
.
Note: Sening the
call
to 0
disables
the call t0ne feature,
Hands-Free
Use
Withoui Accessories
{iVOXl
You can use the
iVoX
fsature lo transmil hands-free withoul
the
need
for any headset accessories. 0nce
iVoX
is turned on, the radio detecls
your
voice and transmits
when
you
speak into th€ internal microphone.
1. Press
@
until
iVoX
appears on the
display.
The currenl
settinq 0n/otf will llash.
2. Press
@or
Otoselect0norOff
3. Press
@
to set or
@
to continue set
up,
Hands-Frco
Use
Wilh
Accesoriss
{
VoX
}
You can transmit hands{ree mor8 reliably
with
the uss 0l optional
headset accessories, 0nce
VOX
is turned on. the radio detects
vour
voice and transmits when
you
speak.
Many
accessories
(sold
separately) are available lor
your
radio. For
more
information, visit our Web site at www,motorola.com or
shop.giantintl.com.
l. Turn
the
radio
otf and
plug
tho VoX accsssory into the
accessory Don.
2. Turn the radio 0n. VoX shows on the display.
3. Adjustthe v0lume appropriatelyby rotating
i!j.
Lowerthe
volume before
placing
the
accessory on
your
head or
in
your
eal
4. To
turn
otl. simply remove accessorr.
ilolo: There is a shon dBlay between the time
you
start talking
and
when
the radio transmits. There
is a short delav before the
transmission is completed.
Continued on back
EMl000
1\r
 Loading...