EasyManua.ls Logo

Mount-It! MI-2752 User Manual

Mount-It! MI-2752
6 pages
To Next Page IconTo Next Page
Page #1 background imageLoading...
Page #1 background image
MI-2752
1
Installation Instruction
UNPACKING INSTRUCTIONS
IMPORTANT SAFETY INFORMATION
Carefully open the carton, remove contents and lay out on cardboard or other protective
surface to avoid damage.
Check package contents against the Supplied Parts List in the next page to assure that all
components were received undamaged. Do not use damaged or defective parts.
Carefully read all instructions before attempting installation.
Install and operate this device with care. Please read this instruction before installation, and
carefully follow all instructions contained herein. Use proper safety equipment during installa-
tion.
Please call a qualied installation contractor for help if you don't understand these directions or
have any doubts about the safety of the installation.
Do not use this product for any purpose or in any conguration not explicitly specied in this
instruction. We hereby disclaims any and all liability for injury or damage arising from incorrect
assembly, incorrect mounting, or incorrect use of this product.
Question and Answer IconNeed help?

Do you have a question about the Mount-It! MI-2752 and is the answer not in the manual?

Mount-It! MI-2752 Specifications

General IconGeneral
Product NameMount-It! MI-2752
CategoryRacks & Stands
TypeTV Stand
ColorBlack
MaterialSteel, Glass
Weight Capacity88 lbs
Shelves2
Cable ManagementYes
Assembly RequiredYes
Mounting TypeFreestanding

Summary

Step 1 Install the Pole to the Desktop

Option A: Desk Clamp Install

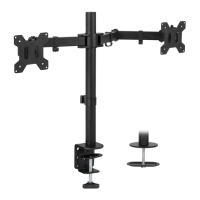
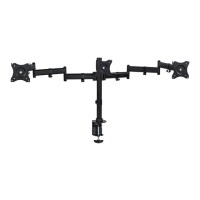
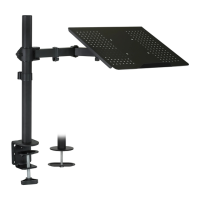
Instructions for securing the pole to the desktop using a desk clamp mechanism.

Option B: Grommet Base Install

Instructions for mounting the pole through an existing desk grommet hole.

Option C: Grommet Base Install

Instructions for mounting the pole through a self-drilled desk grommet hole.
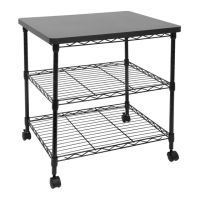
Step 2 Install Arm to the Pole

Step 3 Attach the VESA Plate to the Monitor

Step 4 Slide the Monitor onto the Head of Swivel Arm

Step 5 Make the Necessary Adjustments

Step 6 Manage the Wires and Store the Allen Keys on Wire Clip

Related product manuals