6
5
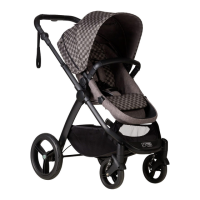
Adjust the length of the waist and
shoulder str
aps by moving the clasps
until a comfortable but secure fit is
achieved.
Squeeze the two tabs to release the
two buckle halves.
D-rings are provided if you wish to
use a standard safety harness in
addition to the 5-point harness
supplied.
Unclip the leash (o) by squeezing the
two tabs together to release the two
buckle halves.
1) open the safety latch (l)
2) lift the securing clip (r)
carefully off the stud. Pulling the
bac
krest back helps align the hole
with the stud.
Push the button in the centre of the
saf
ety latc
h (l) before lifting it
upw
ar
ds...
F
old the Bug
g
ypod up on itself
...
…bef
or
e f
olding it up ag
ainst the
pushchair.
Step 11. Folding up
your Buggypod®
If the s
afety latc
h is stif
f, spray inside
with a non-silicone lubricant e.g.
furniture polish. See p7 for all
main
tenance tips.
Make sure you fold it fully, otherwise it
may not fold up against the pushchair
properly.
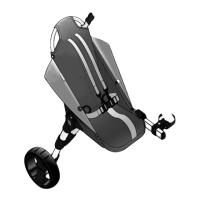
Remove the wheel (a) from the upper
axle (q) by squeezing the two red
tabs and lifting the wheel off. Push
the wheel onto the secondary axle (j)
as sho
wn. Make sure it clicks into
place. The hinges should rest on top
of the wheel.
Push the holding str
ap (m) over the
wheel axle
f
old up the footrest (s) by closing
the popper buttons on both sides.
The folded Buggypod® can now be
removed from the side of the pushchair
when folding and transporting the
pushchair and Buggypod®.
By clipping the wheel onto the
secondary axle, you are supporting
the Bug
gypod® in the upright position
Tip: you can remove holding strap from
y
our Buggypod by undoing the popper
on the seat co
ver.You can then loop
the holding str
ap around your
pushchair bar to create a tighter hold.
Step 12. Detaching the
folded Buggypod®
a) Follow steps 1 and 2
b)
R
emo
ve the end plug (i) from that end of the connector
bar (c) to which you intend to attach the adaptor (d).
Note: the adaptor must be positioned correctly so as to compensate for the lack
of width at the narrowest part of the host pushchair (see Fitting Check List).
Parts labelled
1.
r
ef
er to a host pushc
hair that narrows towards the front,
par
ts labelled 2.
r
efer to a pushchair that narrows towards the rear.
Make any necessary adjustments to the location of the mounting brackets.
c)
Slide the near
est mounting boss (
g
) off the connector bar (c),
then attach the adaptor to the connector bar adaptor
d
)
Slide the mounting boss onto the adaptor (do not tighten it)
and place end plug onto end of connector bar.
e) Follow Step 3 onwards
c
b
Assembly instructions using connector bar adaptor
(e.g. for some 3 wheeler pushchairs)
You must remove the Buggypod from the
brackets if you want to fold the pushchair.
BuggyPodSmorph_May10 5/5/10 20:44 Page 6