EasyManua.ls Logo

MRP SXg User Manual

MRP SXg
2 pages
To Next Page IconTo Next Page
Page #1 background imageLoading...
Page #1 background image
SXg INSTALLATION INSTRUCTIONS
1) Begin the installation of the SXg
by removing your crankset. Remove
the chain from the chainring to ease
this process. If you have a Shadow
Plus or Type 2 derailleur, disengage
the clutch or lock the cage in the
relaxed position.
2A) Remove the fastener bolt from
the upper guide and swing the front
half of the guide open.
3A) Attach the backplate to the
three threaded tabs around the
bottom bracket shell of your frame.
ISCG spacers are included with
your guide, install these washers
between the backplate and frame
as needed for alignment (step 5).
4) Reinstall the
crankset and chain.
Close the upper guide
and skid.
6) Align the rear skid bolt hole
with the correct position in the
backplate. If you are using a
chainring size in the middle of the
accommodated range (32T for
the small SXg, 36T for the large),
choose the upper skid position first
(some installations may require the
lower position). Tighten the rear
skid bolt to 4 Nm.
2B) Remove the rear skid bolt located at
the rear of the guide. With that removed
the skid should swing open and down.
5) To check guide alignment, from
above, look directly down on the upper
guide and find the joint of the two upper
guide pieces and the chainring aligned.
Use the ISCG spacers to achieve this.
SM SXg LG SXg
5B) Orient the rotational position of
the SXg so that the MRP logo on the
upper guide is roughly parallel with the
ground. Tighten the ISCG bolts to 8-9
Nm for alloy models, 5-7 Nm for carbon.
Question and Answer IconNeed help?

Do you have a question about the MRP SXg and is the answer not in the manual?

MRP SXg Specifications

General IconGeneral
BrandMRP
ModelSXg
CategoryBicycle Accessories
LanguageEnglish

Summary

SXg Chain Guide Installation

Crankset and Chain Removal

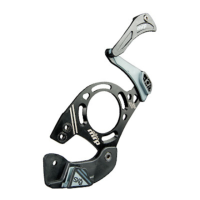
Remove crankset and chain. Disengage derailleur clutch if applicable.

Upper Guide Opening Procedure

Remove fastener bolt from upper guide and swing front half open.

Rear Skid Bolt Removal

Remove rear skid bolt to allow the skid to swing open and down.

Backplate Attachment to Frame

Attach backplate to frame's bottom bracket shell with ISCG spacers for alignment.

Crankset and Guide Reassembly

Reinstall crankset and chain, then close the upper guide and skid.

Guide Alignment Check

Align upper guide pieces with chainring by checking from above and using ISCG spacers.

Rotational Position Adjustment

Orient SXg with MRP logo parallel to ground; tighten ISCG bolts.

Rear Skid Bolt Alignment

Align rear skid bolt hole with backplate and tighten to 4 Nm.

Upper Guide Vertical Positioning

Set correct vertical position for chainring and tighten upper guide bolt.

Chain Clearance Check

Pedal through gears to check chain contact; adjust clearance as needed.

Important Consumer Safety Information

Read warnings, inspect guide, use safety gear, use genuine parts, and seek professional installation if needed.

Related product manuals