EasyManua.ls Logo

MSW MINIAC CC-200 User Manual

MSW MINIAC CC-200
4 pages
To Next Page IconTo Next Page
Page #1 background imageLoading...
Page #1 background image
10444 10/16 | 85-000276_INST01_RG
MINIAC WIRELESS CYCLING COMPUTER INSTRUCTIONS
6400 WEST 105TH STREET // BLOOMINGTON, MN 55438 // 1-855-883-6563 // WWW.MSWBIKE.COM
Thank you for your purchase! At MSW
®
we believe that having essential
accessories makes a good ride great—whether you’re tracking fitness or just
looking for the fastest route to work, we hope this MSW Miniac Wireless
Cycling Computer CC-200 gives you the data you need to achieve your goal.
WARNING: CYCLING CAN BE DANGEROUS. BICYCLE PRODUCTS
SHOULD BE INSTALLED AND SERVICED BY A PROFESSIONAL MECHANIC.
NEVER MODIFY YOUR BICYCLE OR ACCESSORIES. READ AND FOLLOW ALL
PRODUCT INSTRUCTIONS AND WARNINGS INCLUDING INFORMATION ON THE
MANUFACTURER’S WEBSITE. INSPECT YOUR BICYCLE BEFORE EVERY RIDE.
ALWAYS WEAR A HELMET.
WARNING: Chemical Burn Hazard. Keep batteries away from children.
This product contains a lithium button/coin cell battery. If a new or used lithium
button/coin cell battery is swallowed or enters the body, it can cause severe
internal burns and can lead to death in as little as 2 hours. Always completely
secure the battery compartment. If the battery compartment does not close
securely, stop using the product, remove the batteries, and keep it away from
children. If you think batteries might have been swallowed or placed inside any
part of the body, seek immediate medical attention.
For additional product and safety information go to: www.mswbike.com/safety.
COMPATIBILITY AND INTENDED USE
The MSW wireless computer can be used on any bike with wheels from
14" to 700c; from kids bikes to road bikes.
The wireless sensor and computer are not ANT+ or Bluetooth compatible.
Sensors from other manufacturers will not work with MSW computers.
The computer and sensor are water resistant (splash resistant) but should
not be submerged.
INCLUDED PARTS
Please check that all the following items have been included with the cycle
computer before starting.
A CC-200 cycle computer
B Battery cover
C Sensor
D 4 nylon zip-ties
E Mounting bracket
F Rubber shim
G Wheel magnet
INSTALLATION
MOUNTING THE HANDLEBAR BRACKET
Fit the rubber pad to the back of the handlebar bracket and use the nylon ties
to attach it to the bar. Do not fully tighten the nylon ties until you’re certain the
angle of the computer is correct. (figs 1, 2).
Place the cycle computer on the bracket and secure it by turning clockwise
(fig 3).
MOUNTING THE SENSOR
Find a suitable point on the fork to mount the sensor.(fig 4). The distance
between cycle computer and the speed sensor should be within 60cm (fig 5).
Use the nylon ties to secure the sensor, but don’t tighten fully yet.
Magnet
Screw
Rubber
Max. 30°
Max. 60cm
Bracket
Cycle Computer
Bracket
Nylon Ties
Sensor
Magnet
Sensor
1–5mm
Sensor Point
Sensor Zone
Magnet
Screw
Rubber
Max. 30°
Max. 60cm
Bracket
Cycle Computer
Bracket
Nylon Ties
Sensor
Magnet
Sensor
1–5mm
Sensor Point
Sensor Zone
Figure 1 Figure 2
Magnet
Screw
Rubber
Max. 30°
Max. 60cm
Bracket
Cycle Computer
Bracket
Nylon Ties
Sensor
Magnet
Sensor
1–5mm
Sensor Point
Sensor Zone
Figure 3
Magnet
Screw
Rubber
Max. 30°
Max. 60cm
Bracket
Cycle Computer
Bracket
Nylon Ties
Sensor
Magnet
Sensor
1–5mm
Sensor Point
Sensor Zone
Figure 5Figure 4
Magnet
Screw
Rubber
Max. 30°
Max. 60cm
Bracket
Cycle Computer
Bracket
Nylon Ties
Sensor
Magnet
Sensor
1–5mm
Sensor Point
Sensor Zone
Magnet
Screw
Rubber
Max. 30°
Max. 60cm
Bracket
Cycle Computer
Bracket
Nylon Ties
Sensor
Magnet
Sensor
1–5mm
Sensor Point
Sensor Zone
A
B
C
D E F G
Question and Answer IconNeed help?

Do you have a question about the MSW MINIAC CC-200 and is the answer not in the manual?

MSW MINIAC CC-200 Specifications

General IconGeneral
BrandMSW
ModelMINIAC CC-200
CategoryBicycle Accessories
LanguageEnglish

Summary

Installation

Mounting the Handlebar Bracket

Instructions for attaching the handlebar bracket and computer to the bicycle handlebar using nylon ties.

Mounting the Sensor

Guidance on mounting the speed sensor to the fork and ensuring proper distance to the computer.

Included Parts

Mounting the Wheel Magnet

Cycle Computer Main Display & Button Function

Mode Change

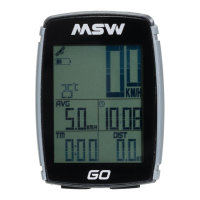
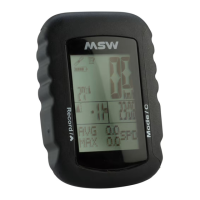
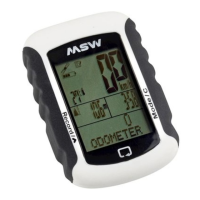
Explains how to navigate between different operational modes of the cycling computer.

CLK MODE (Clock Mode)

Instructions for setting the current time on the cycling computer.

TM MODE (Trip Time Mode)

Details on the trip time mode, including automatic operation and data reset.

AVS MODE (Average Speed Mode)

Explanation of the average speed display and its calculation.

MXS MODE (Maximum Speed Mode)

Explanation of the maximum speed display and its calculation.

Distance and Odometer Modes

DST MODE (Distance Mode)

Details the trip distance mode, showing accumulated distance from the start.

ODO (Total Mileage Mode)

Information on the total mileage mode and how to set wheel size and enter mileage.

SCAN MODE

Describes the SCAN MODE where all modes display automatically in a loop.

Maintenance and Battery

Maintenance

Guidance on general maintenance, including display contrast issues and temperature considerations.

Sensor

Advice on checking the sensor and magnet position and condition.

Bracket / Magnet / Sensor Band

Instructions for cleaning the bracket, magnet, and sensor band with mild solutions.

Battery Replacement

Steps for replacing the battery in the computer and sensor units.

Battery Warnings

Crucial safety warnings regarding coin-cell lithium-ion battery handling and disposal.

Troubleshooting and Specifications

Troubleshooting

Common display issues and their potential causes and solutions.

Wheel Size Chart

A chart providing tire scales and their corresponding circumferences in millimeters.

Specifications

Technical details including operating temperature, battery life, and measurement ranges.

Warranty Process

Instructions for returning the product for warranty inspection with proof of purchase.

Related product manuals