Do you have a question about the MTX Thunder TH90.4 and is the answer not in the manual?
Matches input sensitivity of amplifier to source unit. Operating range 100mV to 6V.
Selects active low pass (LP), high pass (HP), or turns off x-over.
Selects desired high-pass frequency, adjustable from 40Hz to 400Hz.
Selects desired low-pass frequency, adjustable from 40Hz to 400Hz.
Used for source units with RCA or Line level outputs. Minimum 100mV output required.
Indicates unit power status. Blinks when amplifier enters protect mode.
Allows operation from source units with speaker-level outputs. Requires remote turn-on wire.
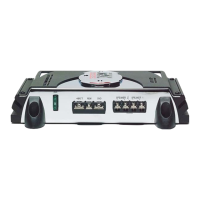
Main power input. Connect directly to the positive battery terminal. Use 4 AWG wire.
Turns amplifier on when supplied with 12 volts, usually from source unit.
Requires a proper ground connection to the vehicle chassis for peak performance.
Connect speakers here. Observe polarity. Supports bridging for 4 ohm minimum.
Protects the amplifier. Replace with same rating. Fuses are under the amp.
Crucial first step before installation. Disconnect the vehicle's negative battery cable.
Determine mounting place considering airflow. Mark and drill holes safely.
Route positive power cable through firewall using grommet. Connect to +BATT terminal.
Install circuit breaker/fuse near battery. Switch off or remove fuse until connections are made.
Connect ground wire to bare metal chassis point and amplifier GND terminal.
Connect source unit's remote-out to amplifier's REM terminal or power antenna lead.
Connect RCA cables or use high-level speaker terminals for signal input.
Connect speakers to amplifier terminals using proper gauge wire. Bridged channels require 4 ohm minimum.
Double-check all wiring and connections. Reconnect battery and turn on circuit breaker.
Addresses issues with no power or status LEDs. Check remote/power connections and ground.
Solutions for no sound with power. Check volume, speaker connections, and gain settings.
Fixes for distorted audio. Adjust head unit volume and amplifier gain.
Corrects channel imbalance. Verify speaker wiring orientation and RCA input.
Troubleshoots weak bass. Ensure correct speaker phasing and consider MTX woofers.
Addresses blown fuses. Lower output levels or check for amplifier defects.
Five-year limited warranty for Mitek Mobile products purchased in the USA after 1/1/2013.
Products found defective within the first 2 years will be repaired or replaced.
After 2 years, defective products may be credited toward a new Mitek product purchase.
Warranty excludes neglect, abuse, misuse, incorrect connection, or unauthorized alterations.
Contact Mitek Warranty via website, email, or phone. Proof of purchase and RA number required.
| Channels | 4 |
|---|---|
| RMS Power @ 4 Ohms | 90W x 4 |
| RMS Power @ 2 Ohms | 135W x 4 |
| Bridged RMS Power @ 4 Ohms | 270W x 2 |
| Frequency Response | 20Hz - 20kHz |
| Damping Factor | >200 |
| Crossover Frequency | 40Hz - 400Hz |
| Fuse Rating | 30A x 2 |
| Crossover | Variable |
| Crossover Type | Variable Low-Pass/High-Pass |