USING YOUR METER
1. Turn the Range Switch to the desired range. If you don't know
which range to use, set it to 1000.
2. Rinse the cell cup three times with the sample you want to test.
(For very hot or very cold samples see TEMPERATURE
COMPENSATION below.)
NEVER FILL THE CELL BY DIPPING THE METER INTO WATER!
3. Fill the cell with another sample to at least 1/4" (6 mm) above
the upper electrode.
4. Press the black button.
5. Read the dial value indicated by the pointer. If the pointer is
very low on the left or goes off the scale to the right, try the next
lower or higher range.
6. Multiply the dial value by the range setting to determine parts
per million (ppm) Total Dissolved Solids on the 532T models or
the conductivity in micromhos (µmhos) on the 532M1.
7. If the pointer goes off the scale to the right on the x1000 range,
try RANGE DOUBLING (see inside) or an RE-10 Range
Extender (see ACCESSORIES).
NOTE:
When you are finished with the meter, RINSE THE CELL CUP
with clean water, preferably distilled or deionized.
TEMPERATURE COMPENSATION: For very hot or very cold
solutions let the three rinse samples each remain in the cell for
several seconds. Then immediately fill the cell with the sample
you want to test (step 3 above). This allows the automatic
temperature compensation feature time to work properly.
CAUTION
DO NOT use with samples hotter than 160°F (71°C).
The readings WILL NOT be accurate.
DO NOT splash solvents such as lacquer thinner, acetone,
benzene or chlorinated solvents on the plastic case.
DO NOT fix or modify the meter. That will void your warranty.
See SERVICE for details or consult Myron L Company.
DO NOT DIP THE INSTRUMENT INTO WATER. If water does
get inside the instrument, see MAINTENANCE for instructions on
drying it.
CALIBRATION
STANDARD SOLUTIONS: A Standard Solution has a known
conductivity and ppm. Your meter was calibrated at the factory
using NIST traceable Standard Solutions. You can keep your meter
accurate by using these same Standard Solutions. To pick the right
Standard Solution for your meter see ACCESSORIES.
CHECKING CALIBRATION
1. Turn the Range Switch to the x1000 range.
2. Test a sample of appropriate Standard Solution.
CAUTION: Throw the Standard Solution away as you use it. Don't
put the used samples back in the bottle.
3. If the DS Meter does not indicate the same value as is on the
Standard Solution bottle's label, first clean the cell. For directions
on how to do this see CELL inside. Rinse the cell thoroughly
and test the Standard Solution again. If the DS Meter still does
not indicate the correct value, recalibrate it as described below.
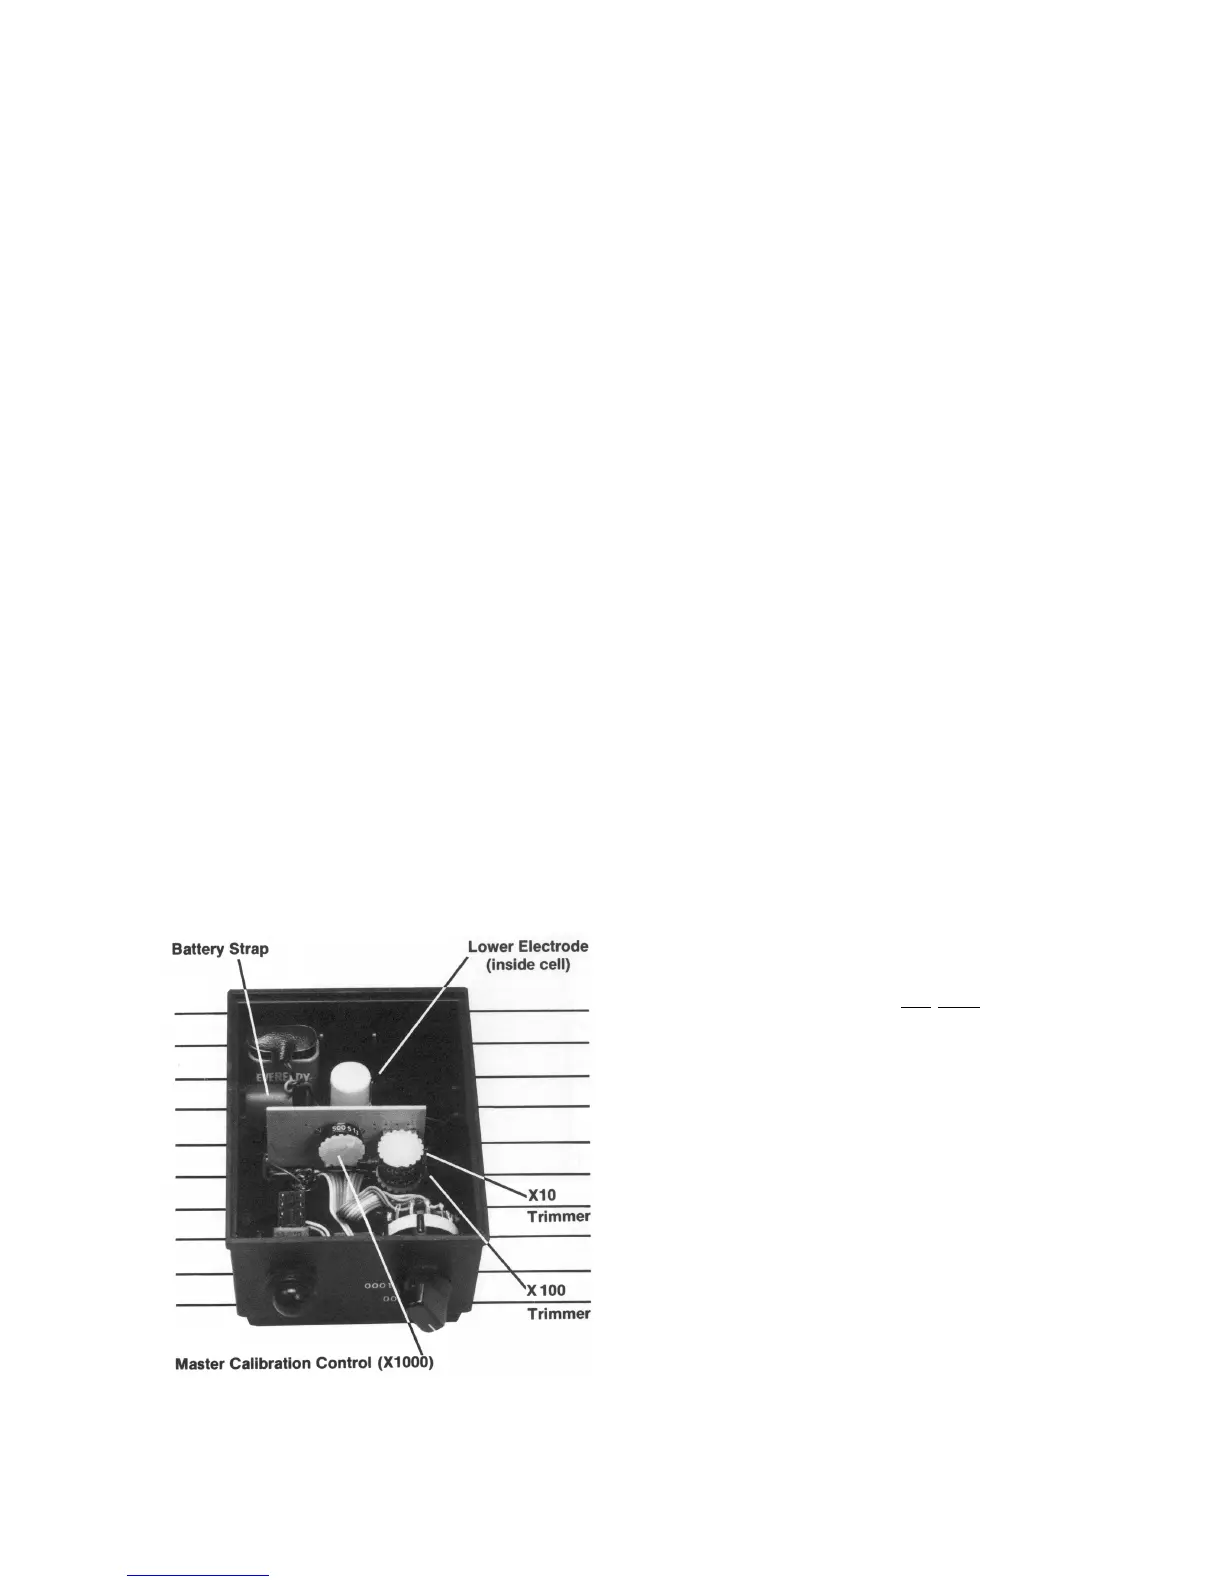
TO RECALIBRATE THE METER
1. Remove the bottom cover using fingernails or a small
screwdriver to loosen the front or rear edge. Identify the three
Calibration Controls (see photo below left) so you can find them
by touch while calibrating.
2. Test another sample of the Standard Solution (be careful to not
to splash solution inside the meter).
3. Adjust the Master Calibration Control until the meter indicates
the value that is on the Standard Solution label.
4. The Master Calibration Control adjusts all ranges. For best
accuracy in the lower ranges, get the recommended Standard
Solutions for the x100 and x10 ranges. Use the x100 and x10
trimmers to recalibrate those ranges as in steps 2 and 3 above.
5. Turn the Range Switch to "S" and press the button. Compare
the meter reading to the INTERNAL STANDARD value on the
meter's bottom label. If they are noticeably different, mark the
new value in place of the old one.
NOTE:
A 532T (ppm) Meter may be calibrated to read either 442 or
NaCI parts per million, but not micromhos. A 532M1 (conductivity)
Meter may only be set to read micromhos.
INTERNAL STANDARD: An INTERNAL STANDARD value for
each meter is on the label on the bottom cover of each meter. Use
it between normal calibrations as a
field check of your meter's
accuracy.
To verify your meter's calibration:
1. Turn the Range Switch to "S" and press the button.
2. If the reading matches the INTERNAL STANDARD value on
the bottom label, your meter is in calibration. If not, see FIELD
CALIBRATION.
NOTE:
The feature described above is intended as a quick field
calibration check, or for using the range doubling technique. It is
not a replacement for calibration with Standard Solution.
 Loading...