Do you have a question about the National Geographic 40-1024X and is the answer not in the manual?
Instructions for installing batteries correctly into the microscope's compartment.
Guide on how to turn on and use the microscope's built-in light source.
Steps for proper positioning and initial focus adjustments for observation.
Procedure for viewing specimens, including focusing and magnification changes.
Solutions for when a clear image is not visible, involving focus and object centering.
Steps to take when the microscope shows no image at all.
Troubleshooting steps for when the microscope's light source does not turn on.
Instructions for connecting and using the USB eyepiece to capture images on a computer.
Covers child supervision, handling sharp parts, chemicals, choking hazards, and battery safety.
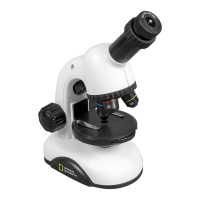
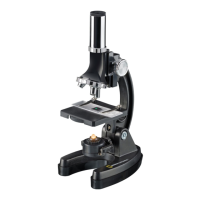
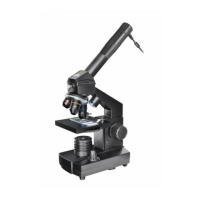
This document describes a 40-1024X Microscope, an instructional manual for a device designed to magnify small objects for observation. The manual includes details on its parts, how to use it, and how to maintain it, along with safety warnings.
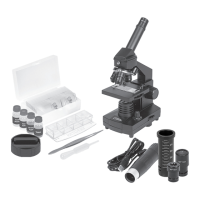
The microscope's primary function is to magnify small objects, allowing users to observe details not visible to the naked eye. It achieves this through a system of lenses, including eyepieces and objective lenses, which work together to provide various levels of magnification. The device is equipped with illumination to ensure clear viewing of specimens. It also includes a USB eyepiece, enabling users to connect the microscope to a computer for digital viewing and image capture. The kit comes with prepared slides and blank slides, allowing users to observe pre-mounted specimens or prepare their own. Accessories like tweezers, a pipette, and a slicer are provided for specimen handling and preparation. Additionally, the kit includes materials for a hatchery, suggesting the possibility of observing live specimens like brine shrimp.
The microscope is designed for ease of use, with several features facilitating observation.
Illumination: The device includes an illumination system with an On/Off switch and a mirror. The mirror is used to direct ambient light onto the specimen, while the built-in light source provides direct illumination, especially useful in low-light conditions or for opaque specimens. The manual provides guidance on how to adjust illumination for optimal viewing, suggesting that for translucent specimens, the mirror should be used, and for opaque specimens, the built-in light source is preferred.
Magnification Adjustment: Magnification is controlled by rotating the objective turret to select different objective lenses (40x, 100x, 400x) and by interchanging the eyepieces (WF 10x, WF 16x). A Barlow lens is also included, which further increases the overall magnification. The manual explains how to calculate total magnification by multiplying the eyepiece magnification by the objective lens magnification. It also advises on the appropriate use of different magnification levels, suggesting starting with lower magnifications for a wider field of view and then moving to higher magnifications for detailed observation.
Focusing: The microscope features a focus knob that allows users to adjust the distance between the objective lens and the specimen, bringing the image into sharp focus. The manual recommends starting with the lowest magnification and using the focus knob to bring the specimen into view before switching to higher magnifications. It also provides troubleshooting tips for focusing issues, such as ensuring the specimen is correctly placed and the illumination is adequate.
Specimen Preparation: The kit includes blank slides, a slicer, tweezers, and a pipette, enabling users to prepare their own specimens. The slicer can be used to create thin sections of objects, which are then placed on slides. The pipette is useful for transferring liquid specimens, and tweezers help in handling small objects. The manual provides basic instructions on how to prepare specimens for observation, emphasizing the importance of thin, translucent samples for best results.
Digital Observation (USB Eyepiece): The USB eyepiece allows the microscope to be connected to a computer, transforming it into a digital microscope. The manual provides instructions for installing the necessary software (Photomizer software) and using the USB eyepiece to view, capture, and edit images and videos of specimens. This feature enhances the educational value of the microscope, allowing users to document their observations and share them.
Hatchery: The inclusion of materials for a hatchery (yeast, gum media, sea salt, brine shrimp eggs) suggests a feature for observing live organisms. Users can cultivate brine shrimp and then observe their development under the microscope, providing a dynamic and engaging learning experience.
The manual provides instructions for the care and maintenance of the microscope to ensure its longevity and optimal performance.
Cleaning: Regular cleaning is essential. The manual advises on how to clean the lenses and other parts of the microscope, recommending the use of a soft, lint-free cloth and specialized lens cleaning solutions to avoid scratching the delicate optical surfaces. It also warns against using harsh chemicals that could damage the microscope's finish or optical components.
Storage: Proper storage is crucial to protect the microscope from dust, moisture, and physical damage. The manual suggests storing the microscope in a clean, dry place, preferably in its original packaging or a protective case when not in use. It also recommends covering the microscope with a dust cover to prevent dust accumulation on the lenses and mechanical parts.
Battery Replacement: The microscope operates on batteries, and the manual includes instructions for battery installation and replacement. It provides warnings about mixing old and new batteries or different types of batteries (alkaline, carbon-zinc, rechargeable), emphasizing the importance of using the correct battery type and disposing of used batteries responsibly.
Troubleshooting: The manual includes a troubleshooting guide to help users resolve common issues they might encounter, such as problems with illumination, focusing, or image clarity. This section provides practical solutions to ensure a smooth user experience.
Safety Warnings: The manual prominently features safety warnings, including choking hazards for small parts, functional sharp points, and warnings about lead content in the lenses. It emphasizes that the device is not suitable for children under a certain age and advises washing hands after touching the lenses. These warnings are crucial for ensuring safe operation and handling of the microscope.
| Magnification | 40x-1024x |
|---|---|
| Illumination | LED |
| Objective Lenses | 4x, 10x, 40x |
| Type | Biological Microscope |
| Head | Monocular |
| Focus Type | Coarse and Fine Focus |
| Lighting | LED |
| Power Source | Battery |
| Eyepiece | WF10x |