EasyManua.ls Logo

National Geographic 900X - User Manual

National Geographic 900X
2 pages
Print Icon
To Next Page IconTo Next Page
Loading...
Install Batteries
1. Remove button screws and cover.
2. Install batteries with the positive
(+) and negative (-) in the correct
direction indicated by the battery
compartment label.
3. Replace the cover and screws.
Please recycle batteries responsibly.
How Do I Use My Microscope
Before you use your microscope, make sure that the table, desk or surface that you
place it on is stable and is not subject to vibration. If the microscope needs to be moved,
hold it by the arm and base while carefully transferring it. Once the microscope is in a
suitable location and the batteries are installed, check the light source to make sure that
it illuminates. Use a microfiber cleaning cloth to gently wipe the lenses o. If the stage is
dirty with dust or oil, carefully clean it o. Make sure that you only raise and lower the stage
using the focus adjustment knob.
How Do I Operate The Illumination?
Locate the mirror/light on the base of the microscope. Flip the mirror/light to the “on
position (with the light facing up) and the light will illuminate. This microscope is equipped
with an incandescent light that illuminates the specimen from below. The color filter wheel
is located in the middle of the microscope stage. The filters help you when you observing
very bright or clear specimens. Using these filters, you can choose various brightness
levels and colors. This helps you better recognize the components of colorless or
transparent objects (e.g. sea salt).
How Do I Adjust My Microscope Correctly?
Place the microscope in a suitable location as described above, and sit in a comfortable
viewing position. Always start each observation with the lowest magnification. Adjust the
distance of the microscope stage so that the stage is in the lowest position — farthest
away from the turret head. Turn the objective turret until it clicks into place at the lowest
magnification (Objective: 5x/Magnification: 100x). Note: Before you change the objective
setting, always make sure the microscope stage is farthest away from the turret by
rotating the focus knob. Separating the stage and turret by rotating the focus knob will
avoid causing damage to the specimen slide or microscope. When starting an observation,
always start with the 5x objective in the rotating head.
How Do I Observe The Specimen?
Sitting in your location with adequate illumination, the following basic rules should be
observed. Start with a simple observation at the lowest magnification. Position the object
or specimen in the middle of the stage under the stage clips, center over the lower light.
Focus the image by rotating the focus knob until a clear image appears in the eyepiece.
Place the prepared slide directly under the objective on the microscope stage and secure
it with the stage clips. The prepared slide should be located directly over the lower
illumination. Look through the eyepiece and carefully turn the focus knob until the image
appears clear and sharp. Now you can select a higher magnification by rotating to the
objective turret. Higher levels of magnification can be achieved by turning the objective
turret to a higher setting (400x or 900x). Following this procedure creates a steady
increase of magnification without overpowering the view of the object. The following
magnification order should be used: 100x, 400x then 900x. Each time the magnification
changes (due to the objective change), the image sharpness must be readjusted with the
focus knob. When doing this, be careful because if you move the microscope stage too
quickly, the objective and the slide could come into contact and cause damage to the slide
or microscope.
For transparent objects (e.g. sea salt), light is projected by the lower light traveling from
below the stage, through the objective and eyepiece, and finally into your eye. This process
of light transmission is known as microscopy. Many micro-organisms found in water, plant
components and the smallest animal parts are transparent in nature. Opaque specimens,
on the other hand, will need to be prepared for viewing. Opaque specimens can be made
transparent by a process of treatment and penetration with the correct materials (media),
or by slicing. You can read more about creating specimens in the enclosed microscope
experiments booklet.
MAGNIFICATION GUIDE:
Eyepiece Objective Power
20x 5x 100x
20x 20x 400x
20x 45x 900x
NOTE:
THE HIGHEST MAGNIFICATION IS NOT ALWAYS THE BEST FOR
EVERY SPECIMEN!
TROUBLESHOOTING GUIDE:
Problem Solution
No recognizable image
Turn on light, Readjust focus,
Start with the lowest power objective (5x)
No image
Center object on slide under
lowest power objective
No light Replace batteries, Check on/o position
©2020 National Geographic Partners LLC. All rights reserved.
NATIONAL GEOGRAPHIC and Yellow Border Design are trademarks of the
National Geographic Society, used under license.
©2020 Explore Scientic, LLC.
1010 S. 48th Street, Springdale AR 72762
All rights reserved. explorescienticusa.com | 866.252.3811
Made in China
CONTENTS AND COLORS MAY VARY
CONFORMS TO THE SAFETY REQUIREMENTS OF ASTM F963
V042020
Question and Answer IconNeed help?

Do you have a question about the National Geographic 900X and is the answer not in the manual?

Summary

Install Batteries

Microscope Usage and Operation

Using Your Microscope

Basic steps for microscope setup, including stability and cleaning lenses.

Operating the Illumination

Guide on using the built-in light source and color filters for viewing.

Adjusting Your Microscope Correctly

Procedure for correct positioning and focus, starting with lowest magnification.

Observing the Specimen

Steps for focusing on specimens and increasing magnification.

Troubleshooting Guide

Important Safety Instructions

Overview

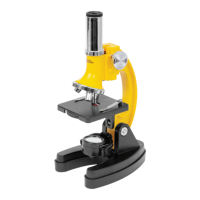
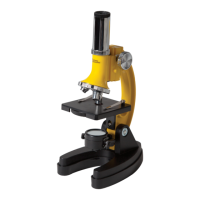
This document describes a 900x microscope set, designed for observing and investigating at a cellular level. It's suitable for children aged 8 and above, with adult supervision recommended, especially given the presence of sharp points and chemicals.

Function Description

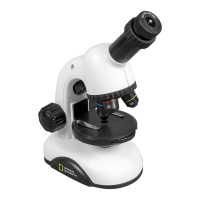
The primary function of this device is to magnify small objects, revealing their hidden details. It allows users to view everyday items like sand, onion skin, hair, and pollen at magnifications ranging from 100x to 900x. The microscope achieves this through a combination of an eyepiece and objective lenses (5x, 20x, 45x), which, when paired with the 20x eyepiece, provide total magnifications of 100x, 400x, and 900x. The device includes an illumination system, featuring both a mirror and a light source, to properly illuminate specimens from below. A color filter wheel is integrated into the stage to assist in observing very bright or clear specimens, allowing users to adjust brightness levels and colors for better recognition of colorless or transparent objects.

Usage Features

To begin using the microscope, ensure it is placed on a stable surface free from vibration. When moving the microscope, hold it by the arm and base. After installing batteries correctly (observing polarity and avoiding mixing old/new or different types), check that the light source illuminates.

Operating the Illumination: Locate the mirror/light on the base and flip it to the "on" position with the light facing up. The incandescent light will then illuminate the specimen from below. The color filter wheel can be used to enhance observations of bright or clear specimens by adjusting brightness and color.

Adjusting the Microscope: Always start observations with the lowest magnification (100x). Position the microscope stage at its lowest point, farthest from the turret head. Rotate the objective turret until the 5x objective clicks into place. Before changing objectives, always ensure the stage is at its farthest point from the turret to prevent damage to the slide or microscope.

Observing a Specimen:

  1. Place the prepared slide directly under the objective on the microscope stage and secure it with the stage clips, ensuring it's centered over the lower illumination.
  2. Look through the eyepiece and slowly turn the focus knob until a clear and sharp image appears.
  3. To increase magnification, rotate the objective turret to the next higher setting (400x, then 900x). Remember to readjust the focus knob after each magnification change. Exercise caution when moving the stage to avoid contact between the objective and the slide.

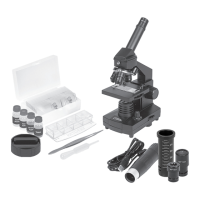
For transparent objects, light from below passes through the stage, objective, and eyepiece to the eye. Opaque specimens, however, require preparation (treatment, penetration, or slicing) to become transparent for viewing. The set includes various accessories like prepared slides, blank slides, collection vials, a test tube, a petri dish, scalpel, needle, tweezers, stirring rod, slicer, blue dye, red dye, sea salt, brine shrimp eggs, and a hatchery to facilitate experiments and observations.

Maintenance Features

Regular maintenance ensures the longevity and optimal performance of the microscope.

  • Cleaning: Use a microfiber cleaning cloth to gently wipe the lenses. If the stage is dirty with dust or oil, clean it carefully.
  • Battery Care:
    • Always insert batteries with correct polarity.
    • Do not mix old and new batteries, or different types (alkaline, standard carbon-zinc, rechargeable).
    • Replace all batteries at the same time.
    • Remove batteries from the product during extended storage to prevent leakage.
    • Non-rechargeable batteries are not to be recharged.
    • Rechargeable batteries must be removed from the toy before charging and charged under adult supervision.
    • Recycle exhausted batteries responsibly.
  • Storage: Store the device and all accessories out of reach of young children when not in use. Avoid exposing the device, especially the lenses, to direct sunlight, as concentrated light rays can cause a fire. Do not subject the device to temperatures exceeding 60 °C (140 °F).
  • Disposal: Dispose of packaging materials, electrical, and electronic components according to local regulations. Do not dispose of electrical or electronic waste in general municipal waste; use available return and collection systems.

In case of a defect, do not attempt to disassemble the device; contact your dealer for repair.
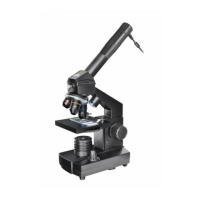
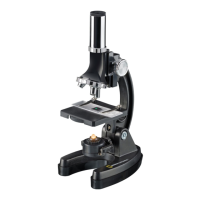
National Geographic 900X Specifications

General IconGeneral
Magnification900X
TypeCompound Microscope
HeadMonocular
IlluminationLED
Objective Lenses4x, 10x, 40x
Focusing SystemCoarse focus
Body MaterialPlastic
Power SupplyBattery
StagePlain stage with clips
Included AccessoriesSlides, cover slips, tools
EyepieceWF10X

Related product manuals