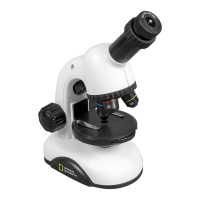
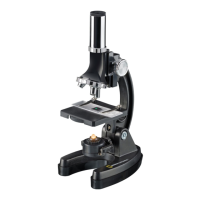
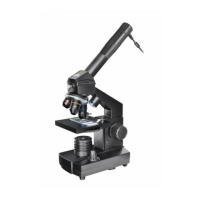
This document describes the National Geographic 40x-640x Microscope, a zoom microscope kit designed for users aged 8 and above, which includes a smartphone adapter for enhanced viewing and image capture. The microscope is intended for children older than 7 and should always be used under adult supervision. It provides a gateway to exploring various scientific fields, from biology to botany and chemistry.
Function Description
The National Geographic 40x-640x Microscope is an optical instrument designed for observing small objects and specimens at magnifications ranging from 40x to 640x. It utilizes modern LED lighting to illuminate specimens from below, allowing for the observation of transparent objects. The microscope features a zoom eyepiece, multiple objective lenses (4x, 10x, 40x), and a color filter wheel to adjust brightness levels, which is particularly useful for observing very bright or clear specimens. The smartphone adapter allows users to connect their smart devices to the eyepiece, enabling them to capture images and videos of their observations.
Usage Features
Getting Started:
Before use, ensure the microscope is placed on a stable, vibration-free surface. If the microscope needs to be moved, handle it by the arm and base. Two "AA" batteries (included) must be installed in the battery compartment located in the base of the microscope. Open the battery door, insert the batteries according to the displayed +/- information, and then close the door. After battery installation, check that the LED light source illuminates when the ON/OFF switch on the base is flipped to the "on" position. Gently wipe the lenses with a soft, lint-free cloth (e.g., microfiber) to remove any dust or oil. The stage should also be cleaned if dirty.
Operating the LED Illumination:
The ON/OFF switch on the base controls the LED illumination. Flipping it to the "on" position will illuminate the specimen from below. The aperture wheel, located in the middle of the microscope stage, helps in observing very bright or clear specimens by allowing users to choose from various brightness levels. This feature is crucial for better recognizing components of colorless or transparent objects such as starch grains or protozoa.
Adjusting Magnification:
Observations should always begin at the lowest magnification to facilitate centering the object and achieving a sharp image. To do this, adjust the microscope stage to its lowest position and turn the objective turret until the 4x objective clicks into place. The zoom eyepiece should also be in its fully lowered position. The magnification guide provides a clear overview:
- Zoom Eyepiece (10-16x) with 4x Objective: Provides 40-64x power.
- Zoom Eyepiece (10-16x) with 10x Objective: Provides 100-160x power.
- Zoom Eyepiece (10-16x) with 40x Objective: Provides 400-640x power.
To observe a specimen, place a prepared slide directly under the objective on the microscope stage, securing it with the stage clips. Ensure the object/specimen is directly over the illumination. Look through the eyepiece and carefully turn the focus knob until the image appears clear and sharp. To increase magnification, slowly turn the zoom eyepiece. When the zoom lens is fully extended, the magnification increases by 62%. For even higher magnification, rotate the objective turret to a higher setting (10x or 40x). It is important to always lower the stage and return the zoom to the lowest power before rotating the objective turret to prevent damage to the slide or microscope. Each time the magnification changes (either by adjusting the eyepiece or objective), the image sharpness must be readjusted using the focus knob. Exercise caution to avoid moving the stage too quickly, which could cause the objective and slide to come into contact.
Smartphone Adapter Usage:
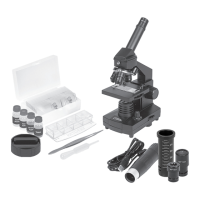
The smartphone adapter allows almost any "smart" device to be connected to the 1.25" eyepiece. To use it, place the adapter directly onto the selected eyepiece and tighten the set screw until snug, being careful not to overtighten to avoid damage. The camera lens on the smart device needs to be centered over the eyepiece. This alignment is best achieved by opening the camera function and viewing the image while centering the device. Once aligned, carefully press the device onto the suction cup/non-skid surface of the adapter pad. Always support the device with your hand; the adapter pad is not intended to hold the device unsupported. The placement of the eyepiece/adapter combination into the diagonal/focuser may vary depending on the dimensions of your device. For smaller devices, it might be easier to secure the combination before inserting it into the telescope's diagonal. For larger devices like tablets, it might be easier to secure the eyepiece/adapter combination into the diagonal first, then align and attach the device. After capturing images, users can enhance and edit photos using imaging software.
Maintenance Features
Cleaning Tips:
To ensure a long service life for the microscope, clean the lenses (objective and eyepiece) only with a soft, lint-free cloth, such as a microfiber cloth. Do not press hard on the lenses, as this could cause scratches. If the microscope is particularly dirty, moisten the cleaning cloth with cleaning fluid and gently wipe the lens with very little pressure. The microscope should always be protected against dust and dirt. After use, allow it to dry off in a warm room.
Troubleshooting Guide:
- No recognizable image: Turn on the light, readjust focus, and start with the lowest power objective (4x) and lowest power eyepiece (10x).
- No image: Center the object on the slide and start with the lowest power objective (4x) and lowest power eyepiece (10x).
- No light: Replace the batteries and check the ON/OFF switch position.
Safety and Disposal:
This microscope set contains accessories with sharp edges and tips, so it should be stored out of reach of young children when not in use. Any chemicals and liquids used with the device must be kept out of reach of children and should not be ingested. Hands must be washed thoroughly after working with chemicals. In case of accidental contact with eyes or mouth, rinse with water and seek medical treatment. Packaging materials like plastic bags and rubber bands pose a choking hazard and should be kept away from children and disposed of legally. The WEEE symbol indicates that the item contains electrical or electronic components that must be collected and disposed of separately, not in general municipal waste. Utilize available return and collection systems or local recycling programs. Electrical and electronic equipment contains hazardous substances that, if disposed of incorrectly, can leak into the ground, contributing to soil and water pollution harmful to human health and wildlife. Consumers are encouraged to reuse or recycle electrical and electronic waste to avoid landfill or incineration.
Battery Guidelines:
Batteries should be kept out of children's reach. When inserting batteries, ensure correct polarity. Do not mix old and new batteries, or different types of batteries (alkaline, standard carbon-zinc, rechargeable nickel-cadmium). Do not short-circuit the device or batteries, or throw them into a fire. Leaking or damaged batteries can cause skin injury; wear safety gloves if handling such batteries. Remove batteries from the product before extended storage to prevent leaking. Non-rechargeable batteries are not to be recharged. Rechargeable batteries must be removed from the toy before charging and should only be charged under adult supervision. Exhausted batteries must be removed from the toy. The supply terminals are not to be short-circuited. Recycle batteries responsibly.
Chemical Warning:
The lens contains lead that may be harmful. Wash hands after touching. This product can expose you to chemicals including lead, which is known to the State of California to cause cancer and birth defects or other reproductive harm. For more information, refer to www.P65Warnings.ca.gov.