This document serves as the user manual for the NA-R5 underwater housing, designed specifically for the Canon R5 camera. The housing is intended for underwater photography and videography, providing a protective and functional enclosure for the camera in marine environments.
Function Description:
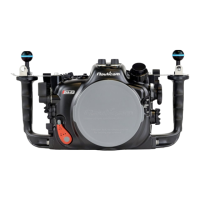
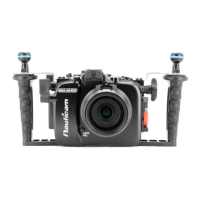
The NA-R5 housing allows users to operate their Canon R5 camera underwater, maintaining access to essential camera controls and functions. It is a robust, watertight enclosure that protects the camera from water, pressure, and other environmental elements encountered during diving. The housing integrates various buttons, levers, and dials that correspond to the camera's native controls, enabling photographers to adjust settings, capture images, and record videos without removing the camera from the housing.
Key functional components include:
- Camera Controls: Buttons for Menu, Rating/Voice memo, Info, Set, Delete, AE lock, AF point selection, and Multi selector are accessible on the rear of the housing.
- Power and Mode Controls: A main switch, mode button, and quick control dials (1 and 2) are provided for power management and shooting mode selection.
- Lens Control: Zoom/Focus dial, RF mount lens release button, and EF mount lens release button facilitate lens adjustments and changes.
- Shutter and Recording: Dedicated levers for shutter release and REC (record) allow for capturing photos and videos.
- Viewfinder and Display: An LCD/Viewfinder lever enables switching between the camera's LCD and electronic viewfinder.
- Accessory Ports: Multiple accessory ports (M24, M14, M16) are available for connecting external accessories such as vacuum valves, optical cables, and other specialized equipment.
- Moisture Alarm System: An integrated moisture alarm provides an early warning system for potential water ingress, enhancing the safety of the camera.
- Port System: The N120 Port System allows for the attachment of various optical ports, accommodating different lenses and photographic needs.
Usage Features:
The NA-R5 housing is designed for ease of use and reliable performance underwater.
- Camera Installation: The camera is mounted onto a removable tray, which is then slid into the housing. Specific instructions are provided for aligning the camera and engaging the various control mechanisms, including the Photo/movie lever and zoom/focus knob. Different procedures are outlined for RF mount and EF mount lenses, ensuring proper alignment of gear engagement knobs and levers.
- Housing Opening and Closing: The housing features a secure locking mechanism. To open, users depress housing unlock buttons and turn housing locks outward before lifting the back housing. To close, the front and back housings are aligned, and the housing locks are turned inward until they click securely into place.
- Port Mounting: The housing utilizes a port locking lever system. Users depress a safety button and rotate anti-clockwise to unlock, then align the index mark and push the port assembly straight in before rotating the locking lever clockwise to secure it.
- Lens/Port Changes (without opening housing): For users with a vacuum valve system, pressure must be released by removing the cap and pressing a red button before unlocking the port. Without a vacuum valve, users proceed directly to unlocking the port. After replacing the port, the blue button is pressed to reset the vacuum alarm, and the vacuum valve system is reset with a hand pump before closing the cap.
- Moisture Alarm Setup: The moisture alarm requires a CR2032 battery. Users remove the battery insulation film and press the battery down until it clicks into place. The alarm is switched on, and its functionality is confirmed by a blue flashing light in the moisture alarm window. A test can be performed by connecting the wires with a dampened cotton bud, which should trigger a repeating beep and a red flashing light.
- Vacuum Valve System (Recommended Accessory): The vacuum valve system is a crucial safety feature. It involves removing a plug from the M16 accessory port, attaching the vacuum valve (after lubricating its O-ring), and connecting a hand pump. Pumping several times until a target vacuum level is reached (indicated by a steady green light on the moisture alarm window) confirms the housing's seal. The system should be left for at least 20 minutes to ensure no leakage. Different LED light indications (flashing blue, steady green, flashing yellow, flashing red, alternating blue and red, steady red) provide status updates on the vacuum level and potential issues.
Maintenance Features:
Proper maintenance is crucial for the longevity and reliability of the NA-R5 housing.
- Post-Dive Care: After use in saltwater, the housing system should be soaked in fresh water. All controls and buttons should be operated at least three times while immersed in fresh water to dislodge any salt crystals or debris.
- O-ring Maintenance: The main O-ring should be cleaned and inspected for any damage each time the housing is opened and after every dive. It should be removed using an O-ring remover, its groove cleaned, and then lightly coated with the provided lubricant before being carefully reinstalled.
- Storage and Transportation: The housing should be protected with a robust and shock-proof travel case during transportation. It is explicitly stated not to travel with the camera inside the housing.
- Professional Servicing: Nauticam recommends shipping the housing to authorized service centers for a complete overhaul after 200 dives or every two years, whichever comes first.
- General Precautions: Users are advised against stretching O-rings excessively, opening the housing in wet or sandy environments, or exposing it to direct sunlight for prolonged periods. Preventing sand, dust, or water penetration is critical, especially when changing lenses or inserting/removing the camera. Any sign of leakage should prompt immediate discontinuation of use. Repairs should only be performed by authorized service centers.