This document is a Quick Start Guide for the Naxa NPB-429 Portable MP3/CD Player with PLL FM Stereo Radio & USB Input. It provides an overview of the device's features, how to connect the speakers, power the unit, and basic support information.
Function Description:
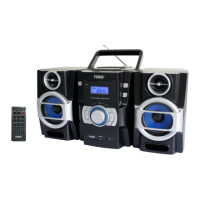
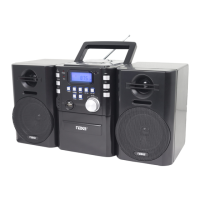
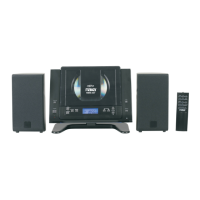
The Naxa NPB-429 is a versatile portable audio system designed for playing MP3 and CD formats, receiving FM stereo radio, and accepting USB input for digital audio playback. It also features an AUX input for connecting external audio players. The unit is designed with detachable speakers, allowing for flexible placement and enhanced stereo separation.
Usage Features:
The device offers a comprehensive set of controls for managing audio playback and radio functions.
Power and Standby:
- Power Button [1]: Used to turn the unit on or place it in Standby mode (off).
- Standby Indicator [2]: Lights red when the unit is in Standby mode, providing a visual cue of its power status.
Remote Control Interaction:
- IR Receiver [3]: Detects signals from the included remote control, enabling convenient operation from a distance.
Display and Mode Selection:
- Screen [4]: Displays status information, such as the current mode, track number, or radio frequency.
- Function Button [5]: Pressing this button cycles through the available function modes: CD, USB, FM, and AUX, allowing the user to switch between different audio sources.
Volume Control:
- Volume Knob [7]: A rotary control used to adjust the audio output level, providing precise volume management.
CD/USB Playback Controls:
- Folder +, +10 [8]: In CD and USB modes, this button allows users to navigate to the next folder or skip forward 10 tracks, facilitating quick content browsing.
- Memory + [9]: In FM mode, this button tunes to a higher preset station.
- Memory [10]: In FM mode, this button saves the current station to preset memory.
- Memory - [11]: In FM mode, this button tunes to a lower preset station.
- Folder -, -10 [12]: In CD and USB modes, this button allows users to navigate to the previous folder or skip back 10 tracks.
- Next, Tuning + [13]: In CD and USB modes, this button skips to the next track. In FM mode, it tunes to a higher station frequency.
- Play/Pause [14]: In CD and USB modes, this button starts or pauses playback.
- Mode [15]: In CD and USB modes, this button changes the playback mode, offering options such as repeat, repeat all, or random playback.
- Stop [16]: In CD and USB modes, this button stops playback.
- Previous, Tuning – [17]: In CD and USB modes, this button skips to the previous track. In FM mode, it tunes to a lower station frequency.
Radio Features:
- Mono/Stereo [6]: In FM mode, this button toggles the radio reception mode between mono and stereo. Users can select mono if reception quality is poor, which can improve clarity in weak signal areas.
- Antenna [27]: An extendable antenna that should be fully extended and adjusted to optimize radio reception.
- USB Port [18]: Connects USB memory drives for digital audio playback. After connecting a drive, the Function button [5] must be pressed to switch to USB mode.
- AUX Input [19]: Allows connection of external audio players. After connecting a device, the Function button [5] must be pressed to switch to AUX mode.
- CD Compartment [28]: The area where compact discs are loaded. Discs should be placed with the label side facing up.
- CD Compartment Release [29]: Pressing down on this corner releases the latch and opens the CD compartment lid. It is crucial not to open the compartment while a CD is playing or spinning to prevent damage.
Speaker System:
The NPB-429 features detachable speakers, which can be used attached to the main unit for portability or detached for wider stereo separation.
- Left Speaker Input [20] & Right Speaker Input [21]: These inputs on the back of the main unit are where the speaker cables are connected.
- Speaker Cable Lead [26]: The cable that connects the speaker to the center unit.
- Speaker Cable Manager [25]: A feature on the back of the speakers to wrap excess cable, keeping it tidy and out of the way.
Powering the Device:
The unit can be powered by either AC household power or batteries, offering flexibility for both home and portable use.
AC Power:
- AC Power Socket [22]: Connects to a household power socket using the included power cord.
- AC Voltage Switch [24]: Located inside the battery compartment, this switch allows users to select between 110V and 220V to match the local power supply. It must be set correctly to prevent damage to the unit.
Battery Power:
- Battery Compartment [23]: Located on the back of the main unit, this compartment holds eight "D" size batteries for portable operation.
Maintenance Features:
Speaker Attachment/Detachment:
- Attaching Speakers: Position the speaker next to the main unit, ensuring the top of the speaker rises one inch above the main unit's top and the four hooks on the main unit sit flush inside the rectangular indent on the speaker. Slowly slide the speaker down until the retaining tab clicks into the latch.
- Detaching Speakers: Press the retaining tab down towards the speaker, then slide the speaker up and away from the main unit. This feature allows for easy transport or customized audio setup.
AC Voltage Setting:
- The AC voltage switch [24] is crucial for proper operation and must be set to match the regional power supply. To access it, the battery compartment lid must be removed. A flat head screwdriver is needed to gently push the switch to the desired voltage (110V or 220V). After setting, the battery compartment lid should be replaced.
Battery Installation:
- To install batteries, remove the lid from the battery compartment [23]. Load eight "D" size batteries, carefully matching the polarities indicated inside the compartment. This ensures the unit can be powered on the go.
Antenna Adjustment:
- The antenna [27] should be fully extended and adjusted to achieve the best possible radio reception. This simple adjustment can significantly improve sound quality for FM radio.
General Care:
- Users are advised not to open the CD compartment while a CD is playing or spinning to prevent damage to the disc or the player mechanism.
- For any operational issues, users are directed to consult the manual or visit the Naxa website for support, including news, alerts, and documentation. Technical support contact information is also provided.