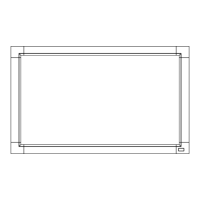
(10) Screen
Position,Size,Side
Pincushion,Digital
control
(10-l) Screen position and size
Signal
1,2,3,4,5,6,7,8,9
*
Independent adjustments of each signal
(a) For signals 1 to
9(except
signal
6),
check that the screen
position and size fall within the following limits.
Screen Size Horizontal:
26Omm±2mm
Vertical
:
195mm±2mm
Screen Position Space between bezel picture edge
Top and bottom space difference
:
±2mm
Right and left space difference
:
±2mm
If the screen position and/or size dose not fall within the above
Iimits,carry
out the following readjustment procedure.
Receive a crosshatch pattern(with border) of the signal in
question.
Short SW41 and SW42 on adjustment jig.(TP-A
@,@
and
0)
Adjust the screen position and size to within the limits listed
above using the user control
switches(SWlOl-108).
Push MEMORY RECALL
SWITCH(SW109)
for at least 2 seconds.
If more than one signal requires
readjustment, repeat
steps (b)
I
through (e).
Release the short.
(10-2) Side Pincushion
Signal
1,6,7,9
*
Repeat the following procedure for each of the 4
signa
(a) Receive a crosshatch pattern.
(b)
Check to if th
e side pincushion distortion is within
If readjustment is
necessary,carry
out the following
procedure starting with step (c).
If no readjustment is required, check the next
signa
(c)
Short SW41 on adjustment j ig.(TP-A
@
and
0)
S.
±1.
0mm.
adjustment
(d)
Switch level 2 and check that the user level LED lights.
(e) Adjust V SIZE
DOWN(SW106)
and V POS DOWN(SW108) so that the
vertical lines on both sides of the screen image are straight.
(f) Return to level 1.
(g) Release the short.
21