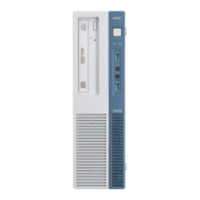
The document provided is a disassembly manual for the NEC PowerMate ML5 chassis. It outlines step-by-step instructions for disassembling various components of the computer system, accompanied by illustrations where necessary. The manual is intended for authorized technicians and emphasizes safety precautions, particularly regarding hazardous voltage and electrostatic discharge.
Function Description:
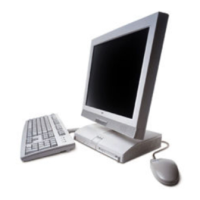
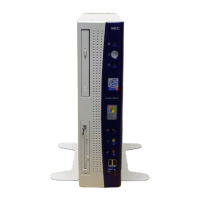
The NEC PowerMate ML5 is a computer system, and this manual details the procedures for its disassembly. The primary function of the manual is to guide technicians through the process of removing and reassembling internal components for repair, maintenance, or replacement. It covers the removal of external stabilizers, opening the chassis, and then systematically disassembling internal components such as expansion cards, disk drives, power supply, fans, CPU, and the motherboard. The manual implicitly describes the PowerMate ML5 as a desktop computer, given the components and the chassis design shown in the illustrations. It features standard PC components like PCI, CNR, and AGP expansion slots, floppy disk drives, optical device drives, hard disk drives, a power supply unit, auxiliary system fans, a CPU with a heat sink, serial ports, a switch/LED board, an internal speaker, and a motherboard.
Important Technical Specifications (Inferred from Disassembly Procedures):
While the manual does not explicitly list technical specifications in a dedicated section, several can be inferred from the disassembly instructions:
- Chassis Type: The illustrations suggest a tower or mini-tower chassis design, requiring external stabilizers for stability and a cover that slides off horizontally.
- Expansion Slots: The system supports PCI, CNR (Communications and Networking Riser), and AGP (Accelerated Graphics Port) expansion cards, indicating its architecture and capabilities for graphics, networking, and other peripherals. The presence of a riser board bracket suggests a design that allows for multiple expansion cards, possibly in a compact form factor or for easier access.
- Storage Devices: The system accommodates at least one floppy disk drive, one optical device drive (e.g., CD-ROM, DVD-ROM), and at least two hard disk drives (referred to as "Master HDD" and "Slave HDD" with corresponding bays). This indicates support for legacy and contemporary storage technologies of its time. The mention of IDE cables for hard drives further specifies the interface type.
- Cooling: An auxiliary system fan and a CPU heat sink with an active fan (referred to as "active sink fan") are present, indicating a cooling system designed to manage heat generated by the CPU and other internal components.
- Ports and Connectors: The manual mentions a second serial port, a switch/LED board, and an internal speaker, indicating standard input/output and user interface components. Power connectors from the power supply unit to the motherboard and peripherals are also highlighted.
- Motherboard: The motherboard is the central component, connecting all other parts. Its removal is the final step in the complete disassembly, suggesting a modular design where most components attach to or are supported by the motherboard.
- CPU Socket: The CPU is installed in a socket with a locking lever, a common design for processors, allowing for replacement or upgrade.
Usage Features (Inferred from Disassembly Context):
The manual focuses on the internal structure and serviceability rather than end-user features. However, the design elements revealed during disassembly imply certain usage characteristics:
- Expandability: The presence of multiple expansion slots (PCI, CNR, AGP) and bays for various disk drives suggests that the PowerMate ML5 was designed with expandability in mind, allowing users or technicians to add or upgrade components like graphics cards, network cards, and storage.
- Serviceability: The detailed disassembly instructions, including the removal of stabilizers, sliding chassis cover, and modular component design (e.g., riser board bracket, drive bays with latches), indicate that the system was designed to be serviceable by trained technicians. The clear labeling of screws and components in the illustrations aids in this process.
- Stability: The inclusion of external "stabilisers" (stabilizers) suggests a design consideration for physical stability, especially if the chassis is intended to be used in a vertical orientation.
- User Interface Elements: The switch/LED board indicates standard front panel controls and indicators (e.g., power button, reset button, power LED, hard drive activity LED). The internal speaker provides audible feedback for system events.
Maintenance Features:
The entire manual is a guide to maintenance, specifically disassembly for repair or component replacement. Key maintenance features include:
- Step-by-Step Procedures: Each component removal is broken down into clear, numbered steps, making the maintenance process systematic and less prone to error.
- Illustrations: Images accompany most steps, showing the component being removed, the location of screws, and the direction of movement, which is crucial for visual guidance during maintenance.
- Screw Identification: The manual explicitly shows the number of screws (e.g., "X1," "X2," "X3," "X4") required for each component, helping technicians keep track of fasteners.
- Safety Warnings: Prominent warnings about hazardous voltage and electrostatic discharge (ESD) are provided, emphasizing safe handling practices essential for protecting both the technician and the equipment during maintenance. This includes advice on disconnecting power, using anti-static wrist wraps, and proper handling of circuit cards.
- Reassembly Instructions: Although brief, the manual states that reassembly is the reverse of disassembly, implying a logical and straightforward process once components are removed. It also advises checking for loose parts and proper tightening.
- Required Tools: A list of basic tools (Philips screwdriver, small Philips screwdriver, small flatbed screwdriver) is provided, indicating that specialized tools are generally not required for these maintenance tasks.
- Component-Level Repair Restriction: The "Technician Notes" explicitly state that repairs should be at the subassembly/module level, discouraging component-level repairs on individual boards. This streamlines maintenance by focusing on replacing entire modules rather than intricate component-level troubleshooting.
- Power Supply Unit (PSU) Handling: A specific warning against disassembling the PSU highlights a critical safety and maintenance instruction, directing technicians to return defective PSUs to the dealer rather than attempting internal repairs.
- Notes for Reassembly: Specific notes, such as those for the floppy disk drive bracket and riser board bracket, provide crucial details for correct reassembly, ensuring proper fit and function. For example, the note for the floppy disk drive bracket mentions ensuring tabs fit into corresponding holes.