EasyManua.ls Logo

Neurio W1 User Manual

Default Icon
3 pages
To Next Page IconTo Next Page
Page #1 background imageLoading...
Page #1 background image
Check the Panel
Take the cover o the panel. It should look something like this:
1 Mains Service Wires
2 Main Breaker
4 15A or 20A Single-pole Breaker on Phase A
Mount Neurio
The leads on the CTs are 4ft long, and the voltage cables are 2ft long. Try to nd a location that’s within 4ft of
the mains service wires and 2ft of the breakers and the neutral bus bar. Make sure theres enough room on
either side of Neurio to connect the CTs, voltage cable, and antenna cable.
Once you’ve found your location, drill the two self-drilling mounting screws into the panel to mount Neurio.
Connect the Voltage Cable
Plug the voltage cable to the matching connector port on Neurio.
100.00029A.A
5 15A or 20A Single-pole Breaker on Phase B
6 15A or 20A Single-pole Breaker on Phase C
You might also have to remove a service entrance cover on the high side of the main breaker to access the
mains wires. Remember that there may be voltage on the high side of the main breaker.
Got Everything?
3 Neutral Bus Bar
1
Neurio Sensor W1
Voltage Cable
Antenna Cable
Antenna
Neurio Sensor Box Tools3-Phase Kit
2 Current Transformers (CTs)
2 Self-Drilling Screws
2 Antenna Mounts
2 Wire Taps
Phillips #2 Bit and
Cordless Drill
Multimeter (Optional)
1 Current Transformer (CT)
1 Wire Tap
Turn Off the Main Breaker
2
Neurio should only be installed when the main breaker in the panel is turned o.
3
4
This product must be installed by an electrician or other qualified professional.
Before following this guide, please read and review the safety warnings provided
at the end of this guide.
Repeat for the red and blue wires, being sure to use breakers on dierent phases. We’ll call the phase that
the red wire connects to Phase B, and the phase that the blue wire connects to Phase C. Alternatively, you
can connect the black, red, and blue wires to an empty 3-phase breaker if one is available. For tips on nding
breakers on dierent phases, see Step 4 of the 2-Phase Installation Guide.
If an empty breaker is available, connect Neurios black wire to it. If no breakers are available, disconnect the
wire from an occupied 15A or 20A breaker, and replace it with a jumper wire of equivalent or lower gauge.
Use the included wire tap to connect the jumper wire, Neurios black wire, and the original wire back to this
breaker. Let’s call this phase Phase A.
Take the white wire and connect it to the neutral bus bar.
3-Phase Installation Guide
Question and Answer IconNeed help?

Do you have a question about the Neurio W1 and is the answer not in the manual?

Neurio W1 Specifications

General IconGeneral
BrandNeurio
ModelW1
CategoryAccessories
LanguageEnglish

Summary

Installation Steps

Turn Off the Main Breaker

Ensure the main breaker in the panel is turned off before starting Neurio installation.

Check the Panel

Remove the panel cover to identify main service wires, breakers, and neutral bus bar.

Mount Neurio

Locate a suitable mounting spot within 4ft of mains wires and 2ft of breakers/neutral bus bar.

Connect the Voltage Cable

Connect the voltage cable to Neurio and wire it to the neutral bus bar and appropriate breakers.

Connect the Current Transformers

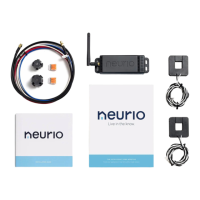
Clip CTs around main wires for each phase and connect them to the corresponding ports on Neurio.

Connect the Antenna

Feed the antenna cable through a panel knockout and connect the antenna.

Check Your Work

Verify that all CTs and voltage cables are connected correctly to the panel components.

Close the Panel

Replace the panel cover, label the Phase A breaker, and turn the main breaker back on.

Installation Validation

Audio Cues

Listen for specific tones (beeps, chimes) indicating successful voltage check and WiFi connection.

Troubleshooting Tones

Interpret tones like falling tones for voltage warnings or network connection failures.

Safety Warnings and Rules

Qualified Professional

Emphasizes that installation must be performed by a qualified electrician due to hazardous voltages.

Voltage and Environment

Do not exceed 240V, use approved panels, and avoid moisture or extreme temperatures.

Related product manuals