NeurOptics® NPi®-200 Pupillometer System—Instructions for Use © 2018 NeurOptics, Inc. 1
Introduction
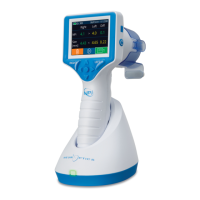
The NeurOptics® NPi®-200 Pupillometer offers clinicians quantitative infrared
technology to objectively and accurately measure and trend pupil size and
reactivity in their critically ill patients with neuronal injuries. The NeurOptics
NPi-200 Pupillometer is designed to upload into any hospital electronic medical
record (EMR) system using the SmartGuard® Reader by Omnikey®. The NPi-200
provides a comfortable ergonomic design, easy-to-read touchscreen LCD and
graphics, simple patient identification (ID) number entry and trending capabilities
customized to the clinician preference.
Indications for Use
NPi-200 Pupillometer is a handheld optical scanner which measures pupil size and pupil reactivity in patients requiring
neurological pupil examinations. The results obtained from the Pupillometer scans are used for information only and are
not to be used for clinical diagnostic purposes. The NPi-200 Pupillometer should only be operated by properly trained
clinical personnel, under the direction of a qualified physician.
Contraindications
Avoid use when the orbit structure is damaged, or surrounding soft tissue is edematous or has an open lesion.
Table of Contents
Warnings and Cautions ..................................................... 2
Classification ...................................................................... 2
Patents, Copyright and Trademark Notice ........................ 2
Getting Started .................................................................. 3
Power Up ........................................................................... 3
Scan the Patient ID ............................................................ 4
Measure Pupils .................................................................. 5
Pupil Measurements - Special Considerations ................. 6
Trend for Changes ............................................................. 7
Power Off ........................................................................... 7
Rebooting the NPi-200 Pupillometer ............................... 7
Troubleshooting ................................................................. 7
Cleaning and Maintenance ............................................... 8
Customer Service .............................................................. 9
Ordering Information ........................................................................ 9
Appendix A
Pupillary Measurement Parameters..............................10
Appendix B
Technical Specifications ...............................................10
Appendix C
Bluetooth® and Radio Frequency Identification Device
(RFID) Broadcast Range and Frequency .......................11
Appendix D
Pupillometer Display Limits for Electronic Medical Record
(EMR) Flowsheet Integration .......................................................11
Appendix E
International Symbol Definition ................................................12
NPi
®
-200
Pupillometer
Instructions for Use
NPi®-200 Pupillometer
NeurOptics® NPI®-200 Pupillometer System—Instructions for Use © 2022 NeurOptics, Inc.