23
How to start charging
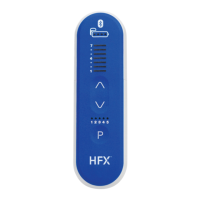
1. Press the Charge Start Button to
turn ON your charger. The light on the
side of your charger (Charger Battery Level
Indicator) will light up to conrm your
charger is ON. Your charger will start to beep
and look for your device. The
beeping will continue until your charger
connects with your device.
• If 10 seconds pass without a connection,
you’ll hear 1 long beep and your charger will
shut OFF. Reposition the Charging Coil and
press the Charge Start Button again.
2. When at least 1 lighted circle
appears on the Antenna Strength Indicator,
a connection has been made. More circles
mean a better connection and make it
less likely that charging will be interrupted
by movements. If only the middle dot is
illuminated, this indicates poor connection
and your device and charger will not connect.
1 2 3
3. When your charger is in the correct
position, the Battery Level Indicator
will light up.
• If the connection isn’t made, is insufcient, or
is lost, reposition the blue Charging Coil slowly
and repeat the steps under the “How to Start
Charging” section.
• Charging is in progress when you see
the Battery Level Indicator and the circles
on the Antenna Strength Indicator are lit.
As charging progresses, the number of
lit dots on the Battery Level Indicator
will increase.
• If the connection is lost, your charger
will beep. Reposition the Charging Coil
and repeat steps under the “How to
Start Charging” section.
• If you only see the inner dot illuminated
on the Antenna Strength Indicator, you’re not
connected to the charger.
For Implanted Patients
(CHRG2500)
How to Use Your Charger
 Loading...