EasyManua.ls Logo

Next BRONX - User Manual

Next BRONX
21 pages
Print Icon
To Next Page IconTo Next Page
Loading...
Were condent youll love your gorgeous new Next
furniture. However, it’s worth making absolutely certain
before you put it all together.
So, let’s quickly run through these three steps:
TIPS FOR RETURNS
Not completely happy with the product? No problem.
We just need everything back in the original packaging, so follow the steps below
and this will ensure a super-smooth returns process and no delay to your refund.
1. COLOUR
Make sure you’re happy with the colour
No need to unpack everything, just check the first component.
2. PROTECTIVE PACKAGING
If you’re happy, then it’s time to get opening! Start by laying everything out
on the protective packaging – this will prevent anything getting scratched.
3. PARTS PAGE
Finally, double check you have all the pieces by referencing
the parts page of the instructions.
Check everything is there (the ‘parts page’
is a handy checklist).
Pop all the loose fittings and fixtures into
the packaging provided or tie them up in a
plastic bag.
Wrap all the big components back
up in the original protective packaging.
Close up the box and seal it securely
(don’t be afraid to use plenty of tape).
DO DON’T
Leave anything assembled -
all components should be dismantled
and separately packed.
Put loose fixtures and fittings straight
into the box.
Throw it back in the box carelessly –
as it may get damaged.
Then just give us a call on 0333 777 8999 and we’ll sort out a pick up time for you.
BEFORE YOU GET
STARTED...
Question and Answer IconNeed help?

Do you have a question about the Next BRONX and is the answer not in the manual?

Summary

Before You Get Started

1. Check Colour

Verify the colour of the first component before proceeding with assembly.

2. Protective Packaging Use

Utilize protective packaging to lay out components, preventing scratches during assembly.

3. Verify Parts List

Confirm all necessary parts are present by cross-referencing the parts page.

Product Warnings and Safety Information

Missing Parts Support

Contact customer service for replacement parts if any are missing from the package.

Home Service Technician Information

Details regarding scheduling service technicians for product faults or repairs.

Customer Contact Address

Provides the official mailing address for customer service inquiries.

Overview

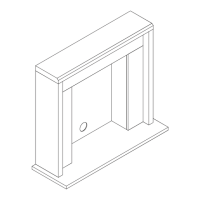
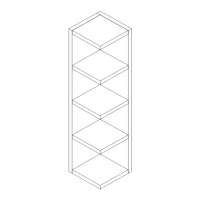
This document provides assembly instructions and product information for the Next Bronx / Bronx Light / Bronx Grey / Bronx Black Corner Ladder, identified by product codes 217201, 255104, 550779, and C06482.

Function Description:

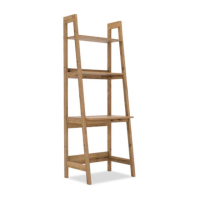
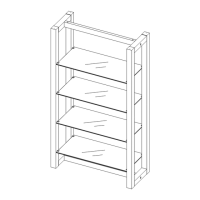
The Next Bronx Corner Ladder is a piece of furniture designed to be assembled and used as a corner shelving unit. Its primary function is to provide storage and display space in a corner of a room, utilizing vertical space efficiently. The "ladder" design suggests a tiered structure with multiple shelves. The product is intended for indoor use in a home setting.

Important Technical Specifications:

  • Product Name: Bronx / Bronx Light / Bronx Grey / Bronx Black Corner Ladder
  • Product Codes: 217201 / 255104 / 550779 / C06482
  • Actual Product Size: H160 x W50 x D50cm (Height 160cm, Width 50cm, Depth 50cm)
  • Assembly Time: Approximately 30 minutes
  • Number of People Required for Assembly: Two people
  • Tools Required: PH2 screwdriver (not supplied)
  • Material: Wood (as indicated by maintenance instructions for wood)
  • Shelf Dimensions (examples from components list):
    • Ref 1: 46 x 46cm
    • Ref 2: 16 x 45cm
    • Ref 3: 16 x 46cm
    • Ref 4: 46 x 46cm
    • Ref 5: 48 x 160cm (likely a side panel)
    • Ref 6: 29 x 29cm
    • Ref 7: 34 x 34cm
    • Ref 8: 39 x 39cm
    • Ref 9: 50 x 160cm (likely a side panel)
    • Ref 10: 20 x 68cm
    • Ref 11: 44 x 44cm
    • Ref 12: 11 x 42cm
    • Ref 13: 11 x 44cm
    • Ref 14: 7 x 10cm
  • Fittings and Fixtures (examples):
    • B2: Ø15 x 10mm (5 pcs supplied, 1 spare)
    • B3: Ø15 x 12mm (13 pcs supplied, 2 spare)
    • B8: Ø8 x 38mm (N/A, 1 spare)
    • D3: Ø6 x 30mm (N/A, 1 spare)
    • D6: Ø8 x 30mm (N/A, 2 spare)
    • V47: Ø6 x 25mm (4 pcs supplied, 1 spare)
    • U154: Ø4 x 32mm (6 pcs supplied, 1 spare)
    • B12: Ø7.5 x 33mm (18 pcs supplied, 2 spare)
    • S41: Ø4 x 16mm (1 pc supplied, 1 spare)
    • T4: N/A (2 pcs supplied, N/A spare)
    • N1: N/A (1 pc supplied, N/A spare)
    • O1: 21mm (4 pcs supplied, 1 spare)
    • O2: 21mm (4 pcs supplied, 1 spare)
  • Wall Attachment: Includes wall attachment bracket/strap for safety reasons. Wall fixings (screws and wall plugs) are not included and must be sourced by the user based on their wall type.

Usage Features:

  • Easy Build: The instructions indicate an "EASY BUILD" design, suggesting a straightforward assembly process.
  • Corner Placement: Specifically designed to fit into a corner, maximizing space utilization.
  • Tiered Shelving: Features multiple shelves at varying heights, suitable for displaying decorative items, books, or other small objects.
  • Stability: Requires two people for assembly and emphasizes ensuring all fixings are fully tightened for stability. A wall attachment bracket is provided for enhanced safety, recommending securing the unit to the wall.
  • Safety Warnings:
    • Retain instructions for future reference.
    • Keep fittings out of children's reach.
    • Keep children well away from the construction area.
    • Use only on firm, level ground.
    • Periodically check and re-tighten all fittings.
    • Do not sit or stand on the furniture.
    • Avoid excessive heat or direct sunlight to prevent colour deterioration.
    • When using the wall attachment, ensure the drilling area is free from hidden electrical wires, water, and gas pipes. Consult a qualified tradesperson if in doubt about wall fixings.

Maintenance Features:

  • Cleaning: Wipe occasionally with a soft cloth slightly dampened with water, then buff with a dry, clean, soft cloth.
  • Wood Care:
    • Wood will mellow and change colour over time.
    • Ornaments and items placed on the surface should be moved regularly for the first few months to prevent uneven mellowing (discolouration).
  • Don'ts for Maintenance:
    • Do not drag or pull the furniture.
    • Do not rub or scrub the surface when cleaning.
    • Do not use silicone-based furniture polish, as it can break down the finish.
    • Never allow any liquid to remain on the furniture, as absorption can cause wood to warp or finishes to delaminate.
    • Do not place hot items (e.g., hot drinks) directly on the wood surface; always use a placemat or coaster.

Assembly Process Overview:

  1. Pre-assembly Check (Before You Start):
    • Colour: Check the first component to ensure satisfaction with the colour without unpacking everything.
    • Protective Packaging: Lay out all components on the protective packaging to prevent scratches during assembly.
    • Parts Page: Double-check all pieces against the parts page in the instructions.
  2. General Assembly Tips (Do's):
    • Read the leaflet before starting.
    • Ensure sufficient space and correct tools.
    • Unwrap packaging carefully and use it to protect surfaces.
    • Verify all parts are present.
    • Assemble in the intended room due to product size.
    • Ensure the product is fully assembled and all fixings tightened.
  3. Titus Tightening Instructions (Cam Lock System):
    • Step 1: Line up the arrow on the CAM with the PIN.
    • Step 2: Push pins into the holes of the panel to be joined.
    • Step 3: Ensure no gap between panels.
    • Step 4: Use a cross-point screwdriver (PH2 or PZ2 recommended) to tighten cams and lock panels.
    • Step 5: Panels are locked when the cam is turned 1/2 to 2/3 of a full turn (maximum rotation).
    • Important Note: "DON'T STOP UNTIL THE 2 O'CLOCK LOCK" – refers to turning the cam clockwise until the arrow points to the "CORRECT LOCK" position shown in diagrams.
    • Loosening the Cam: Turn the cam in a counterclockwise direction until the arrow points to the "TURN TO UNLOCK" position.

Returns Information:

  • If not completely happy, ensure everything is returned in its original packaging.
  • DO:
    • Check all parts are present using the 'parts page' as a checklist.
    • Put all loose fittings and fixtures into provided packaging or a plastic bag.
    • Wrap all big components back in original protective packaging.
    • Close and securely seal the box (use plenty of tape).
  • DON'T:
    • Leave anything assembled; all components must be dismantled and separately packed.
    • Put loose fixtures and fittings directly into the box.
    • Throw items carelessly into the box, as they may get damaged.
  • Contact customer service at 0333 777 8999 for pickup arrangements.

Customer Service:

  • Missing Parts: Contact 0333 777 8999 for free replacement parts.
  • Home Service Technicians:
    • If a fault occurs within 28 days of purchase, a replacement, refund, or home service technician visit may be offered.
    • If a fault occurs after 28 days, an independent home service technician will review and repair the product.
  • Contact Address: Home Customer Services, Next Retail Ltd., Desford Road, Enderby, Leicester, LE19 4AT.
  • Website: www.next.co.uk for the full furniture range.

Next BRONX Specifications

General IconGeneral
BrandNext
ModelBRONX
CategoryIndoor Furnishing
LanguageEnglish

Related product manuals