Do you have a question about the Next CORSICA and is the answer not in the manual?
Details the materials used, including honeycomb board, particle board, and MDF with a wood effect finish, and confirms it is made in China.
Recommends reading the instructions thoroughly before starting assembly and checking all parts are present.
Provides guidance on cleaning, avoiding damage from spills, heat, sunlight, and friction, and ensuring fixings are tightened.
Attaches panels 17 & 18 to panel 19 using screws (H) to form two units.
Slides panel 20 into the grooves of the drawer frame.
Assembles drawer components using cambolts (E), dowels (B), glue (C), and camlocks (F), including attaching a handle.
Inserts cambolts (E) into panels 10, 11, and 1 for the main structure.
Glues dowels (A) into panels 10 & 11, attaches them to panel 1, and secures with camlocks (F).
Slides panels 16 (x2) into the grooves of panels 10 & 11.
Glues and inserts eight wooden dowels (A) into panels 14 (x2).
Connects panels 14, 13, and 12 to the main structure using dowels (A) and secures with camlocks (F).
Inserts dowels (A) into panels 10 & 11, attaches panels 7 and 8, and secures with camlocks (F).
Tightens panels 7 to panel 12 and panel 8 to panel 13 using screws (H).
Glues dowels (A) into panel 1, attaches panel 9, and secures with camlocks (F).
Inserts cambolts (E) and dowels (A) into panels 5 & 15, attaches them to panels 2 & 6, and secures with camlocks (F).
Attaches assembled panels 2 & 5 to panels 7, 8, & 9 using screws (G) with an Allen key (D).
Glues dowels (A) into panel 1, attaches panels 3 & 4, and secures with camlocks (F).
Tightens panels 3 & 4 to panel 2 using screws (G) with an Allen key (D).
Turns the unit over, inserts fittings (I), and attaches panel 6 onto the fittings.
Inserts the two assembled drawers (21) into the main unit.
Uses stickers (J) to cover the holes on panels 3, 4, and 8.
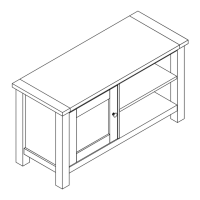
Presents the fully assembled unit.
This document provides assembly instructions for the CORSICA CORNER TV UNIT. It is a self-assembly furniture item designed to hold a television and other media devices, featuring drawers and shelves for storage.
The Corsica Corner TV Unit is a furniture piece intended for placement in the corner of a room, designed to support a television. It incorporates multiple storage options, including two drawers and open shelves, to accommodate media players, remote controls, and other accessories. The unit's design aims to be both functional and aesthetically pleasing, providing a dedicated space for entertainment systems while helping to keep the living area tidy.
| Brand | Next |
|---|---|
| Model | CORSICA |
| Category | Indoor Furnishing |
| Language | English |