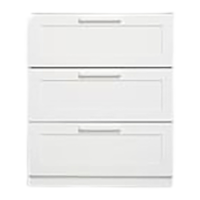
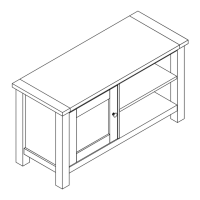
The Flynn 3 Drawer Chest (model 192084 / 390034) is a piece of furniture designed for storage, featuring three drawers. It is supplied with assembly instructions and a wall-fixing strap for enhanced stability and safety. The chest is produced in Italy for Next Retail Ltd.
- Adult Assembly: Assembly must be carried out by a competent adult only.
- Damaged Components: Do not use the item if any components are missing or damaged.
- Fittings Safety: Keep all fittings out of children's reach and ensure children are kept well away from the construction area during assembly.
- Stable Surface: The product should only be used on a firm, level ground to prevent instability.
- Regular Checks: Periodically check all fittings and re-tighten them as necessary to maintain structural integrity.
- Weight Restrictions: Do not sit or stand on the furniture. This is a crucial safety warning to prevent injury and damage to the chest.
- Heat and Sunlight Exposure: Avoid exposing the furniture to excessive heat or direct sunlight, as this can cause deterioration of the color and material.
- Packaging Disposal: Unwrap all packaging materials and place the components on top of the carton box or on a clean floor to protect them from damage during assembly. The packaging itself is recommended to be used to protect surfaces during assembly.
Assembly and Usage Guidelines (Do's and Don'ts):
Do's:
- Read Instructions: Spend a short time reading through the assembly leaflet before starting.
- Prepare Workspace: Ensure you have the right tools and plenty of space before beginning assembly.
- Unpack Carefully: Unwrap all packaging materials and place components on a clean surface to protect them from damage.
- Check Parts: Carefully check that you have all the parts before starting assembly.
- Assemble in Intended Room: Due to the size of the product, it is recommended that it is assembled in the room where it will be used.
- Full Assembly: Ensure the product is fully assembled as illustrated and all fixings are fully tightened before use.
- Cleaning: Wipe occasionally with a soft cloth slightly dampened with water, then buff with a dry, clean soft cloth.
- Wood Mellowing: Wood will mellow and change color over time. To prevent uneven mellowing, it is recommended that ornaments and items placed on the surface are moved regularly for the first few months.
Don'ts:
- Dragging: Do not drag or pull your furniture, as this can damage the product or floor.
- Silicone Polish: Do not use silicone-based furniture polish, as silicone in furniture polishes can break down the finish.
- Liquid Exposure: Never allow any kind of liquid to remain on your furniture, as absorption can cause wood to warp or finishes to de-laminate.
- Hot Items: Do not place hot items (e.g., hot drinks) directly onto the wood surface. Always use a placemat or coaster.
Technical Specifications:
- Actual Product Size: H95 x W78.4 x D39.2 cm.
- Assembly Time: Approximately 1 hour.
- People Required for Assembly: One person.
Components and Fittings:
The chest comes with a detailed list of components and fixtures. Key components include:
- Side panels (Ref 1, 2): 93 x 37.4cm
- Back panel (Ref 3): 88 x 76.3cm
- Drawer sides (Ref 4): 74.8 x 6.5cm
- Drawer front (Ref 5): 74.8 x 4cm
- Top panel (Ref 6): 78.4 x 39.2cm
- Drawer runners (Ref 7): 20 x 1.87cm (3 sets)
- Drawer bases (Ref 8): 77.7 x 28.5cm (3 pieces)
- Drawer back panels (Ref 9): 69.8 x 16cm (3 pieces)
- Drawer front panels (Ref 10): 35 x 16cm (3 pieces)
- Drawer side panels (Ref 11): 35 x 16cm (3 pieces)
- Drawer bottom panels (Ref 12): 71 x 34.9cm (3 pieces)
Fittings include various screws, cams, dowels, and brackets:
- A: 8 x 36mm (22 pieces)
- B: 15 x 12.5mm (10 pieces) - Cams
- C: 15 x 10.5mm (12 pieces) - Cam pillars
- D: 3.5 x 15mm (19 pieces)
- E: 4 x 30mm (18 pieces)
- F: 8 x 30mm (26 pieces) - Wooden dowels
- G: 6 x 11mm (12 pieces)
- H: 3.5 x 25mm (2 pieces)
- L: Ø10 x 1.5mm (6 pieces)
- N: N/A (4 pieces) - Corner brackets
- O: N/A (12 pieces) - Back panel nails
- Q: N/A (1 piece) - Wall fixing strap
- R: N/A (3 pieces) - Drawer runners (left)
- S: N/A (3 pieces) - Drawer runners (right)
- PH2 screwdriver (not supplied)
- Hammer (not supplied)
The product is supplied with a wall-fixing strap (Q) and associated screws (D). It is crucial to attach the cabinet to the wall to prevent tipping. Professional advice should be sought if there is any doubt about the appropriate wall fixing method.
- Wood: If fixing to wood, ensure it is not chipboard, as screws can easily pull away from the core structure.
- Brick or Masonry: Use an appropriate wall plug (provided) if you are sure your wall is sound.
- Cavity Wall: Special toggle wall plugs are needed. Seek expert advice for this type of wall.
Customer Support:
- Missing Parts: If any fixtures or fittings are missing, contact customer service at 0333 777 8999 for a free replacement.
- Faulty Product: For product faults, contact customer service at 0333 777 8999.
- Within 28 days of purchase: Replacement, refund, or a visit from a home service technician may be offered.
- After 28 days: An independent home service technician will review and repair the product and recommend further action.
- Written Correspondence: Home Customer Services, Next Retail Ltd, Desford Road, Leicester, LE19 4AT.
- Full Furniture Range: Visit www.next.co.uk to view the full furniture range.
Assembly Steps Overview:
The manual provides a step-by-step guide for assembly, including:
- Attaching wooden dowels (F) to specific panels.
- Securing cams (B) to panels.
- Inserting cam pillars (A) and ensuring correct orientation before tightening cams.
- Attaching drawer runners (R) to side panels using screws (G) and dowels (D).
- Assembling the main frame of the chest using cam pillars (A) and cams (B).
- Securing the back panel (O) using nails.
- Attaching the wall fixing strap (Q) to the top of the unit and the wall using screws (D).
- Assembling the drawers, which involves attaching drawer sides (E), drawer fronts (C), drawer back panels (D), drawer bases (S), and drawer runners (R).
- Inserting the completed drawers into the chest.
The assembly process emphasizes the correct orientation of cams and cam pillars, with clear diagrams indicating "CORRECT" and "WRONG" positions, and instructions to "DON'T STOP UNTIL THE 2 O'CLOCK LOCK" when tightening cams.